Flower collection 2014-01-31 Materials: • 5mL tubes with caps • de
advertisement

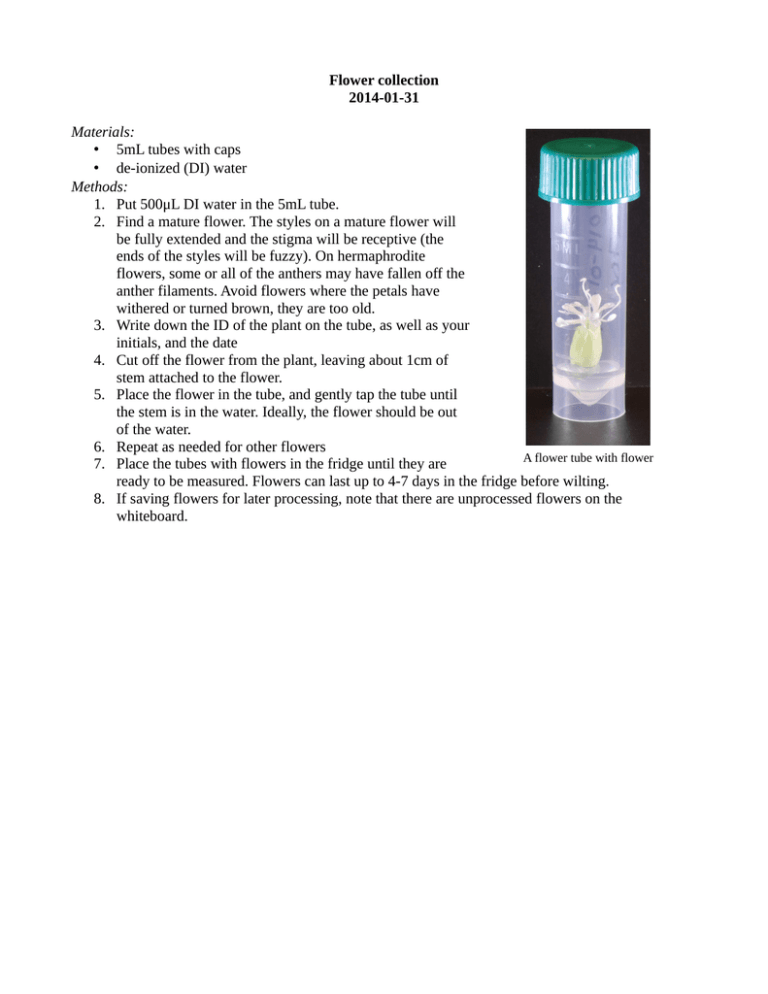
Flower collection 2014-01-31 Materials: • 5mL tubes with caps • de-ionized (DI) water Methods: 1. Put 500μL DI water in the 5mL tube. 2. Find a mature flower. The styles on a mature flower will be fully extended and the stigma will be receptive (the ends of the styles will be fuzzy). On hermaphrodite flowers, some or all of the anthers may have fallen off the anther filaments. Avoid flowers where the petals have withered or turned brown, they are too old. 3. Write down the ID of the plant on the tube, as well as your initials, and the date 4. Cut off the flower from the plant, leaving about 1cm of stem attached to the flower. 5. Place the flower in the tube, and gently tap the tube until the stem is in the water. Ideally, the flower should be out of the water. 6. Repeat as needed for other flowers A flower tube with flower 7. Place the tubes with flowers in the fridge until they are ready to be measured. Flowers can last up to 4-7 days in the fridge before wilting. 8. If saving flowers for later processing, note that there are unprocessed flowers on the whiteboard. Floral morphology protocol 2014-01-31 Materials: • flower datasheets • forceps • calipers • image codes, clear tape, and ½-inch hole punch • lightbox with LED light, and camera The lightbox has three major components: a chamber at the bottom with an LED light, an imaging chamber in the middle with a reference square on origami paper, and a removable lid at the top with a place to attach a camera. • tracing paper Methods: 1. Record metadata: a) Before measuring the first flower, write the date, time, and your initials on the top of the datasheet. If there is already data on the datasheet, instead draw a line and write the information under the line. b) Assign a unique flower ID to this flower, and record it on the datasheet. c) Copy the ID of the flower's plant from the tube, as well as the initials of the flower's collector, and its collected date. 2. Measure the external morphology of the flower. a) Measure the width and length of the calyx (the body of the flower) with calipers. The width should be measured at the widest point, and the length should be measured from the base of the calyx to the tip, as shown in the image below. Measuring calyx width Measuring calyx length Where to measure calyx width and length b) Measure the width and length of the petal limb (the part of the petal which sticks out of the calyx, there will typically be a bend in the petal where the petal limb begins). The petal width should be measured at the widest point of a single petal limb (not both), and the length should be measured from the tip of one limb to the bend where the limb begins. Measuring petal length Parts of the petal. The claw is inside the Where to measure petal width and length calyx, and the limb protrudes outside the calyx. 3. Photograph the sex organs a) Prepare an image label. If using triangular labels, image codes will be three letters and can be cut out by cutting along the dots. Circular image labels will have four letter codes, and can be prepared by cutting the printed paper into strips, then using a ½-inch hole punch to punch out the labels. A section of triangle image codes to be cut out A section of circular image codes to be punched out Cutting the circular image code sheet into strips Punching out circular image codes b) Prepare a piece of clear tape approximately 2.5 cm by 2.5 cm in size, and attach the label to the corner of the tape so that the sticky side of the tape is face up when looking at the image code. c) If there was a leaf in the tube, attach the leaf to the sticky side of the tape, with the leaf top facing down. Try to arrange the leaf so it is as flat as possible, and cut off the stem before placing down the leaf. Diagram of a leaf on tape, with image code. Tape with code attached. Two styles are also attached to the tape. d) Make sure the LED light in the bottom of the lightbox is on, then place the tape with the leaf and code into the lightbox, keeping the tape sticky side up. Lightbox with leaf and tape inside. e) Turn the camera on, and set it to “Program” mode (the “P” symbol). This will turn off most automatic image processing. Set the camera to macro 1cm focus mode, for a more detailed image. f) Make sure the leaf and code are in focus, then photograph the leaf and code. g) Record the image code for the leaf on the datasheet. h) Place the tape with the leaf sticky side down on a piece of tracing paper, and record the date, time, and your initials for this session on the tracing paper if you have not already down so. i) Repeat steps a-g with the nonpetal anther filaments. To do this you will need to tear open the calyx and dissect out each stamen Photograph of styles (anther and filament) by using forceps and plucking it out at the base where it meets the ovary. Remove the anther from the stamen and gently press the filament flat against the tape. Repeat this for all undamaged filaments, taking care that none of the filaments overlap or touch each other, or the image code. Flower with calyx removed. Diagram of petal and nonpetal anther filaments. In most flowers there are five of each type of anther, with nonpetal ones occurring in the gaps between petals. j) Repeat steps a-g with the anther filaments on the petals. These should be plucked where they attach to the petal, not at the base of the ovary. Diagram of the location and attachment of petal anther filaments. Five anther filaments on tape. k) Repeat steps a-g with the styles. These can be easily removed by plucking them with forceps right where they meet the ovary. Place all undamaged styles on the tape, taking care that they do not overlap or touch each other, or the image code. After the petals and stamen are removed, only the ovary and styles remain. Diagram of styles and ovary. Three styles on tape. 4. Other measurements. a) If a leaf was in the tube, note whether there was any significant leaf damage. b) Note whether the stigmas (the ends of the styles) are mature. The ends will be fuzzy when mature. c) Count and record the number of styles. d) Measure the width of the ovary using calipers. It should be measured at its widest point. e) Note anything else unusual about the flower. For instance, if it had an irregular number of petals or anthers for each set (typically there are 5 petals, and 5 anthers in each set). 5. Discard of the flower in the trash. Measuring the ovary with calipers
