™
The Torus - 3D Tank Cleaning Tool, up to 22 kpsi (TR-100)
Description:
The Torus 3D Tool is designed for cleaning tanks, vessels, autoclaves, ducts and reactor interiors. The tool is capable of working pressures up to 22,000 psi (1500 bar)
and flow rates of 17 to 80 gpm. The wide range of flow rates is accommodated by the use of four different manifolds: High Flow (HF), Medium Flow (MF), Low Flow
(LF) and Extra Low Flow (XLF). A maintenance-free magnetic brake is used to control rotation speed. Note that rotation speed may increase as the tool warms up to
operating temperature. The complete Torus cleaning cycle varies from about 4 to 30 minutes of operating time and 3 to 23 revolutions of the body per minute depending
on pressure, flow rate, nozzle diameter and manifold choice. The HP manifold revolves 2.36 times for each body revolution. When used in large vessels, extension
arms up to 36 inches long can be used to reduce the jet standoff distance. The Torus can be hung from the high pressure water hose or by the optional pulling ring
available for the tool. It is recommended to blow out all internal water passages (nozzles, weep holes, inlet) with compressed air after each use.
WARNING: The Torus contains several high-energy, rare-earth magnets that produce a magnetic field in excess of 10 Gauss. Persons with a pacemaker or other
electronic medical device must use extreme caution when handling, or in close proximity to the Torus. It is recommended that a minimum distance of 6 inches (152mm)
be maintained at all times between the Torus and any electronic medical devices.
CAUTION: The use of gloves when handling the tool after operation is recommended as the body and cover at the pulling ring end may reach temperatures of up to
160°F depending on operating conditions.
Operation:
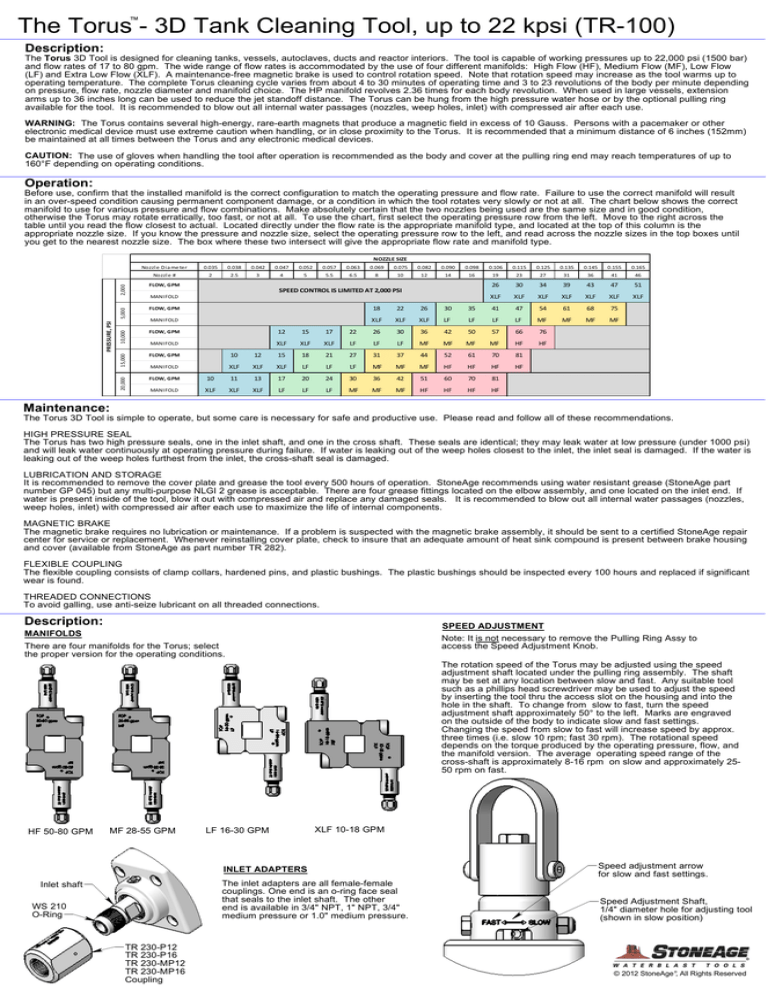
Before use, confirm that the installed manifold is the correct configuration to match the operating pressure and flow rate. Failure to use the correct manifold will result
in an over-speed condition causing permanent component damage, or a condition in which the tool rotates very slowly or not at all. The chart below shows the correct
manifold to use for various pressure and flow combinations. Make absolutely certain that the two nozzles being used are the same size and in good condition,
otherwise the Torus may rotate erratically, too fast, or not at all. To use the chart, first select the operating pressure row from the left. Move to the right across the
table until you read the flow closest to actual. Located directly under the flow rate is the appropriate manifold type, and located at the top of this column is the
appropriate nozzle size. If you know the pressure and nozzle size, select the operating pressure row to the left, and read across the nozzle sizes in the top boxes until
you get to the nearest nozzle size. The box where these two intersect will give the appropriate flow rate and manifold type.
0.052
0.057
0.063
0.069
0.075
0.082
0.090
0.098
0.106
0.115
0.125
0.135
0.145
0.155
Nozzl e #
2
2.5
3
4
5
5.5
6.5
8
10
12
14
16
19
23
27
31
36
41
46
26
30
34
39
43
47
51
XLF
XLF
XLF
XLF
XLF
XLF
XLF
41
47
54
61
68
75
MF
MF
MF
2,000
0.047
FLOW, GPM
5,000
0.042
FLOW, GPM
10,000
0.038
FLOW, GPM
15,000
0.035
FLOW, GPM
20,000
PRESSURE, PSI
NOZZLE SIZE
Nozzl e Dia me ter
FLOW, GPM
10
11
13
17
20
24
30
36
42
51
60
70
81
MANIFOLD
XLF
XLF
XLF
LF
LF
LF
MF
MF
MF
HF
HF
HF
HF
SPEED CONTROL IS LIMITED AT 2,000 PSI
MANIFOLD
MANIFOLD
12
15
17
22
18
22
26
30
35
XLF
XLF
XLF
LF
LF
LF
LF
MF
26
30
36
42
50
57
66
76
HF
XLF
XLF
XLF
LF
LF
LF
MF
MF
MF
MF
HF
10
12
15
18
21
27
31
37
44
52
61
70
81
MANIFOLD
XLF
XLF
XLF
LF
LF
LF
MF
MF
MF
HF
HF
HF
HF
MANIFOLD
0.165
Maintenance:
The Torus 3D Tool is simple to operate, but some care is necessary for safe and productive use. Please read and follow all of these recommendations.
HIGH PRESSURE SEAL
The Torus has two high pressure seals, one in the inlet shaft, and one in the cross shaft. These seals are identical; they may leak water at low pressure (under 1000 psi)
and will leak water continuously at operating pressure during failure. If water is leaking out of the weep holes closest to the inlet, the inlet seal is damaged. If the water is
leaking out of the weep holes furthest from the inlet, the cross-shaft seal is damaged.
LUBRICATION AND STORAGE
It is recommended to remove the cover plate and grease the tool every 500 hours of operation. StoneAge recommends using water resistant grease (StoneAge part
number GP 045) but any multi-purpose NLGI 2 grease is acceptable. There are four grease fittings located on the elbow assembly, and one located on the inlet end. If
water is present inside of the tool, blow it out with compressed air and replace any damaged seals. It is recommended to blow out all internal water passages (nozzles,
weep holes, inlet) with compressed air after each use to maximize the life of internal components.
MAGNETIC BRAKE
The magnetic brake requires no lubrication or maintenance. If a problem is suspected with the magnetic brake assembly, it should be sent to a certified StoneAge repair
center for service or replacement. Whenever reinstalling cover plate, check to insure that an adequate amount of heat sink compound is present between brake housing
and cover (available from StoneAge as part number TR 282).
FLEXIBLE COUPLING
The flexible coupling consists of clamp collars, hardened pins, and plastic bushings. The plastic bushings should be inspected every 100 hours and replaced if significant
wear is found.
THREADED CONNECTIONS
To avoid galling, use anti-seize lubricant on all threaded connections.
Description:
SPEED ADJUSTMENT
Note: It is not necessary to remove the Pulling Ring Assy to
access the Speed Adjustment Knob.
MANIFOLDS
There are four manifolds for the Torus; select
the proper version for the operating conditions.
The rotation speed of the Torus may be adjusted using the speed
adjustment shaft located under the pulling ring assembly. The shaft
may be set at any location between slow and fast. Any suitable tool
such as a phillips head screwdriver may be used to adjust the speed
by inserting the tool thru the access slot on the housing and into the
hole in the shaft. To change from slow to fast, turn the speed
adjustment shaft approximately 50° to the left. Marks are engraved
on the outside of the body to indicate slow and fast settings.
Changing the speed from slow to fast will increase speed by approx.
three times (i.e. slow 10 rpm; fast 30 rpm). The rotational speed
depends on the torque produced by the operating pressure, flow, and
the manifold version. The average operating speed range of the
cross-shaft is approximately 8-16 rpm on slow and approximately 2550 rpm on fast.
HF 50-80 GPM
MF 28-55 GPM
LF 16-30 GPM
XLF 10-18 GPM
INLET ADAPTERS
The inlet adapters are all female-female
couplings. One end is an o-ring face seal
that seals to the inlet shaft. The other
end is available in 3/4" NPT, 1" NPT, 3/4"
medium pressure or 1.0" medium pressure.
Inlet shaft
WS 210
O-Ring
TR 230-P12
TR 230-P16
TR 230-MP12
TR 230-MP16
Coupling
Speed adjustment arrow
for slow and fast settings.
Speed Adjustment Shaft,
1/4" diameter hole for adjusting tool
(shown in slow position)
© 2012 StoneAge ®, All Rights Reserved
™
The Torus - 3D Tank CleaningTool
HC 090
PULLING RING
TR-100 ASSEMBLY
GB 337-12
HEX BOLT .37-16 X 3.00 SS
TR 152
INSERT, PULLING RING
TR 200
BRAKE ASSEMBLY
TR 220
COUPLING ASSEMBLY
(6) TR 116
SEALING SCREW
SBHCS .31-18 X .50 SS
TR 170
CROSS SHAFT ASSEMBLY
GN 337-L
NUT, HEX LOCK SS
TR 121
PLATE,
COVER
(6) TR 115
SEALING SCREW
SHBCS .19-24 X .38 SS
TR 240-HF
TR 240-MF
TR 240-LF
TR 240-XLF
MANIFOLD ASSEMBLY
TR 102
BODY WELDMENT
TR 120
INLET ASSEMBLY
TR 130
ELBOW ASSEMBLY
TR 230-MP16
TR 230-MP12
TR 230-P16
TR 230-P12
COUPLING, O-RING FACE
GS 319-015
SHCS .19-24 X .38 SS
TR 107
O-RING , COVER PLATE
TR 240-XX MANIFOLD ASSEMBLY
TR 250
SHAFT CAP
MJ 011-C
SEAT
(2) TR 247
SOCKET HEAD CAP SCREW
HC 012-TO
HP SEAL AND O-RING
(2) TR 260-HF
(2) TR 260-MF
(2) TR 260-LF
(2) TR 260-XLF
HALF MANIFOLD
TR 126
GEAR, BEVEL 27T
CJ 009
BEARING
TR 245
SEAL, HP MANIFOLD
SA 059
O-RING
TR 577.3
FLOW STRAIGHTENER
TR 577-XX
NIPPLE ASSEMBLY
TR 170 CROSS SHAFT ASSEMBLY
TR 173
CAP, OUTLET
TR 175
O-RING
TR 172
CROSS SHAFT
TR 113
SEAL
BJ 007
BEARING
wide outer race
(2) AP4-XXX
NOZZLE
FS 004-45-SS
ZERK, 45°
(2) FS 004-0-SS
ZERK, STRAIGHT
(4) GS 337-03
SHCS .375-16 X .75 SS
HC 012-TO
HP SEAL AND O-RING
TR 118
RETAINING RING
TR 122 INLET SHAFT
TR 120 INLET ASSEMBLY
TR 250
SHAFT CAP
WS 210
O-RING
FS 004-0-SS
ZERK, STRAIGHT
spring side in
(2) BJ 007
BEARING
(2) GS 319-015
SHCS .19-24 X .38
MJ 011-C
SEAT
TR 220 COUPLING ASSEMBLY
TR 103
END INLET
TR 104
GEAR, INLET SHAFT
wide outer race
TR 113
SEAL
TR 223
BUSHING, PEEK
wide inner race
TR 124
LOCK NUT
TR 222
DOWEL PIN
TR 105
O-RING, INLET END
spring side in
TR 118
RETAINING RING
(4) TR 117
SEALING SCREW
SHCS .37-16 X 1.25 SS
TR 221
COLLAR ASSEMBLY
®
© 2012 StoneAge , All Rights Reserved
™
The Torus - 3D Tank Cleaning Tool
FS 004-0-SS
ZERK, STRAIGHT
(2) TR 138 RETAINING RING
TR 130 ELBOW ASSEMBLY
TR 140
GEAR 8T
(2) TR 134 SEAL
open side of
seal towards
elbow
TR 135
NEEDLE BEARING
TR 144
GEAR, BEVEL 18T
open side of
seal towards
elbow
TR 139
GEAR 23T
(2) TR 143
KEY, PRIMARY SHAFT
TR 131
PRIMARY SHAFT
(2) TR 142
KEY, PINION SHAFT
TR 132
ELBOW
TR 146
RETAINING RING
(4) TR 127
O-RING
TR 133
GEAR 21T
(2) TR 136
NEEDLE BEARING
(2) GP 025-P4
PLUG, P4
TR 141
WASHER, PINION SHAFT
TR 145
BEARING
DT 032
RETAINING RING
GS 325-02
SHCS .25-20 X .50 SS
TR 200 BRAKE ASSEMBLY
TR 212
O-RING
TR 202
PLATE, BASE
(8) GS 313-02
SHCS .13-32 X .50 SS
(2) TR 210
MAGNET ASSEMBLY
TR 205
SHAFT, BRAKE
RJ 009
BEARING
spring side
TR 201
PLANETARY GEARBOX
RJ 010
SEAL
GC 313-025
SHCS .13-32 X .62 SS
key not required
TR 215
O-RING
TR 206
SHAFT, SPEED CONTROL
(2) TR 208
SHOULDER BOLT
(2) TR 214
WAVE SPRING
TR130 233
O-RING
TR 204
PLATE, STOP
TR 207
DISC, CU
GN 337-L
LOCKNUT
TR 203
COVER, BRAKE GS 319-08
SHCS .19-24 X 2.0 SS
TR 213
WAVE SPRING
GP 025-P4
PLUG, P4
TORUS INSTALLATION IN TR 408-SS CAGE
One set of ribs on the cage
have a slightly larger gap
which allows easier installation
of the Torus into the cage.
Insure that the end plate of the cage is installed
as shown over the Pulling Ring Housing and
NOT over the Insert; otherwise the Torus will
not rotate correctly during operation.
Pulling Ring Housing
Note that the short
2" nipples must be
installed when using
the Torus in the cage.
Pulling Ring Insert
© 2012 StoneAge®, All Rights Reserved
The Torus - 3D Tank Cleaning Tool
™
TR-100 HIGH PRESSURE SEAL MAINTENANCE
(2) SHCS
The Torus has 2 high pressure seals. These seals may leak at
tap pressure, but should seal at pressures above 1000 psi.
To access the Torus internals:
TR 250 Shaft Cap
H.P. Half Manifolds
(2) TR 247
SHCS
TR 121 Cover Plate
1. Remove the (2) Socket Head Cap Screws
holding the Shaft Cap (TR 250) in place. Loosen
the (2) Socket Head Cap Screws (TR 247) on the
High Pressure Half Manifolds & slip the Manifolds
off the Cross Shaft.
2. Remove the (6) Sealing Button Head Cap
Screws (TR 115) from the Cover Plate (TR 121)
and remove the Cover Plate.
(6) TR 115 Sealing BHCS
To access the Inlet Shaft Seal:
! SEE CAUTION !
1. Remove the (4) Sealing Socket Head Cap
Screws holding the Inlet Assy (TR 120) to the
Body and the Elbow Assy. The Inlet Assy may
then be slid out of the Elbow Assy to gain access
to the Seal. The Seal is located in the end of the
Inlet Shaft. No more disassembly is required.
To access the Cross Shaft Seal:
1. Remove the (4) Socket Head Cap Screws that
hold the Cross Shaft Assy to the Elbow Assy. Lift
the Cross Shaft Assy out of the Main Elbow. The
Seal is located in the end of the Cross Shaft. No
more disassembly is required.
(4) SHCS
MJ 011-C Seat
TR 170
Cross Shaft Assy
HC 012-TO
H.P. Seal & O-Ring
HC 012-TO
H.P. Seal & O-Ring
MJ 011-C Seat
To maintain H.P. Seat & Seal:
1. Remove the Carbide Seat (MJ 011-C) and
the H.P. Seal (HC 012-TO). Inspect the Seat
for chips on edges. Replace if damaged.
Inspect the related face of the Elbow Assy for
dings or pits. If damaged, it must be faced or
replaced, otherwise the Seal will leak.
2. Apply grease to new H.P. Seal and install
into bore. Place the Seat on the Seal with the
flat side against the Seal. The chamfered side
should face towards the Elbow Assy.
Elbow Assy
chamfered face
MJ 011-C
Carbide Seat
(4) Sealing SHCS
TR 120 Inlet Assy
flat face
towards seal
! CAUTION !: The use of gloves when handling the
tool after operation is recommended as the body and
cover at the pulling ring end may reach temperatures
of up to 160°F depending on operating conditions.
HC 012-TO
H.P. Seal & O-Ring
Body
! SEE CAUTION !
TR-100 ASSEMBLY SEQUENCE & DETAILS
Note: Always use anti-seize lubricant
on all threaded connections to
prevent galling.
1. Apply heat-conducting grease
(StoneAge part number TR 282) to
bottom surface of Brake Assy (the
surface that will be in contact with the
inside bottom of the Body) and insert
Brake Assy into Body by first tilting and
inserting under web of Body and then
sliding forward as shown; use care to
insure that the Speed Adjust Knob with
O-Ring starts into the hole in the end of
the Body while sliding the Assy forward.
Loosely start (2) Sealing Button Head
Cap Screws thru bottom of Body and
into Brake Assy.
Body
Brake
Assy
2. Insert Elbow Assy (may include Cross Shaft Assy) into
Body and loosely start (4) Sealing Button Head Cap Screws
thru bottom of Body and into Elbow.
Elbow Assy
Pulling Ring
Assy
6. Install the H.P. Manifolds onto the
Cross Shaft and hand tighten the (2) large
Socket Head Cap Screws.
7. Install the Shaft Cap using (2) small
Socket Head Cap Screws and tighten
them to 24 in/lbs. Then tighten the (2)
large Cap Screws on the H.P. Manifolds
to 50 ft/lbs.
(4) Sealing
SHCS
Hex Bolt & Hex Lock Nut
Inlet Assy
Brake Assy top surface
(4) Elbow Sealing BHCS
3. Insert Inlet Assy into end of Body and tighten (4)
Sealing Socket Head Cap Screws thru end of Body and
into Elbow. Take care to insure O-Ring is properly
seated in groove. Next, tighten the (4) Sealing Button
Head Cap Screws at the bottom of the Body into the
Elbow Assy.
(2) Brake
Sealing BHCS
5. Apply heat-conducting grease
(StoneAge part number TR 282) to top
surface of Brake Assy and install the
Cover Plate using (6) Sealing Button
Head Cap Screws. Take care to insure
the O-Ring is properly seated in the
groove of the Cover Plate.
Cover Plate
start shaft
into hole
4. Once the Elbow Assy is firmly mounted and the Brake Assy is loosely in place, the (2) Coupling Assys need
to be installed. Note that keys are NOT required in the shafts. The easiest way to install the Couplings are to
couple (1) Male Half and (1) Female Half together, place a rag in the bottom of the Body cavity under where
the couplings are to be, and slip them into place underneath the bottom of the shafts (resting on top of the rag).
The rag will help hold them in place and up against the shafts while starting the Socket Head Cap Screws in
the opposite pair of Coupling Halves. Note that there should be a .03" gap between the Elbow and the
Coupling face abutting the Elbow. Tighten the (2) Elbow Coupling screws evenly to 50 in/lbs. Next, allow a
.03" gap between the Elbow Coupling and the Brake Coupling as shown. Tighten the (2) Brake Coupling
screws to 50 in/lbs. Finally, tighten the (2) remaining Sealing Button Head Cap Screws holding the Brake Assy
to the Body. Also grease the (4) Zerks on the Elbow if necessary.
Grease Zerks
H.P. Manifolds
Grease Zerks
Shaft
Cap
8. Finally, install the Pulling Ring
Assy onto the Body with the Hex Bolt
and Hex Lock Nut.
Male
Coupling Half
Elbow Coupling
.03 gap
.03 gap
Female
Coupling Half
Note: It is not necessary to remove
the Pulling Ring Assy to access the
Speed Adjustment Shaft.
Brake Coupling
®
© 2012 StoneAge , All Rights Reserved


