ALTERNATIVE ENERGY
LED Light Project #1
LED LIGHT PROJECT #1
SPONSOR
This project will focus on making power efficient LED lights, and we will do this on a budget of $15 per
light. Our LED lights can be powered by a small 12 volt battery or incorporated into your large alternative
energy battery bank. By following our guide, you can make 12 volt LED puck lights, pendants, or modify an
existing lamp base for around $3 - $8, or you can build a complete light for $15.
I
n a power outage, the absence of lighting causes
many challenges; you can’t see, therefore you are
vulnerable to falls or running into things. While most
power outages are short-term, what if it lasted for
days or weeks? How would you provide light to safely
navigate your home?
4. 2 x #4 x ½" Screws
A flashlight helps, but were not intended for running long
periods (battery consumption), nor are they designed to
provide light to large areas efficiently. Oil lamps require fuel
and can be hazardous (fires). Candles work, but you are
limited to the amount that you store, and are a fire hazard.
Even if you have a generator, and can power your entire
home’s electrical system, you will eventually run out of fuel.
7. Optional, splice connectors, electrical tape, heat
shrink wire wrap. If using T-Taps, you will also need
Male Quick Disconnect Connectors.
If you wanted a store bought solution, that is safe and
energy efficient, we recommend d.lights. They are
affordable; at around $12 - $16 they are within most
individual’s budget. D.lights can be charged by its small
solar cell, or AC power. However, as great as d.lights are,
you will need sunlight to recharge the battery during a
power outage. Read our d.light product review.
2. Small Phillips screwdriver
5. Optional, 1 x Clamp Lamp Light (if purchasing from
Amazon.com, we used the clamp lights from Toby’s Tool
Shed – great customer service and very fast shipping)
6. Optional, Lamp Wire (cut to required length)
RECOMMENDED PRODUCTS
Tools
1. Drill with small drill bits
3. Optional, Dremel type tool with sanding stone (I use
a Black & Decker RTX-B)
4. Optional, scissors
5. Optional, wire stripper
Another option includes LED pancake lights designed
for the recreational vehicle (RV) industry. While these
products are energy efficient, they are expensive ($20 or
more). We have tested and recommend Diamond Group
LED Dome Lights (single pancake, double pancake)
Power Consumption and Light Bulbs
There are three main types of light bulbs; incandescent,
compact fluorescent, and LEDs. Each type of light bulb
consumes a certain amount of energy. For this example
we will start with a basic 60 watt incandescent light
bulb. A 60 watt incandescent light bulb uses 5 amps
per hour. A 14 watt Compact Fluorescent Light bulb
(CFL), is as bright as the 60 watt incandescent bulb,
but is four times more energy efficient (you can use
4 x 14 watt CFL bulbs for each 60 watt incandescent
bulb). A 2.1 watt LED bulb is approximately six times
more efficient than a CFL (you can use 6 x 2.1 watt LED
bulbs for each 14 watt CFL, or 28 x 2.1 watt LEDs for
each 60 watt incandescent bulb).
Additionally, both incandescent bulbs and CFL bulbs are
designed to run off of AC power. We already covered
using a generator; eventually you will run out of fuel.
If you had a battery bank and a DC to AC inverter,
you could power your incandescent and CFL bulbs.
However, in the large scheme of things, using an
inverter to power inefficient bulbs is a double negative.
If you are designing an emergency lighting system, or
system to be powered by a battery bank, it makes more
sense to use LED bulbs.
What You Will Need
1. 1 x LED light bulb – We recommend MR11 2.1 Watt
LED Bulbs or 5 Watt MR 11 fiber optic bulbs. While
more expensive the 2.1 watt LED bulbs are the better
purchase (more energy efficient and brighter).
2. 1 x MR11 LED light bulb socket (purchase the 10
pack if you are making more than one light)
3. 1 x Threaded PVC end cap, ¾" or 1"
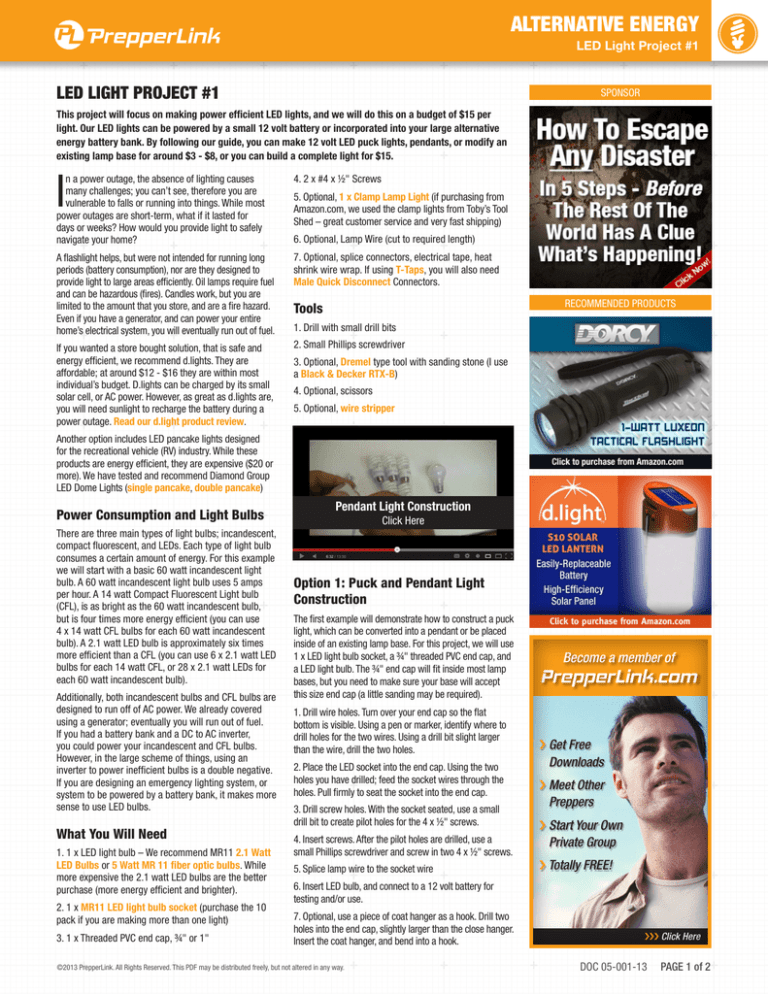
Pendant Light Construction
Click Here
Option 1: Puck and Pendant Light
Construction
The first example will demonstrate how to construct a puck
light, which can be converted into a pendant or be placed
inside of an existing lamp base. For this project, we will use
1 x LED light bulb socket, a ¾" threaded PVC end cap, and
a LED light bulb. The ¾" end cap will fit inside most lamp
bases, but you need to make sure your base will accept
this size end cap (a little sanding may be required).
1. Drill wire holes. Turn over your end cap so the flat
bottom is visible. Using a pen or marker, identify where to
drill holes for the two wires. Using a drill bit slight larger
than the wire, drill the two holes.
2. Place the LED socket into the end cap. Using the two
holes you have drilled; feed the socket wires through the
holes. Pull firmly to seat the socket into the end cap.
3. Drill screw holes. With the socket seated, use a small
drill bit to create pilot holes for the 4 x ½" screws.
4. Insert screws. After the pilot holes are drilled, use a
small Phillips screwdriver and screw in two 4 x ½" screws.
5. Splice lamp wire to the socket wire
Become a member of
PrepperLink.com
›G
et Free
Downloads
›M
eet Other
Preppers
›S
tart Your Own
Private Group
› Totally FREE!
6. Insert LED bulb, and connect to a 12 volt battery for
testing and/or use.
7. Optional, use a piece of coat hanger as a hook. Drill two
holes into the end cap, slightly larger than the close hanger.
Insert the coat hanger, and bend into a hook.
©2013 PrepperLink. All Rights Reserved. This PDF may be distributed freely, but not altered in any way.
››› Click Here
DOC 05-001-13
PAGE 1 of 2
ALTERNATIVE ENERGY
LED Light Project #1
Option 1, Step 1
6. Using the lamp cord from the original light, splice it
to the socket leads (order does not matter). Wrap with
electrical tape, and/or heat shrink wire wrap.
RECOMMENDED PRODUCTS
7. Reassemble the light
8. Insert LED light into the socket
9. Depending on your wiring method, you may have to
remove the AC wall power plug from the lamp cord. If
so, cut wire with three inches above the plug (so you
can use again later), and wire it so you can use it with
your 12 volt system.
Option 1, Step 2
Option 3: 1" Threaded End Cap and
Lamp Shade
If you know where to purchase the clamp light lamp
shades (shade only), or do not want to use the entire
shell with the lamp shade, the 1" threaded PVC end cap
will screw directly into the lamp shade. Construct the
puck light using the 1" end cap, and screw directly into
the lamp shade. You will need to splice lamp wire (or
other power supply wire) to your socket.
Conclusion
Option 1, Step 4
There you have it, our budget energy efficient LED
project. Please let us know what you think, and ask us
any questions on the project. Also, please stay tuned as
we put together a solar powered, emergency lighting
system for one of our Prepper Link family members.
Option 2, Step 4
Option 2: Lamp Base and Clamp Light
Construction
The ¾" threaded PVC end cap will fit inside most
lamp bases, with a little sanding. If you do not have a
spare lamp base, you can use a clamp light. Whichever
method you chose, you need to make sure you can take
apart your lamp base (cheap lamp bases usually screw
apart and are great for this project). The following
example will use a Clamp Light.
Become a member of
Option 2, Step 5
PrepperLink.com
for FREE to get downloads, win
prizes, meet other preppers,
and start your own group.
1. Disassemble your clamp lamp. Unscrew the
aluminum shade from the socket. Remove the clamp by
unscrewing the wing nut. Unscrew the top part of the
shell from the bottom.
2. Pull on the light socket, exposing three inches of
cord. Cut the cord with scissors (leave three inches for
future projects). Dispose of the light socket, but keep
the lamp cord (it will be spliced later).
3. Place the ¾" Puck light into the bottom part of the
shell; it will not fit. Identify how much of the end cap
will need to be sanded.
Option 2, Step 6
4. Using a Dremel type tool, with sharpening stone,
remove PVC from the bottom of the end cap, until it fits
snug into the bottom base.
5. After the end cap fits into the base, run the socket
wire through the bottom hole of the shell.
©2013 PrepperLink. All Rights Reserved. This PDF may be distributed freely, but not altered in any way.
DOC 05-001-13
PAGE 2 of 2


