Connecting a Two-Wire Bently Nevada Velomitor
advertisement
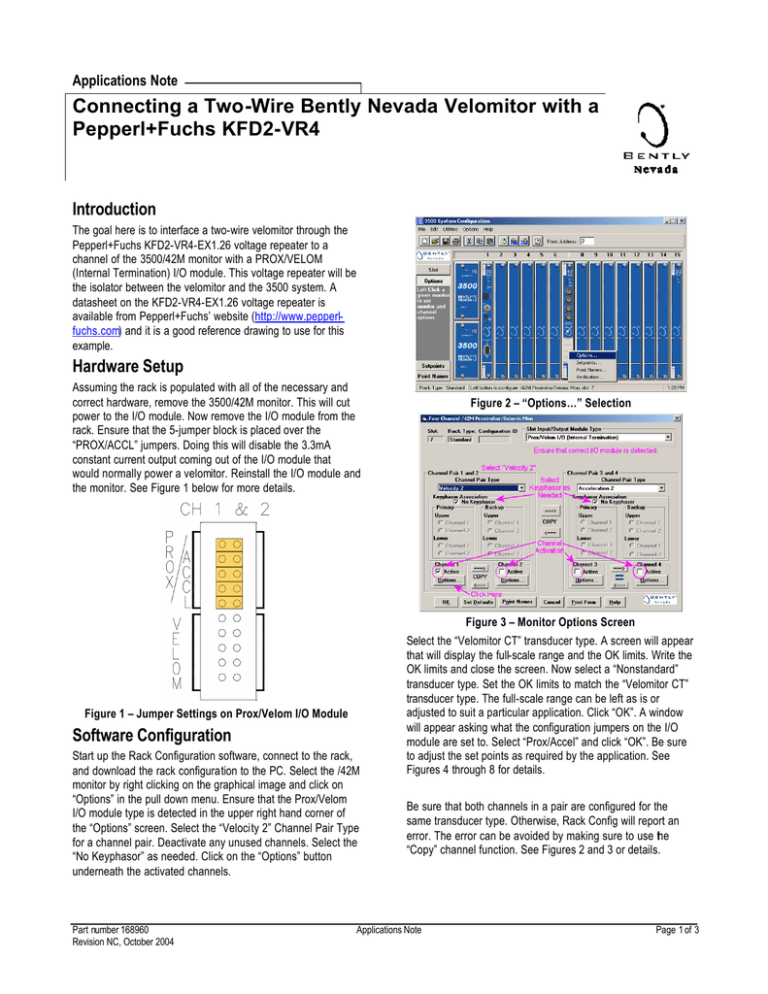
Applications Note Connecting a Two-Wire Bently Nevada Velomitor with a Pepperl+Fuchs KFD2-VR4 Introduction The goal here is to interface a two-wire velomitor through the Pepperl+Fuchs KFD2-VR4-EX1.26 voltage repeater to a channel of the 3500/42M monitor with a PROX/VELOM (Internal Termination) I/O module. This voltage repeater will be the isolator between the velomitor and the 3500 system. A datasheet on the KFD2-VR4-EX1.26 voltage repeater is available from Pepperl+Fuchs’ website (http://www.pepperlfuchs.com) and it is a good reference drawing to use for this example. Hardware Setup Assuming the rack is populated with all of the necessary and correct hardware, remove the 3500/42M monitor. This will cut power to the I/O module. Now remove the I/O module from the rack. Ensure that the 5-jumper block is placed over the “PROX/ACCL” jumpers. Doing this will disable the 3.3mA constant current output coming out of the I/O module that would normally power a velomitor. Reinstall the I/O module and the monitor. See Figure 1 below for more details. Figure 2 – “Options…” Selection Figure 3 – Monitor Options Screen Figure 1 – Jumper Settings on Prox/Velom I/O Module Software Configuration Start up the Rack Configuration software, connect to the rack, and download the rack configuration to the PC. Select the /42M monitor by right clicking on the graphical image and click on “Options” in the pull down menu. Ensure that the Prox/Velom I/O module type is detected in the upper right hand corner of the “Options” screen. Select the “Velocity 2” Channel Pair Type for a channel pair. Deactivate any unused channels. Select the “No Keyphasor” as needed. Click on the “Options” button underneath the activated channels. Part number 168960 Revision NC, October 2004 Select the “Velomitor CT” transducer type. A screen will appear that will display the full-scale range and the OK limits. Write the OK limits and close the screen. Now select a “Nonstandard” transducer type. Set the OK limits to match the “Velomitor CT” transducer type. The full-scale range can be left as is or adjusted to suit a particular application. Click “OK”. A window will appear asking what the configuration jumpers on the I/O module are set to. Select “Prox/Accel” and click “OK”. Be sure to adjust the set points as required by the application. See Figures 4 through 8 for details. Be sure that both channels in a pair are configured for the same transducer type. Otherwise, Rack Config will report an error. The error can be avoided by making sure to use the “Copy” channel function. See Figures 2 and 3 or details. Applications Note Page 1 of 3 Figure 4 – “Velomitor CT” Selection Figure 7 – “OK Limits” to Set Figure 5 – “OK Limits” Figure 8 – “Prox/Accel” Selection Disconnect power from the rack. Connect a +24VDC external power supply to the KFD2-VR4-EX1.26 across terminals 11 (+) and 12 (-) but do not activate the power supply yet. An external power supply must be used as the 3500 cannot provide sufficient current to the isolator. Place a jumper between terminals 3 and 2. This will generate a 3.6mA constant current flow on the input terminals of the KFD2-VR4-EX1.26. This current will be used to power the velomitor. Connect the velomitor to terminals 6 (-) and 4 (+). Take special notice of the polarity of the velomitor and the isolator. The “A” lead of the velomitor is the more “positive” of the two. Bently Nevada uses a positive common system. Connect the isolator at terminals 8 (+) and 7 (-) to the I/O module at terminals COM/A and SIG/B. Notice that the leads are reversed to accommodate the positive ground of the I/O module. See the wiring diagram in figure 9 for details. Figure 6 – “Nonstandard” Selection Part number 168960 Revision NC, October 2004 Applications Note Page 2 of 3 2-Wire Velomitor* A 1 2 3 4 5 6 An external power supply must be used to power the voltage isolator because the 3500 cannot supply enough current through the I/O module for all possible cases. Damage to the I/O module and/or the voltage may occur if the internal power is used. Using the power from the I/O module also nullifies the ground isolation between the I/O module and the velomitor. B Additional Resources Further information on the Pepperl+Fuchs KFD2-VR4-EX1.26 voltage isolator can be found on the Pepperl+Fuchs website located at http://www.pepperl- fuchs.com. Information on Bently Nevada’s two wire velomitors can be found on the Bently Nevada website located at http://www.bently-nevada.com. KFD2-VR4Ex1.26 7 8 9 10 11 12 + PWR COM/A SIG/B SHLD PWR COM/A SIG/B SHLD There are countless websites that describe the theories and various applications of intrinsic safety. A websearch will yield numerous results pointing to universities, organizations, and manufacturers of intrinsic safety devices. Bently Nevada has summarized much of this information in an application note titled, “The Basics of Intrinsic Safety”. C H 1 C H 2 Copyright 2004 Bently Nevada LLC 1631 Bently Parkway South Minden, Nevada USA 89423 Phone: (775) 782 3611 Fax (775) 782 9253 www.bently.com - EXTERNAL POWER SUPPLY Notes * Assume velomitor returns a positive voltage. Figure 9 – Wiring Diagram NOT OK Checking The 3500/42M monitor will continue to perform NOT OK checking on the data signal. Below is a list of scenarios that will trigger a NOT OK state. 1) Velomitor probe not connected to the KFD2-VR4EX1.26 (Open Circuit). 2) Velomitor signal to the KFD2-VR4-EX1.26 is shorted (0V). 3) Isolated signal from the KFD2-VR4-EX1.26 is not connected to the I/O module (Open Circuit). 4) Isolated signal from the KFD2-VR4-EX1.26 is shorted (0V). Summary Interfacing a velomitor to the 3500/42M through the Pepperl+Fuchs voltage isolator provides intrinsic safety. Special care must be taken to match the polarity of the velomitor to the voltage isolator and to match the polarity of the voltage isolator to the Prox/Velom I/O module. Mismatching the polarity will cause incorrect readings and/or invalid operation of the 3500/42M monitor. Part number 168960 Revision NC, October 2004 Applications Note Page 3 of 3
