INSTALLATION INSTRUCTIONS
UTILITY TRACK - MODEL UT48-10
PARTS LIST
Utility Track UT48-10
To avoid SERIOUS INJURY or DAMAGE to personal belongings:
• Please read installation instructions carefully prior to installing Utility Track System.
• DO NOT allow children to climb on or play with Utility Track System or its components.
• Install ONLY as instructed using included hardware.
• ALWAYS wear eye and ear protection when you need to cut the utility track.
Utility Track End Cap UE48-10
HDF01 10 x 2" utility track screws
TOOLS NEEDED
•
•
•
•
Tape measure
Stud finder
Pencil or marker
Drill
•
•
•
7/32" Drill bit
#2 Phillips head power bit ¼"
hex shank
Level
•
•
•
Square
Sawhorses
File - to remove burrs from
cut edges
•
Use a file to deburr any cut or rough edges or drilled holes.
NOTE: Always attempt to keep cut edges on the ends of multiple
utility track runs in order to achieve the cleanest mate-up between
utility track sections.
•
Cutoff saw - to cut track
INSTALLATION REQUIREMENTS
• One full-length utility track REQUIRES 3 studs.
• Shortened or cut utility track REQUIRES 2 studs.
Example: The mounting location has 4 studs, then two utility tracks
MUST be cut down and each utility track MUST be mounted to 2 studs.
INSTALLATION OF SINGLE UTILITY TRACK
1. Access the installation area.
• Determine the height and position to mount the utility track.
• Locate and mark the studs.
• Determine the quantity of utility tracks required for the installation
based on wall span and studs.
2. Use a level to position the utility track at the desired height on the
wall, mark position with a pencil or painter’s tape.
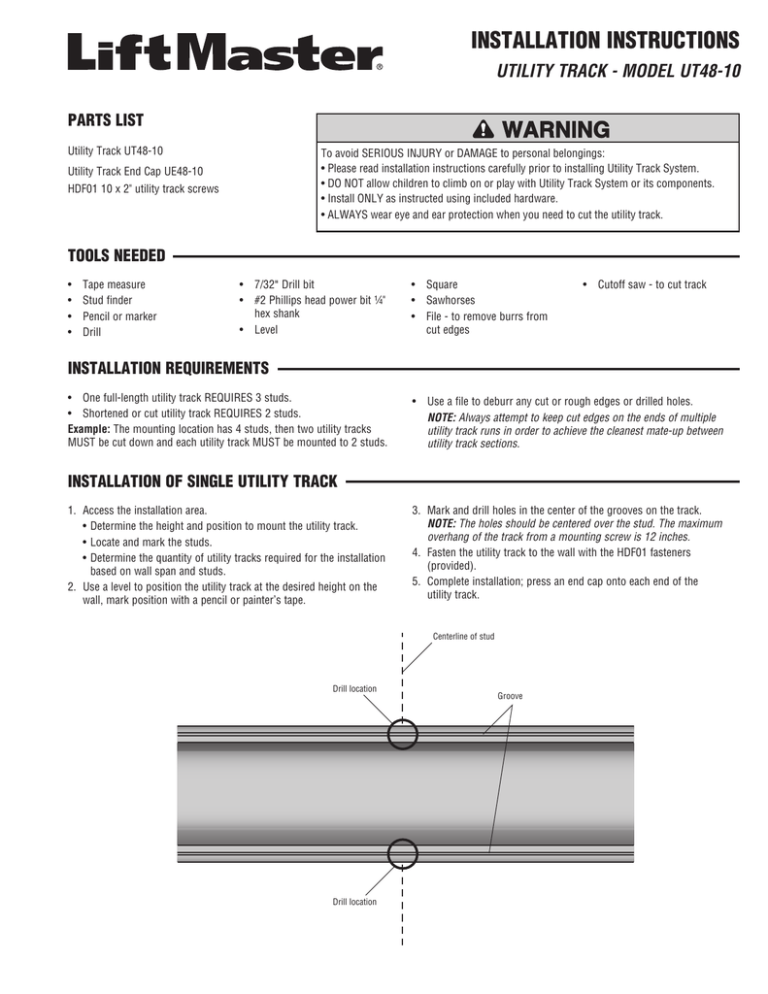
3. Mark and drill holes in the center of the grooves on the track.
NOTE: The holes should be centered over the stud. The maximum
overhang of the track from a mounting screw is 12 inches.
4. Fasten the utility track to the wall with the HDF01 fasteners
(provided).
5. Complete installation; press an end cap onto each end of the
utility track.
Centerline of stud
Drill location
Drill location
Groove
INSTALLATION OF MULTIPLE UTILITY TRACKS
1. Access the installation area.
• Determine the height and position to mount the utility track.
• Locate and mark the studs.
• Determine the quantity of utility tracks required for the installation
based on wall span and studs.
2. Use a level to position the utility track at the desired height on the
wall, mark position with a pencil or painter’s tape.
3. Mark and drill 7/32” holes in the center of the grooves on the utility
track. NOTE: The holes should be centered over the stud.
4. Fasten the utility track to the wall with the HDF01 fasteners
(provided).
5. Add the next utility track at the same height and insert an alignment
bracket into the previously installed utility track.
6. Press second track into the alignment bracket.
7. Use a level to check level of utility tracks.
8. Mark and drill 7/32” holes in the center of the grooves on the utility
track. NOTE: The holes should be centered over the stud.
9. Fasten the utility track to the wall with the HDF01 fasteners
(provided).
10. Complete installation; press an end cap onto each end of the
utility track.
11. Snap on Utility track accessories as required.
FOR TECHNICAL SUPPORT DIAL OUR TOLL FREE NUMBER:
1-800-528-3536
114A4558
© 2012, The Chamberlain Group, Inc.
All Rights Reserved

