Publication No. 11196
Measuring by Laser Diffraction
Introduction
Wavelength
• Interference
• Wavelength
Background
Crest
Amplitude
Crest
More energy
Trough
Infrared
• Measurement
• Diffraction
Visible light
Concepts
Ultraviolet
A variety of methods is available for measuring objects and using the appropriate instrument is important. What if the object
is less than a millimeter wide? Discover how light from a laser can be used to measure the dimensions of very small objects such
as the width of a wire or a human hair.
Less energy
Wavelengths
400 – 700 nm
(violet)
(red)
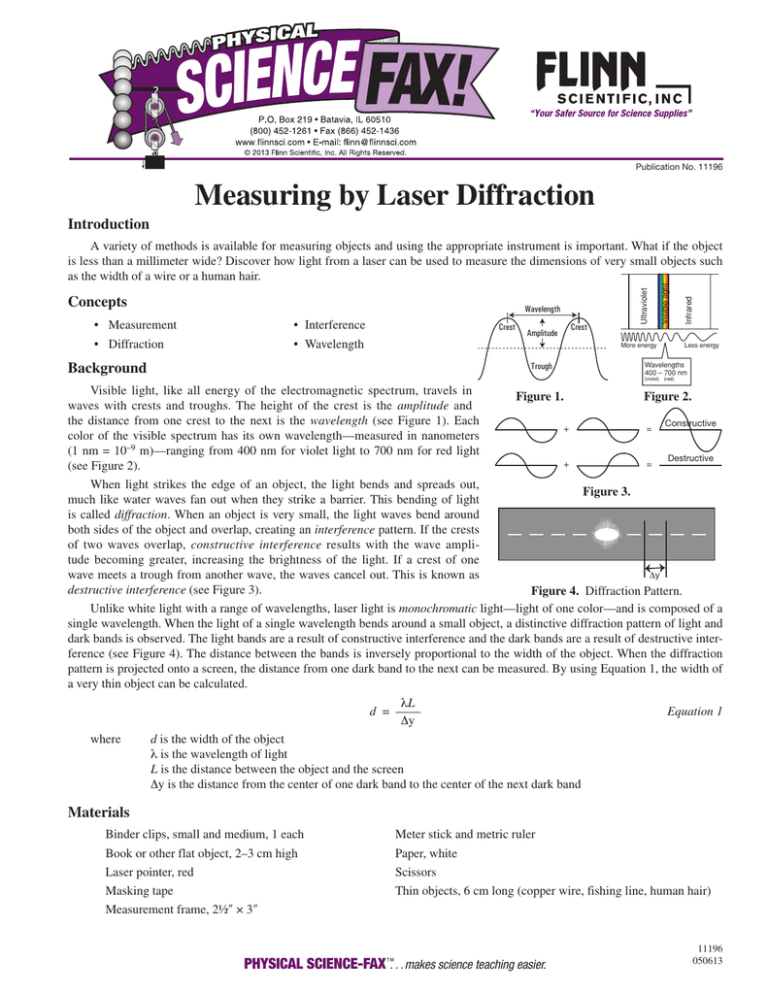
Visible light, like all energy of the electromagnetic spectrum, travels in
Figure 1.
Figure 2.
waves with crests and troughs. The height of the crest is the amplitude and
the distance from one crest to the next is the wavelength (see Figure 1). Each
Constructive
=
+
color of the visible spectrum has its own wavelength—measured in nanometers
(1 nm = 10–9 m)—ranging from 400 nm for violet light to 700 nm for red light
Destructive
=
+
(see Figure 2).
When light strikes the edge of an object, the light bends and spreads out,
Figure 3.
much like water waves fan out when they strike a barrier. This bending of light
is called diffraction. When an object is very small, the light waves bend around
both sides of the object and overlap, creating an interference pattern. If the crests
of two waves overlap, constructive interference results with the wave amplitude becoming greater, increasing the brightness of the light. If a crest of one
Δy
wave meets a trough from another wave, the waves cancel out. This is known as
destructive interference (see Figure 3).
Figure 4. Diffraction Pattern.
Unlike white light with a range of wavelengths, laser light is monochromatic light—light of one color—and is composed of a
single wavelength. When the light of a single wavelength bends around a small object, a distinctive diffraction pattern of light and
dark bands is observed. The light bands are a result of constructive interference and the dark bands are a result of destructive interference (see Figure 4). The distance between the bands is inversely proportional to the width of the object. When the diffraction
pattern is projected onto a screen, the distance from one dark band to the next can be measured. By using Equation 1, the width of
a very thin object can be calculated.
λL
d = ——
Equation 1
∆y
where
d is the width of the object
λ is the wavelength of light
L is the distance between the object and the screen
∆y is the distance from the center of one dark band to the center of the next dark band
Materials
Binder clips, small and medium, 1 each
Book or other flat object, 2–3 cm high
Laser pointer, red
Masking tape
Measurement frame, 2½″ × 3″
Meter stick and metric ruler
Paper, white
Scissors
Thin objects, 6 cm long (copper wire, fishing line, human hair)
PHYSICAL SCIENCE-FAX. . .makes science teaching easier.
11196
050613
Safety Precautions
Do not aim the laser pointer directly into anyone’s eyes and never look directly into the laser beam. The low-power,
coherent light can cause damage to the sensitive retina and may lead to permanent eye damage. Do not aim the laser at any
reflective surfaces such as mirrors or highly polished metal. Prevent stray laser light from projecting beyond the classroom to
eliminate any unintentional exposure to the laser light. It is best to do this procedure on a low work surface to keep the refracted
laser light below “normal” eye level. For people with sensitive eyes it is recommended that dark, IR-protective safety glasses be
worn. Follow all other normal laboratory safety guidelines.
Preparation
1. Insert the batteries into the laser pointer.
Copper
wire
2. Construct a measurement frame by cutting an index card in half
(2 ½″ x 3″). Using scissors, cut a center rectangle out of the card,
leaving a 1.5-cm border around each side (see Figure 5).
3. Orient the measurement frame so the longer sides are at the top
and bottom. Stretch each material to be measured vertically across
the center of the frame opening. Tape each object to the top and
bottom of the frame, making sure the object is vertical and taut
(see Figure 6).
Cut out
Fishing
line
Human
hair
1.5 cm
1.5 cm
Figure 5.
Figure 6.
Procedure
1. Attach a small binder clip to one bottom corner of the frame as shown in Figure 6 so the frame will stand up.
2. Obtain a laser pointer. Note: Make sure you have read the safety precautions section regarding the use of lasers. Do not
press the power button to turn on the laser until the set-up is complete. Leaving the light on too long will affect its wavelength, which in turn will affect the results.
3. Use a medium binder clip as a stand for the laser by placing the laser pointer inside the medium clip
with the power button on top and visible beyond the edge of the clip (see Figure 7). The clip will help
keep the laser steady during use.
Power
button
4. Place the laser pointer and the frame on a table 1.5–3 meters away from a wall so the beam from the
laser will pass through the opening in the frame. Use a book or other object to set the laser in the correct position (See Figure 8).
Figure 7.
5. Tape a piece of white paper to the wall as a screen where the laser beam will shine when it is on.
6. Using a meter stick, measure and record the distance in millimeters from the frame to the
paper screen.
7. Holding the laser pointer steady, press the power button. Aim the laser beam directly at one
of the objects in the frame. When the laser is positioned correctly, a horizontal diffraction
pattern of light and dark bands will be seen on the screen, with a brighter red spot in the
middle (see Figure 4 from the Background section).
8. Once a clear diffraction pattern is visible, one partner should carefully mark the center of
one dark band and the center of the next dark band on the white paper. The marks may be
either to the right or the left of the middle spot, but not one on either side.
Paper
2 meters
Measurement
frame
Figure 8.
9. As soon as the marks have been made, release the power button on the laser.
10. Label the marks with the name of the object the laser beam was striking.
11. Repeat steps 7–10 with the other objects in the frame, using the same distance from the frame to the screen on the wall.
Adjust the frame to the right or left if necessary to ensure the diffraction pattern is in a different place on the screen than
the others. Observe and record any differences in the diffraction patterns made from one object to the next.
12. Measure and record ∆y in mm for each object.
13. Use Equation 1 from the Background section to calculate the width of each object in mm. Note: Lasers have a label with
the wavelength recorded in nanometers (nm). Convert nm to mm (1 nm = 1 × 10⁻⁶ mm).
–2–
© 2013 Flinn Scientific, Inc. All Rights Reserved.
11196
Sample Data Table (Student data will vary.)
Distance from
object to screen
L (mm)
Distance between
dark spaces
∆y (mm)
Wavelength
of laser light
λ (mm)
Object width
(mm)
Fishing line
2000
4
0.00065
0.33
Copper wire, 30-gauge
2000
5
0.00065
0.26
Human hair
2000
12
0.00065
0.11
Object
Connecting to the National Standards
This laboratory activity relates to the following National Science Education Standards (1996):
Unifying Concepts and Processes: Grades K–12
Systems, order, and organization
Evidence, models, and explanation
Constancy, change, and measurement
Content Standards: Grades 5–8
Content Standard A: Science as Inquiry
Content Standard B: Physical Science, properties and changes of properties in matter, transfer of energy
Content Standard E: Science and Technology
Content Standard G: History and Nature of Science, science as a human endeavor, nature of science
Content Standards: Grades 9–12
Content Standard A: Science as Inquiry
Content Standard B: Physical Science, structure and properties of matter, interactions of energy and matter
Content Standard E: Science and Technology
Content Standard G: History and Nature of Science, science as a human endeavor, nature of scientific knowledge
Tips
• The use of lasers in the classroom has significant educational value, and the safe use of lasers in the classroom is
possible. Please remind students how to safely use a laser. Request Flinn Safety Fax, The Safe Use of Lasers, Publication
No. 10167, for more information.
• Lasers are available from Flinn Scientific, Catalog No. AP8934. Laser pointers may also be purchased at some department stores or pet supply stores. Be sure to purchase lasers with clear certification and identification labels that include the
class, power, and wavelength.
• The longer the distance, L, the more spread out the diffraction pattern, but the bands will also be less distinct. Distances
from 1.5 to 3 meters are recommended for ease of measurement between bands.
• The diffraction pattern is more distinct in a dimly lit environment. Turning off classroom overhead lights should be sufficient for viewing the diffraction pattern if other sources of light enter the room. However, a completely dark classroom is
not recommended for safety reasons.
• The laser beam wavelength may vary on the order of ±30 nm from trial to trial because the wavelength depends on the
condition of the transistor. A laser that has been used continuously for several minutes may produce a light with a wavelength that is slightly different compared to when it was just turned on. Remind students to only turn on the laser when
their set-up is ready and to release the power button as soon as they have marked the distance between two dark bands on
the paper.
• The diameter of human hair varies, but is usually in the range of 20–180 μm (0.02–0.18 mm). The width of metal wires
may be found online (for example, the diameter of 30-gauge copper wire is 0.225 mm). Instruct students to calculate the
percent error between the measured and accepted values. Students may convert mm to μm if they measure human hair.
• This activity is available from Flinn Scientific as a student laboratory kit, AP7403, Measuring with Laser Light. Kit
includes a reproducible student worksheet and enough materials for six groups of students, including laser pointers.
–3–
© 2013 Flinn Scientific, Inc. All Rights Reserved.
11196
References
PhysicsQuest. Physics Central. http://www.physicscentral.com (accessed April 2013).
Toombes, G. Diffraction. Cornell Center for Materials Research [Online] March 2003. http://www.ccmr.cornell.edu/education
(accessed April 2013).
Materials for Measuring by Laser Diffraction are available from Flinn Scientific, Inc.
Catalog No.
AP7403
AP8934
Description
Measuring with Laser Light­—Student Laboratory Kit
Laser Pointer
Consult your Flinn Scientific Catalog/Reference Manual for current prices.
–4–
© 2013 Flinn Scientific, Inc. All Rights Reserved.
11196


