YOUR PRODUCT
CABLE CLAMP & GLAND PATTRESS
Thank you for purchasing this Factorylux product. It has been designed and
finished in the UK to give you many years of reliable service. Please read
these user instructions carefully. All user instructions available to
download at factorylux.com
WARNING
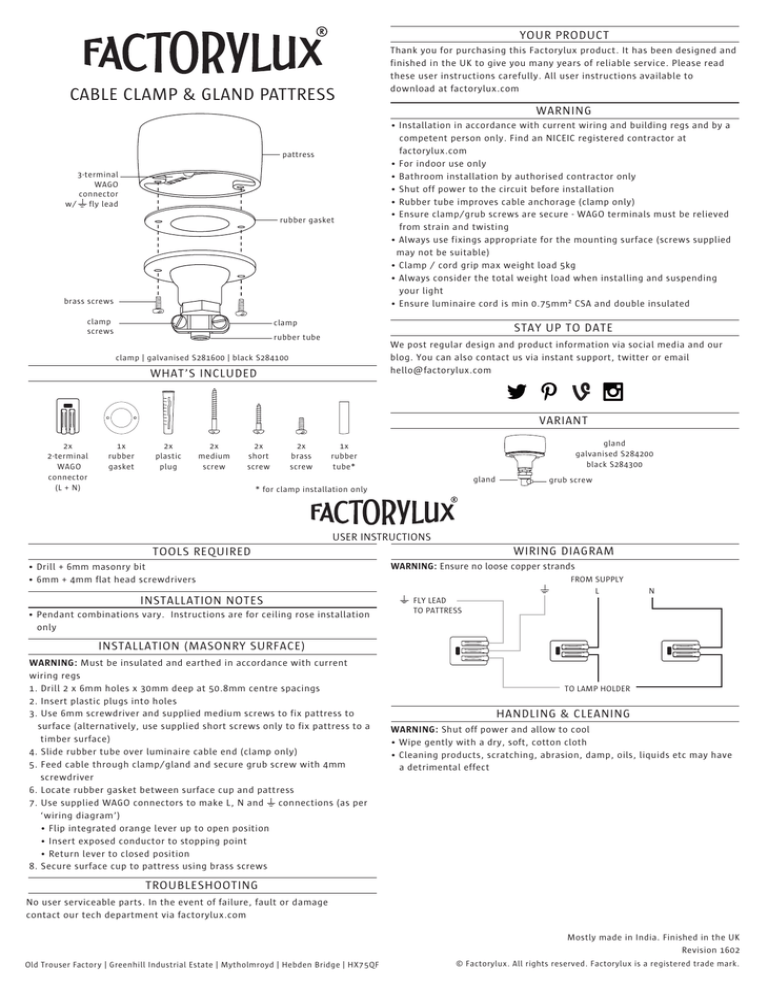
pattress
3-terminal
WAGO
connector
w/ fly lead
rubber gasket
brass screws
clamp
screws
• Installation in accordance with current wiring and building regs and by a
competent person only. Find an NICEIC registered contractor at
factorylux.com
• For indoor use only
• Bathroom installation by authorised contractor only
• Shut off power to the circuit before installation
• Rubber tube improves cable anchorage (clamp only)
• Ensure clamp/grub screws are secure - WAGO terminals must be relieved
from strain and twisting
• Always use fixings appropriate for the mounting surface (screws supplied
may not be suitable)
• Clamp / cord grip max weight load 5kg
• Always consider the total weight load when installing and suspending
your light
• Ensure luminaire cord is min 0.75mm² CSA and double insulated
clamp
STAY UP TO DATE
rubber tube
We post regular design and product information via social media and our
blog. You can also contact us via instant support, twitter or email
hello@factorylux.com
clamp | galvanised S281600 | black S284100
WHAT’S INCLUDED
VARIANT
2x
2-terminal
WAGO
connector
(L + N)
1x
rubber
gasket
2x
plastic
plug
2x
medium
screw
2x
short
screw
2x
brass
screw
gland
galvanised S284200
black S284300
1x
rubber
tube*
gland
grub screw
* for clamp installation only
USER INSTRUCTIONS
WIRING DIAGRAM
TOOLS REQUIRED
• Drill + 6mm masonry bit
• 6mm + 4mm flat head screwdrivers
INSTALLATION NOTES
• Pendant combinations vary. Instructions are for ceiling rose installation
only
WARNING: Ensure no loose copper strands
FROM SUPPLY
L
N
FLY LEAD
TO PATTRESS
INSTALLATION (MASONRY SURFACE)
WARNING: Must be insulated and earthed in accordance with current
wiring regs
1. Drill 2 x 6mm holes x 30mm deep at 50.8mm centre spacings
2. Insert plastic plugs into holes
3. Use 6mm screwdriver and supplied medium screws to fix pattress to
surface (alternatively, use supplied short screws only to fix pattress to a
timber surface)
4. Slide rubber tube over luminaire cable end (clamp only)
5. Feed cable through clamp/gland and secure grub screw with 4mm
screwdriver
6. Locate rubber gasket between surface cup and pattress
7. Use supplied WAGO connectors to make L, N and connections (as per
‘wiring diagram’)
• Flip integrated orange lever up to open position
• Insert exposed conductor to stopping point
• Return lever to closed position
8. Secure surface cup to pattress using brass screws
TO LAMP HOLDER
HANDLING & CLEANING
WARNING: Shut off power and allow to cool
• Wipe gently with a dry, soft, cotton cloth
• Cleaning products, scratching, abrasion, damp, oils, liquids etc may have
a detrimental effect
TROUBLESHOOTING
No user serviceable parts. In the event of failure, fault or damage
contact our tech department via factorylux.com
Mostly made in India. Finished in the UK
Revision 1602
Old Trouser Factory | Greenhill Industrial Estate | Mytholmroyd | Hebden Bridge | HX7 5QF
© Factorylux. All rights reserved. Factorylux is a registered trade mark.


