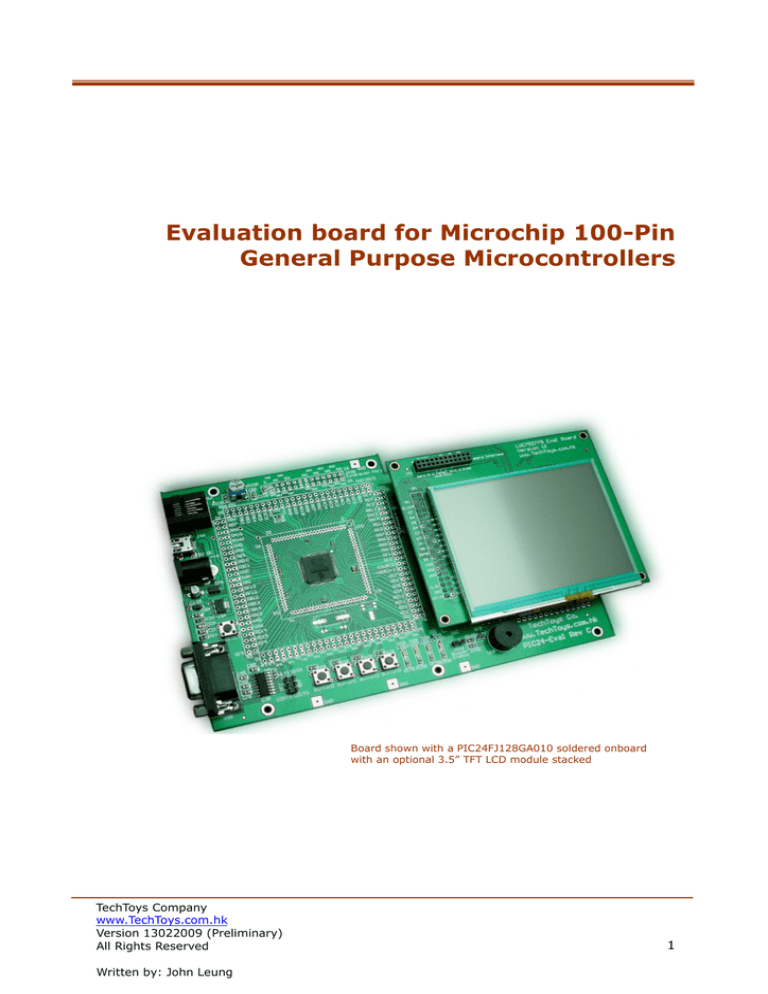
Evaluation board for Microchip 100-Pin
General Purpose Microcontrollers
Board shown with a PIC24FJ128GA010 soldered onboard
with an optional 3.5” TFT LCD module stacked
TechToys Company
www.TechToys.com.hk
Version 13022009 (Preliminary)
All Rights Reserved
Written by: John Leung
1
INTRODUCTION
The part number PIC24-Eval-Rev C provides a low cost platform to evaluate high pincount 16-bit/32-bit microcontrollers of Microchip. There are four ordering options
available:
(1)
PIC24-Eval-Rev C - Option for Plug-In-Module (w/o MCU)
This option omits the microcontroller onboard (designator U1A on schematic) leaving
only 100-pin Plug-in-module socket (designator U2A) therefore different microcontrollers
can be used for development.
No mcu soldered here,
leaving only 1.27mm
100-pin header for PIM
Processor Plug-In Modules (PIM) are small circuit boards to be used with the various
Microchip Development Boards, e.g. Explorer 16. Further information can be found from
Microchip web site at the following hyperlink.
http://www.microchip.com/stellent/idcplg?IdcService=SS_GET_PAGE&nodeId=1406&dDocName=en531260
Microchip is offering its PIM at incredible low cost of US$25.00, I would recommend
customers going directly to Microchip online if the target microcontroller model is
available in PIM format. However, we do offer innovative PIM for some of the Microchip
products to remap a lower MCU (e.g. PIC18F67J50) to 100-Pin PIM socket. The idea of
remap is to fully utilize peripherals of the PIC24 Eval board and at the same time,
minimize production cost to keep selling price lower than US$25.00. Please check our
company web site for details. Below please find a picture with a Microchip PIM for 16-bit
PIC24FJ128GA010 in place.
TechToys Company
www.TechToys.com.hk
Version 13022009 (Preliminary)
All Rights Reserved
Written by: John Leung
2
(2)
PIC24-Eval-Rev C - Option PIC24FJ128GA010 onboard
With just US$5.00 added to option 1, this board has got the PIC24FJ128GA010 16-bit
microcontroller soldered onboard to designator U1A in form of 12x12mm 100-lead TQFP
package.
(3)
PIC24-Eval-Rev C – Option PIC24FJ256GA110 onboard
If you are still not comfortable with 128kb Flash/8kb SRAM of PIC24FJ128GA010, you
may consider the third option with PIC24FJ256GA110. This powerful microcontroller
provides an ample Flash space of 256kb Flash/16kb SRAM. Besides, on top of all features
of PIC24FJ128GA010 family, there are the Peripheral Pin Select feature and Charge Time
Measurement Unit (CTMU) that open up new applications to this mcu. The Peripheral Pin
Select feature provides an alternative to user’s choice of peripheral functions (such as
UART and SPI) on a wide range of I/O pins. Therefore it is not restricted to use only pin
49 and pin 50 for U2RX and U2TX for UART. It is possible to map these pins to other I/O
pins for more hardware design flexibility. The Charge Time Measurement Unit is a flexible
analog module that provides accurate differential time measurement between pulse
sources as well as pulse generation, which is good for interface with capacitive-based
sensors, for example the Touch Sensing human interface.
(4)
PIC24-Eval-Rev C – Option PIC32MX360F512L onboard
Thanks to the compatibility design among PIC32 to PIC24 series, it is possible for us to
use the same footprint of 12x12mm TQFP-100 across these 16-bit to 32-bit MCU. This
option uses the same motherboard for Microchip 32-bit microcontroller of MIPS32 M4K
core running as high as 80MHz! The picture below shows a PIC32MX360F512L
microcontroller soldered. The same footprint would be used for PIC24FJ128GA010 or
PIC24FJ256GA110 as they are pin-compatible.
TechToys Company
www.TechToys.com.hk
Version 13022009 (Preliminary)
All Rights Reserved
Written by: John Leung
3
FEATURES
A rich set of on-chip peripherals such as Fast RC Oscillator, Real Time Clock & Calendar,
flexible Output Compare, & Parallel Master Port module (just to name a few of them)
differentiates PIC24/PIC32-series from previous PIC16 microcontrollers.
However, prototyping with PIC24/PIC32 series especially for 100-pin microcontrollers
could be difficult as they are offered in TQFP-100 package only. A tiny lead pitch of
merely 0.40mm makes it almost impossible for hand-solder. Our development board
offers a handy way to evaluate these 100-pin microcontrollers with the following features
1. Onboard AMS1117-3.3V linear regulator for a clean and regulated 3.3V
2. PICKit2 compatible header
3. ICD2/3 compatible socket
4. Double row 2.54mm headers for 0.100” (2.54) cables or DSO/Logic Analyzer
probes.
These headers are also useful for prototyping with any third-party modules that
don’t fit with our board readily. One may use 0.100” jumper cables for this
purpose. Each board comes with 20 pieces free 0.100” jumper cables. Picture
below shows how an Ethernet module
could be wired up with our board by
joining few jumper cables for the SPI
interface and power.
TechToys Company
www.TechToys.com.hk
Version 13022009 (Preliminary)
All Rights Reserved
Written by: John Leung
4
5. 2.54mm pin headers compatible with all our color LCD modules:
a. 3.5” QVGA TFT LCD with Touch Panel and external Solomon SSD1928
Image Processor
b. 2.8” QVGA TFT LCD with Touch Panel
c. 2.4” QVGA TFT LCD module
Picture below shows the result running a primitive demo for 2.8” TFT LCD
module with Touch Panel. The same headers can be used for both 2.4” and
3.5” LCD modules.
6. SD Card socket
7. UART interface via SIPEX SP3232
8. SPI eeprom (Atmel AT25256A) for storage of critical board information such as
calibration data for Touch Panel
9. 2x13 2.54mm receptacle for more “TechToy” such as nRF905 433 MHz wireless
module (shown below), nRF24L01 2.4GHz wireless module, and SHT1X digital
temperature/humidity sensor module. Because this receptacle has got several
important peripherals including SPI2 module, interrupt pins, Analog-to-digital
converter, and a few general
purpose IO pins from the
microcontroller, it would be just
a matter of imagination to use
this evaluation board for any
real-life applications.
10. Buzzer, LED, trimmer (for ADC
experiment), and tact switches
for user interface.
TechToys Company
www.TechToys.com.hk
Version 13022009 (Preliminary)
All Rights Reserved
Written by: John Leung
5
ANNOTATION: BOARD LAYOUT (board shown for 100-pin PIM header)
20
4
15
1
21
14
2
1
5
3
8
6
7
9
10
11
13
12
19
16
17
TechToys Company
www.TechToys.com.hk
Version 13022009 (Preliminary)
All Rights Reserved
Written by: John Leung
18
6
Function
Land pattern for 12x12mm 100-lead TQFP package. Microcontroller
– PIC24FJ128GA010 or PIC24FJ256GA110 or PIC32MX360F512L,
or no mcu soldered for PIM
Pads for pin header in 1.27mm pitch. These pads are compatible
with Plug-In Module (PIM) released by Microchip
ICSP connector compatible with Microchip ICD2 debugger
ICSP connector (pads only) compatible with Microchip PICKit2
programmer. Triangular mark indicates the MCLR pin
Double row 2.54mm PCB headers for jumper cables, and/or
DSO/Logic Analyzer probes
2.1mm DC power supply jack. Pin positive and the shell is ground.
A supply voltage of 5V recommended
AMS1117-3.3V linear voltage regulator supplies a stable 3.3V as
Vdd for the whole board
Mini-B type USB connector for 5V power supply from a PC. NO USB
D+/D- connection with this USB connector yet.
RESET switch connected to MCLR pin of the microcontroller.
Solder pads for the Primary Oscillator. Only a land pattern has
been provided for your choices of crystal frequency. Internal Fast
RC Oscillator has been used for examples in this manual therefore
this land pattern has been left empty.
Solder pads for the Secondary Oscillator, typically a 32.768kHz
would be used there for Real Time Clock applications.
Designator
U1A
12
13
Module header for TFT LCD modules released by TechToys.
Jumper select between 5V / 3.3V for backlight to LCD module. This
jumper is necessary for 2.4” or 3.5” LCD modules, but not required
for 2.8” LCD module from us.
J6C
J5C
14
15
SD Card Socket wired to the SPI2 module of the microcontroller
Atmel 25256A SPI eeprom for data storage, wired to SPI2 module
of the microcontroller
Sipex SP3232*, for UART connection with PC COMPORT.
The following signals have been routed to SP3232 transceiver:
(a) U2Tx and U2Rx of UART2 for transmit and receive
(b) U2RTS and U2CTS for handshake control. These signals are
optional. So, these control lines have been wired to two
selection jumpers J3B and J4B just next to SP3232 to share
with U1Tx and U1Rx. As a result, user may choose dual
UART, handshake control for UART2, or simply leave the
jumpers open for pure, single UART2 without any
handshake
J1B
U2B
1
2
3
4
5
6
7
8
9
10
11
16
17
18
19
20
21
* Please refer to schematic page 3 for details
Input control by four tact switches, wired to interrupt pins INT3,
INT4, and RD8, RD9.
Simple output to four LEDs to RD0:RD3
Buzzer, wired to RD0. It is multiplexed with LED0 with a jumper
JP1B.
10k trimmer for ADC experiments, wired to RB0 port
2*13 2.54mm headers compatible with TechToys modules incl.
nRF905 433MHz wireless module, nRF24L01 2.4GHz module,
SHT1x digital sensor module, etc.
TechToys Company
www.TechToys.com.hk
Version 13022009 (Preliminary)
All Rights Reserved
Written by: John Leung
U2A
J1A
J2A
JP1A-JP4A
J3A
U3A
J4A
SW1A
Y1A
Y2A
U3B
Button0 –
Button3
LED0 – LED3
Q1B
R22B
JP2B
7
GET STARTED
Most probably the first concern is the power supply.
There are two options, either a USB mini cable or
5V DC power supply. There is a current limit of
500mA from a PC’s USB port. Power supply from a
USB port is a convenient way; however, it is
advised to get an idea of current requirement prior
to USB power especially if you are using a heavy
duty module such as motor drive, MOSFET
applications, etc.
A good indication of current ratings is shown below:
Microcontroller: PIC24FJ128GA010 at 32MHz
AN1136 Demo for a 2.8” TFT LCD with backlight ON
CMOS camera life video application with a 3.5” TFT LCD
with backlight OFF
CMOS camera life video application with a 3.5” TFT LCD
with backlight ON
Simple LED blinky project
Current Ratings @ 5V D.C.
180mA
120mA
210mA
50mA
Every board we shipped would be preloaded with demo application for out-of-box testing.
The exact demo application would be different subject to different ordering option.
The last thing about power supply is the voltage level required. Because it is the
AMS1117-3.3V linear regulator onboard, the theoretical absolute maximum for input
voltage is 15V. However, it is recommended to limit the supply voltage to a regulated 5V
D.C. supply because the external input voltage is wired directly to backlight input of our
LCD modules as well. If one applied 9V D.C. (say) to the board and short the jumper J5C
to the upper two leads by mistake, one would be applying 9V D.C. to the backlight
module of the LCD, too. This will damage the LCD module’s backlight circuit for sure.
Therefore, it is advised to apply only a regulated 5V D.C. if you are not using a USB
cable. Reader is advised to consult the schematic for how J5C is wired to external input.
External input directly
fed to backlight supply
for jumper J5C
TechToys Company
www.TechToys.com.hk
Version 13022009 (Preliminary)
All Rights Reserved
Written by: John Leung
8
SOFTWARE: MPLAB C30 COMPILER
The MPLAB®C C30 compiler is a full-featured ANSI compliant C compiler for the
Microchip 16-bit PIC24 MCUs and dsPIC DSCs. MPLAB C30 v3.11b (or later) Student
Edition is free and thus this is used for examples in this manual. Microchip is generous to
offer this full-featured compiler for the first 60 days, and after 60 days only its
optimization levels would be limited.
Click the link below to download and see a full description of the compiler.
http://www.microchip.com/stellent/idcplg?IdcService=SS_GET_PAGE&nodeId=1406&dD
ocName=en010065&part=SW006012
If you accept the default installation path, you will get a bin directory under the folder
C:\Program Files\Microchip\MPLAB C30\. This bin folder contains the execute file.
It is assumed that MPLAB version 8.20 or later has been installed in your development
workstation. First create a new project under Project→
→New…in MPLAB. A New Project
window will pop up with Project Directory and Project Name information that you
need to fill in. Just create a directory of your convenience (my case being
D:\mcc30\projects\PIC24_Eval_RevC\PIC24FJ128GA010\Blinky\) and the first
project being the HelloWorld as the Project Name. If you don’t want to type it all over,
please download the full source code under Doc 04 at the following html link.
http://www.techtoys.com.hk/PIC_boards/PIC24-Eval-C/PIC24-Eval-RevC.htm
TechToys Company
www.TechToys.com.hk
Version 13022009 (Preliminary)
All Rights Reserved
Written by: John Leung
9
From Configure→
→Select Device… menu of the MPLAB, select PIC24FJ128GA010 as the
microcontroller to use (or PIC24FJ256GA110 if you have ordered this part number). Click
OK.
Click Project→
→Select Language Toolsuite to select Microchip C30 Toolsuite. Point
locations of all MPLAB ASM30 Assembler (pic30-as.exe), C30 C Compiler (pic30-gcc.exe),
LINK30 Object Linker (pic30-ld.exe), and LIB30 Archiver (pic30-ar.exe) to the right path
of the compiler. Click OK to exit upon finish.
TechToys Company
www.TechToys.com.hk
Version 13022009 (Preliminary)
All Rights Reserved
Written by: John Leung
10
All we have to do now is to create a new document and start programming. Under File,
click on New. A new document will be created with an empty template. Type in the
following code and save it as HelloWorld.c.
#include <p24fj128ga010.h>
//(1)
_CONFIG1(JTAGEN_OFF & FWDTEN_OFF)
_CONFIG2(FNOSC_FRCPLL & OSCIOFNC_OFF)
//(2)
//(3)
void delay(void)
{
int i=0;
//(4)
while(i++<20000);
}
int main (void)
{
char i;
//FRC postscaler divided by 1 (8MHz from internal RC)
CLKDIV = 0x0000;
LATD = 0xFFFF;
TRISD = 0xFFF0;
for(;;){
for (i=0; i<16; i++)
{
LATD = i;
delay();
}
}
return (0);
//(5)
//(6)
//(7)
//(8)
}
Line (1) includes the header file for PIC24FJ128GA010. Change it to PIC24FJ256GA110 if
you are using this option.
Line (2), (3), & (5) define the Configuration bit settings and clock postscaler of the
microcontroller. The oscillator source that is used at a device power-on reset is selected
using Configuration bit settings. This is very important for our development board
because there is no external crystal by default (OSC1 and
OSC2 pins empty). The default configuration for
FNOSC2:FNOSC0 is 1:1:1 (Fast RC Oscillator with
Postscaler). The postscaler value is configured in register
CLKDIV, with default value RCDIV2:RCDIV0 = 0:1:1. This
gives a clock speed of 1MHz (divided by 8). Therefore, if
we didn't configure the FNOSC values, the clock source of
the mcu would be given by FRC oscillator at 8MHz with a
postscaler divided by 8, giving a Fosc value of 1MHz with
cpu peripheral clock ratio set to 1:1. If we want to set a
faster cpu speed without using an external crystal, we need
to use the PLL (x4). This can be done by using the
configuration marco _CONFIG2(FNOSC_FRCPLL) provided by mcc30 compiler. The result
is a cpu clock speed of 4MHz (8MHz*4 divided by the postscaler 8). The full speed of the
mcu can be achieved by setting RCDIV2:RCDIV0 to 000 (divide by 1). Thus Fosc
becomes 32MHz. There is an easy way to monitor the cpu clock speed by setting RC15
pin to OSCO (Fosc/2). This can be done by using the _CONFIG2 configuration macro with
an argument OSCIOFNC_OFF. If RC15 digital IO function is required, we just use the
complementary argument OSCIOFNC_ON to get it back.
TechToys Company
www.TechToys.com.hk
Version 13022009 (Preliminary)
All Rights Reserved
Written by: John Leung
11
Line (4) declares a simple delay function for visual inspection. No accurate timing feature
applied yet.
Line (6) assigns LATD to 0xFFFF in which only pins RD[3:0] are useful for driving
LED3:LED0 onboard. One may also short jumper JP1B for audio signal because RD0 is
multiplexed with LED0 and BUZZER.
Line (7) assigns TRISD register to 0xFFF0 which in turns assigns PORTD to output for
pins RD[3:0].
Line (8) is the body of this program, simply set LATD to a counter “i” running from 0 to
15.
Right click on Source Files at the project workspace at the left Panel and add
HelloWorld.c to the Source Files. Optionally we may put p24FJ128GA010.h (under
C:\Program Files\Microchip\MPLAB C30\support\PIC24F\h\) to Header Files section for
reference purpose. That is all we need! Under Project, press Build to compile this
simple program.
TechToys Company
www.TechToys.com.hk
Version 13022009 (Preliminary)
All Rights Reserved
Written by: John Leung
12
The Output Window will show at least the project successfully compiled. Browse to the
project folder you will see there is a HelloWorld.hex file created. This is the hex file we
need to download to PIC24FJ128GA010 to build an embedded system.
PROGRAM SECTION
- ICD2 operation
The first choice is to use an ICD2 if you have one because it allows single code stepping
for program debug.
- PICKit2 operation
PIC24-Eval-Board C board is compatible with PICKit2. Match the triangular mark on
PICKit2 with the white triangular mark on board as shown below. The latest version is
V2.60 at time of writing, and its web site is:
http://www.microchip.com/stellent/idcplg?IdcService=SS_GET_PAGE&nodeId=1406&dD
ocName=en027813
RESULT
No matter what programming device or debugger you are using, the result is the same
for such simple program. You will find LED[3:0] blink in sequence and an audio beep
generated if the jumper JP1B short. Picture below also shows a DSO probe for RC15 to
monitor the clock speed, which was found to be 15.76 MHz by a Tektronix DSO.
TechToys Company
www.TechToys.com.hk
Version 13022009 (Preliminary)
All Rights Reserved
Written by: John Leung
13


