LZ2, LZ15
SERVICE
Taking A Unit Out Of Service
If a unit is to be deliberately taken out of service for an extended period, the positive (+) battery lead should be
disconnected from the charger/transfer module and insulated so that the battery will go into storage in a fully
charged condition.
Twin-Head Emergency Lighting Unit
Standard and Spectron® Equipped Models
Installation, Operation and Service Instructions
Replacing A Battery
1. De-energize the AC power.
2. Diserngage the housing cover from the backplate.
3. Disconnect battery leads.
4. Unfasten battery retaining strap and remove battery.
CAUTION: Unfastening battery retaining strap will allow battery to slide out of housing. Exercise proper battery support.
5. Replace with a new battery (see unit model label for correct part number) and attach battery retaining strap and battery leads.
6. Reassemble the unit.
IMPORTANT
SAFEGUARDS
When using electrical equipment, basic safety precautions should
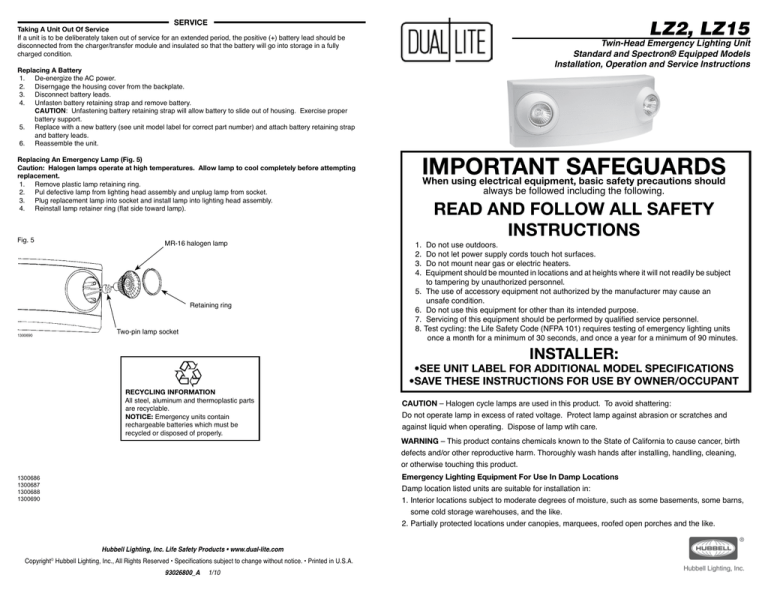
Replacing An Emergency Lamp (Fig. 5)
Caution: Halogen lamps operate at high temperatures. Allow lamp to cool completely before attempting
replacement.
1. Remove plastic lamp retaining ring.
2. Pul defective lamp from lighting head assembly and unplug lamp from socket.
3. Plug replacement lamp into socket and install lamp into lighting head assembly.
4. Reinstall lamp retainer ring (flat side toward lamp).
Fig. 5
MR-16 halogen lamp
Retaining ring
1300690
Two-pin lamp socket
always be followed including the following.
READ AND FOLLOW ALL SAFETY
INSTRUCTIONS
1. Do not use outdoors.
2. Do not let power supply cords touch hot surfaces.
3. Do not mount near gas or electric heaters.
4. Equipment should be mounted in locations and at heights where it will not readily be subject to tampering by unauthorized personnel.
5. The use of accessory equipment not authorized by the manufacturer may cause an
unsafe condition.
6. Do not use this equipment for other than its intended purpose.
7. Servicing of this equipment should be performed by qualified service personnel.
8.Test cycling: the Life Safety Code (NFPA 101) requires testing of emergency lighting units once a month for a minimum of 30 seconds, and once a year for a minimum of 90 minutes.
INSTALLER:
•SEE UNIT LABEL FOR ADDITIONAL MODEL SPECIFICATIONS
•SAVE THESE INSTRUCTIONS FOR USE BY OWNER/OCCUPANT
RECYCLING INFORMATION
All steel, aluminum and thermoplastic parts are recyclable.
NOTICE: Emergency units contain
rechargeable batteries which must be
recycled or disposed of properly.
CAUTION – Halogen cycle lamps are used in this product. To avoid shattering:
Do not operate lamp in excess of rated voltage. Protect lamp against abrasion or scratches and
against liquid when operating. Dispose of lamp wtih care.
WARNING – This product contains chemicals known to the State of California to cause cancer, birth
defects and/or other reproductive harm. Thoroughly wash hands after installing, handling, cleaning,
or otherwise touching this product.
Emergency Lighting Equipment For Use In Damp Locations
Damp location listed units are suitable for installation in:
1.Interior locations subject to moderate degrees of moisture, such as some basements, some barns, some cold storage warehouses, and the like.
2.Partially protected locations under canopies, marquees, roofed open porches and the like.
1300686
1300687
1300688
1300690
Hubbell Lighting, Inc. Life Safety Products • www.dual-lite.com
Copyright© Hubbell Lighting, Inc., All Rights Reserved • Specifications subject to change without notice. • Printed in U.S.A.
93026800_A
1/10
INSTALLATION
General Instructions
This unit is designed for mounting on a wall or ceiling. Provide each unit with a single unswitched supply from a
120VAC or 277VAC branch circuit used for normal lighting in the area to be protected.
Wall or Ceiling Mount Back Power Feed
Fig. 1
Fig. 2
Wall Mount - Surface Wiring
(Top Power Feed Only)
①
Installing The Unit: Final Assembly - All Models
1. Dress wires neatly to prevent pinching.
2. Align housing slots over back plate tabs (Fig 3).
3. Pivot housing and snap closed (Fig. 3).
4. Energize unit. Charge a minimum of 24 hours prior to testing.
5. Aiming the lamps (Fig 4):
Standard units - press test switch and hold.
Fig. 4
Spectron® equipped units - press test switch once for one
minute lamp illumination.
Fig. 3
①
②
②
③
④
④
1300688
③
OPERATION
When the AC circuit is initially energized, the status lamp on standard units will typically stay at full brilliance for
several hours before fading to a “dim” state, indicating the battery has charged to its normal float level.
On Spectron® equipped models, the green Status LED is iluminated when AC power is present.
NOTE: All models are supplied with an AC Lockout circuit, which prevents the emergency lights from
illuminating when the battery is connected and no AC power is present.
NOTE: All models are supplied with a Low Voltage Disconnect circuit, which prevents damage to the
battery from deep discharge during prolonged emergency operation.
⑧
NOTE: Batteries are often shipped in a discharged state – this is normal. The battery will require charging. Allow
several hours of charge before testing the unit.
⑤
⑤
⑥
1300687
⑥
⑦
1300686
⑦
⑧
Models With SPECTRON® Self-Testing/Self-Diagnostic Circuitry
Models equipped with the Spectron self-testing/self-diagnostic electronics system provide:
■ Visual indication of AC power status
Installing The Unit: Wall Or Ceiling Mount - Back Power Feed (Fig. 1)
1. Remove center ¾” KO in back plate.
2. Remove appropriate back plate KO’s for electrical box screws.
3. Feed wires through center KO and mount back plate to electrical box.
4. Attach unit housing to back plate by plastic hinge straps provided.
5. Connect building wires to transformer leads. Black and white wires for 120VAC (use wire nut to cap off red wire). Red and white wires for 277VAC (use wire nut to cap off black wire).
6. Connect red circuit board lead to (+) battery terminal.
7. Remote capacity models only: connect remote lighting load to yellow and (fused) blue pigtail leads provided.
8. The LZ2 and LZ15 may be ceiling mounted (through the back plate) by ensuring the plastic tabs in the back plate are securely attached to the front housing. In addition, the safety screw must be installed from the
outside of the housing through the reinforced boss located at the mid-point of the housing.
No. 8 security screw is shipped inserted in plastic hinge strap (see illustration above). Use pointed tool to remove KO at bottom center of unit chassis. After closing unit, install security screw through bottom KO
and tighten.
IMPORTANT: Safety security screw is not mandatory in standard wall mount application but may be installed if desired. The screw must be installed for ceiling mount.
9. To complete the installation see Final Assembly instructions on next page.
Installing The Unit: Wall Mount - Surface Wiring (Top Power Feed Only) (Fig. 2)
1. Remove keyhole KO’s in back plate and mount to wall.
2. Remove conduit entry KO at top flange of back plate.
3. Secure conduit (or surface raceway) to KO and feed wires.
4. Attach unit housing to back plate by plastic hinge straps provided.
5. Connect building wires to transformer leads. Black and white wires for 120VAC (use wire nut to cap off red wire). Red and white wires for 277VAC (use wire nut to cap off black wire).
6. Connect red circuit board lead to (+) battery terminal.
7. Remove arch KO in the top of the unit housing.
8. Remote capacity models only: connect remote lighting load to yellow and (fused) blue pigtail leads provided.
9. To complete the installation see Final Assembly instructions on next page.
■ Visual indication of self-diagnostic test cycles
—Visual indication of any unit malfunctions including—
■ Battery fault ■ Transfer Fault
■ Charger fault ■ Emergency Lamp fault
Spectron equipped units also include:
Brownout protection: unit will automatically transfer to emergency operation upon detection of low AC power
(approximately 80% of nominal line).
Time Delay Retransfer: upon return of normal AC power, unit will remain in the emergency mode for an additional
15 minutes to allow AC power to stabilize.
LED Status Indicators
Two status indicators, one green and one red, are
provided on the control panel of all models equipped
with the Spectron option.
Green Operating Status LED
The green Operating Status LED serves as both an
AC power and a self-test indicator. During normal
operation, the green Operating Status LED will be
illuminated, indicating the presence of AC power. During all automatic or manual self-test cycles, the green
Operating Status LED will blink at a 1 Hz. rate.
Red Service Alert LED
Under normal operating conditions, the red Service
Alert LED indicator will remain “off”. In the event the
Spectron controller detects a malfunction, the red
Service Alert LED will blink at a 1 Hz. rate, based on
the following table:
Red Status LED Code
Description
One blink ON/pause
Battery not connected
Two blinks ON/pause
Battery fault
Three blinks ON/pause
Charger fault
Four blinks ON/pause
Transfer circuit fault
Five blinks ON/pause
Emergency Lamp fault
Automatic Tests
The unit will automatically initiate a self-test/self-diagnostic
cycle based on the following table:
Testing Period
Duration of Test
Once a month
1 minute
Once every 6 months
30 minutes
Manual Tests
Using the unit test switch, users can initiate
different duration test cycles based on the
following table:
Initiating Action
Test Cycle
Press test switch once
1 minute
Press test switch twice
5 minutes
Press test switch three times
30 minutes
Press test switch four times
60 minutes
Pressing the test switch at any time after a test cycle has
begun cancels the remainder of the test and returns the unit
to normal operation.

