ACUIX TM Analog PTZ Dome Addendum FW2.9
The following information lists the changes and additions based on the most recent firmware
release (2.9) and is an addendum to the ACUIX Installation and Configuration Guide
(800-03140 Rev A). Refer to the full guide for detailed instructions and safety information.
New Protocols: Pelco P_AD and Pelco D_AD
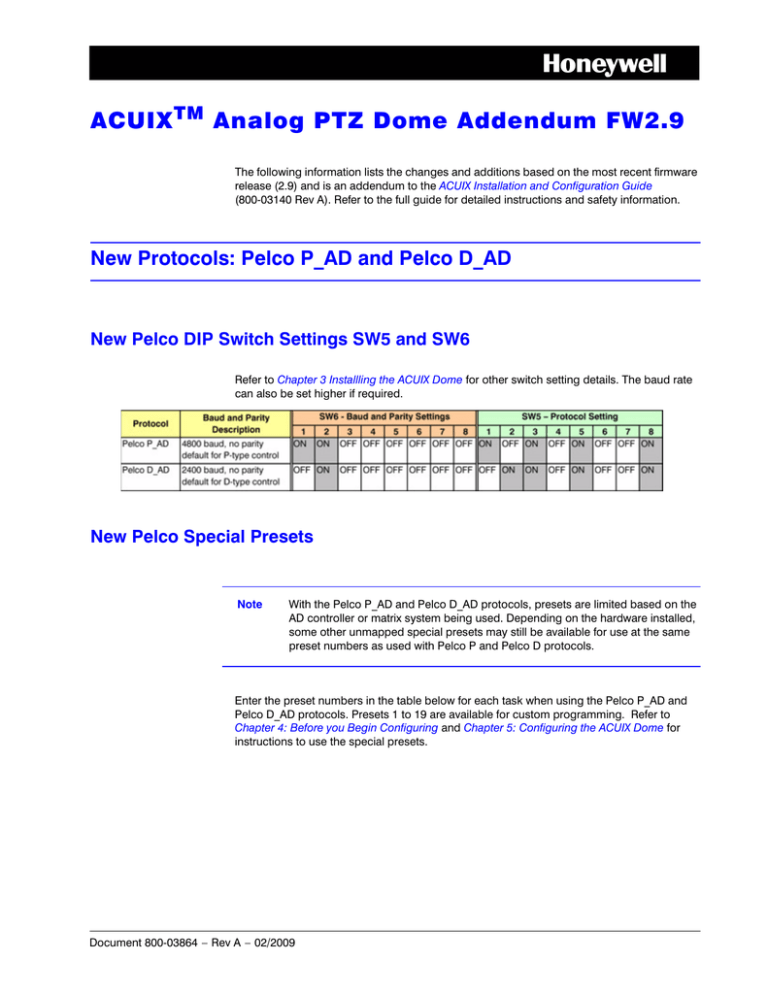
New Pelco DIP Switch Settings SW5 and SW6
Refer to Chapter 3 Installling the ACUIX Dome for other switch setting details. The baud rate
can also be set higher if required.
New Pelco Special Presets
Note
With the Pelco P_AD and Pelco D_AD protocols, presets are limited based on the
AD controller or matrix system being used. Depending on the hardware installed,
some other unmapped special presets may still be available for use at the same
preset numbers as used with Pelco P and Pelco D protocols.
Enter the preset numbers in the table below for each task when using the Pelco P_AD and
Pelco D_AD protocols. Presets 1 to 19 are available for custom programming. Refer to
Chapter 4: Before you Begin Configuring and Chapter 5: Configuring the ACUIX Dome for
instructions to use the special presets.
Document 800-03864 – Rev A – 02/2009
Preset
Function
20
Setup menu (on-screen display/OSD)
21
Toggle Nightshot ON and OFF
22
Toggles backlight compensation ON and OFF (preset 23 /auto exposure
must be ON)
23
Toggles auto exposure or iris ON and OFF (factory default is ON)
24
Run mimic tour menu
25
Program mimic tour menu
26
Stop or end mimic tour programming sequence
27
Run continuous preset tour menu
28
Administrator/password/PIN settings
29
Recover encrypted user login PIN
30
Camera lens reset or cycles the power (camera dependent)
31
Toggles between freeze and unfreeze
32
Run Flashback and toggle between two saved positions to return to a
scene of interest
The following presets may be available depending on the hardware installation.
73
Enable broadcast command receive mode
74
Disable broadcast command receive mode
80, 81, 82
Run mimic tours 1, 2 and 3
83, 84, 85
Program mimic tours 1, 2 and 3
87, 88, 89
Start/run preset tours 1, 2 and 3
Preset 75 Admin Login Screen: Privacy Zone Security Levels
Refer to Chapter 6: System Administration-Working with Passwords and PINs.
Firmware 2.9 has the following changes that affect the Admin Login Screen (preset 75)
menu.
•
•
2
The Admin Login Screen (accessed using preset 75) menu item 4 has been
changed from Delete all privacy zones to a new menu item to set the privacy zone
security level.
The option to delete all privacy zones has been removed (previously menu item 4 as
above). You can delete privacy zones one at a time using the Function
Programming menu as described in the manual on page 95.
ACUIX Analog: Firmware 2.9 Addendum
Setting the Privacy Zone Security Level to High or Low
Note
Even if the user or privacy zone login PIN is disabled, a password is still
required to enter the Admin Login/Password Settings menu.
1.
Ensure you have manual control of the dome.
2.
Press 75 ➤ Preset.
3.
Enter the 4-digit PIN. The default is 1000.
4.
Select 4 PrivZone Security Level ➤ High (default) or Low.
•
•
If the security level is set to High, you cannot program the privacy zone at a
zoom level of more than 10X and the mask size is increased once a zone is
programmed. Also while zooming in/out the patch size increases to prevent
objects from being uncovered.
If the security level is set to Low, you can program the privacy zones at any
zoom level and the mask size is not increased once a zone is programmed.
This means that when you zoom in or out quickly, the privacy zone may
uncover the object.
NightShot and WDR Changes for TDN Cameras
Firmware 2.9 has the following default changes that affect the NightShot Control and OSD
menus available with TDN cameras (models HDXJ, HDXF and HDXG).
Refer to Chapter 5: Configuring the ACUIX Dome - Configuring the Image Quality and
Video Display Settings starting on page 74 for information.
•
•
•
NightShot is enabled as the default.
The thresholds to activate and deactivate NightShot have been changed: activation
occurs at 20 db and deactivation at 0 db.
Wide dynamic range is automatically turned OFF when NightShot is turned on and
WDR is turned back ON when NightShot is OFF (if WDR was turned ON previously).
HDXJ 18X and HDXF 26X Cameras - Defaults Changed
Task/Action with Default
Notes
Setting NightShot Control (TDN) to Manual or Auto
1.
Press 92 ➤ Preset to turn auto exposure ON.
2.
Select 5 Camera Options ➤ 3 NightShot Control ➤ 1
NightShot Mode ➤ MAN or AUTO (default).
Document 800-03864 Rev A
02/2009
Available with camera models HDXJ,
HDXF and HDXG (NOT HDXA).
3
Task/Action with Default
Notes
Activating NightShot (TDN)
1.
Set NightShot mode to Auto.
2.
Select 5 Camera Options ➤ 3 NightShot Control ➤ 3
Activate NightShot.
3.
Toggle between the available gain and shutter speed values.
a.
Gain Settings
•
b.
0dB, 2dB, 4dB, 6dB, 8dB, 10dB, 12dB, 14dB, 16dB,
18dB, 20dB (default), 22dB, 24dB, 26dB, 28dB.
Shutter Speed Settings
•
PAL = 1/3 sec, 1/6 sec, 1/12 sec, 1/25 sec, or 1/50 sec.
•
NTSC = 1/4 sec, 1/8 sec, 1/15 sec, 1/30 sec, or 1/60
sec.
Available with camera models HDXJ,
HDXF.
Keep the activation and deactivation
settings slightly apart to ensure that there
is always some deadband between the
activate and deactivate levels. The
amount of deadband can be adjusted to
prevent the dome from oscillating
between the NightShot activated and
deactivated modes.
Deactivating NightShot (TDN)
1.
Select 5 Camera Options ➤ 3 NightShot Control ➤ 4
Deactivate NightShot.
•
Toggle between the available gain and shutter speed values.
a.
Gain Settings
•
b.
4
0dB (default), 2dB, 4dB, 6dB, 8dB, 10dB, 12dB, 14dB,
16dB, 18dB, 20dB, 22dB, 24dB, 26dB, 28dB.
Shutter Speed Settings
•
PAL = 1/3 sec, 1/6 sec, 1/12 sec, 1/25 sec, or 1/50 sec.
•
NTSC = 1/4 sec, 1/8 sec, 1/15 sec, 1/30 sec, or 1/60
sec.
Available with camera models HDXJ and
HDXF.
ACUIX Analog: Firmware 2.9 Addendum
HDXG 35X Camera Blocks Only - Defaults Changed
Firmware 2.9 has the following default changes for the HDXG 35X camera blocks:
•
•
Default values at startup changed for exposure level (from 91 to 116), chroma level
(from 140 to 127) and AE mode (from AE to AE +1).
AER + 5 corrected to AER +2
Task/Action with Default (HDXG Camera Models Only)
Notes
Setting the Auto AE Mode
1.
Select 5 Camera Options ➤ 2 Exposure Control ➤ 1 Auto
AE Mode.
2.
Select from the available settings (see Table 0-1) displayed
below the menu options. The default mode is AER + 1.
The controller and the camera must be in
auto iris mode.
Setting
NightShot
Control
Auto
NightShot
Sensitivity
Digital Slow
Shutter
Auto AE Mode
MAN
NA
OFF
Auto AER1 Mode
AUTO
HIGH
OFF
Auto AER1 Mode
AUTO
MID
OFF
Auto AE+ Mode
MAN
NA
AUTO
Auto AE+ 1 Mode (default)
AUTO
HIGH
AUTO
Auto AER +2 Mode
AUTO
MID
AUTO
Auto AER +3 Mode
AUTO
LOW
AUTO
Changing the Exposure Level
1.
Select 5 Camera Options ➤3 Video Setup ➤ 1 Exposure
Level.
2.
Enter a number between 0 and 255 where:
•
•
•
HDXG cameras only.
116 (default)
0 = dark
255 = bright
Changing the Chroma Level
1.
Select 5 Camera Options ➤ 3 Video Setup ➤ 3 Chroma
Level.
2.
Enter a number between 0 and 255 where:
•
•
•
HDXG cameras only.
127 (default)
0 = no color
255 = color is saturated
Document 800-03864 Rev A
02/2009
5
Honeywell Systems Group (Head Office)
2700 Blankenbaker Pkwy, Suite 150
Louisville, KY 40299, USA
www.honeywellvideo.com
℡ +1.800.796.2288
Honeywell Systems Group Northern Europe
Ampèrestraat 41
1446 TR Purmerend, The Netherlands
www.honeywell.com/security/nl
℡ +31.299.410.200
Honeywell Systems Group Europe/South Africa
Aston Fields Road, Whitehouse Industrial Estate
Runcorn, Cheshire, WA7 3DL, UK
www.honeywell.com/security/uk
℡ +44.01928.754028
Honeywell Systems Group Deutschland
Johannes-Mauthe-Straße 14
D-72458 Albstadt, Germany
www.honeywell.com/security/de
℡ +49.74 31.8 01.0
Honeywell Systems Group Pacific
Unit 5, Riverside Center, 24-28 River Road West
Parramatta, NSW 2150, Australia
www.honeywellsecurity.com.au
℡ +61.2.8837.9300
Honeywell Systems Group France
Immeuble Lavoisier
Parc de Haute Technologie
3-7 rue Georges Besse
92160 Antony, France
www.honeywell.com/security/fr
℡ +33.(0).1.40.96.20.50
Honeywell Systems Group Asia
35F Tower A, City Center, 100 Zun Yi Road
Shanghai 200051, China
www.asia.security.honeywell.com
℡ +86 21.5257.4568
Honeywell Systems Group Italia SpA
Via della Resistenza 53/59
20090 Buccinasco
Milan, Italy
www.honeywell.com/security/it
℡ +39.02.4888.051
Honeywell Systems Group Middle East/N. Africa
Post Office Box 18530
LOB Building 08, Office 199
Jebel Ali, Dubai, United Arab Emirates
www.honeywell.com/security/me
℡ +971.04.881.5506
Honeywell Systems Group España
Mijancas 1. 3a planta
P.Ind. Las Mercedes
28022 Madrid, Spain
www.honeywell.com/security/es
℡ +34.902.667.800
www.honeywellvideo.com
+1.800.796.CCTV (North America only)
HVSsupport@honeywell.com
Document 800-03864 – Rev A – 02/2009
© 2009 Honeywell International Inc. All rights reserved. No part of this publication may be reproduced by any means without written
permission from Honeywell. The information in this publication is believed to be accurate in all respects. However, Honeywell cannot
assume responsibility for any consequences resulting from the use thereof. The information contained herein is subject to change
without notice. Revisions or new editions to this publication may be issued to incorporate such changes.


