52180-89
1720D Turbidimeter Photocell Assembly Replacement
To replace the photocell assembly (Cat. No. 52180-00), perform the following steps.
1. Remove power from the PS1201 Power Supply that is connected to the 1720D Turbidimeter
head assembly. Ensure the “POWER” LED on the 1720D head is not lit.
Note: Perform all
assembly and
disassembly at an
EDS work station
while wearing a
grounding strap to
avoid damage to the
circuit board.
2. Remove the 1720D head from the turbidimeter body. Turn the 1720D head over so the
photocell faces up.
3. Remove the five Phillips-head screws (Cat. No. 5587-11) from the perimeter of the
turbidimeter head assembly.
4. Separate the turbidimeter head assembly into two parts. The top (Cat. No. 52018-00)
contains the circuit board and the cable connected to the PS1201. The bottom (Cat. No.
52017-00) contains the photocell and lamp.
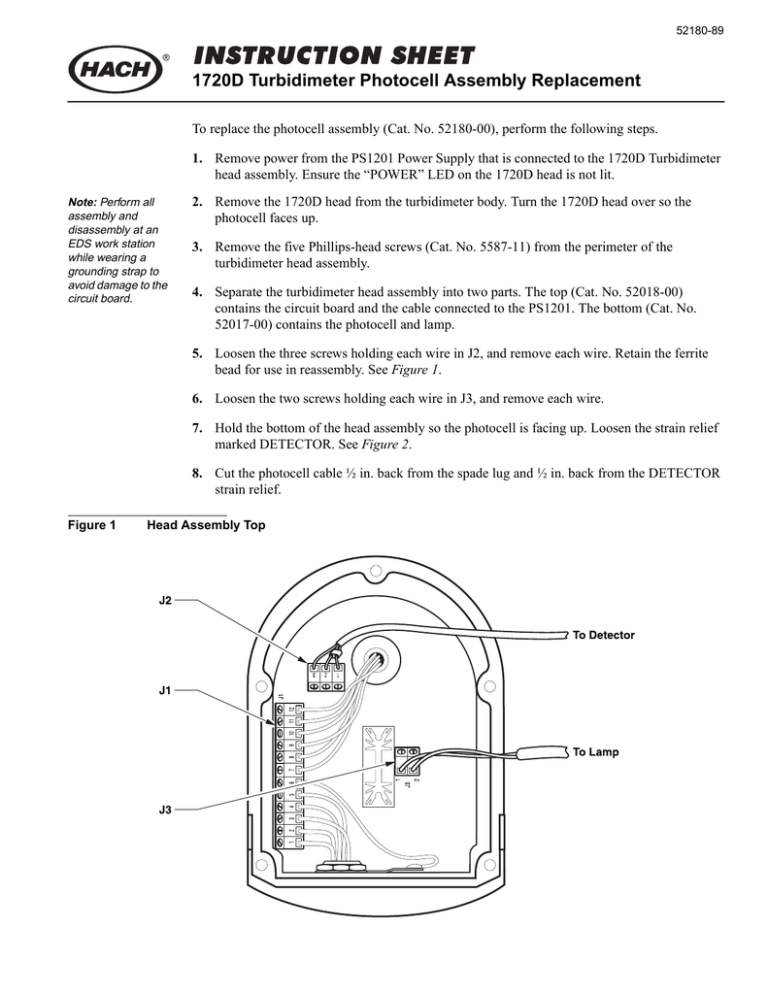
5. Loosen the three screws holding each wire in J2, and remove each wire. Retain the ferrite
bead for use in reassembly. See Figure 1.
6. Loosen the two screws holding each wire in J3, and remove each wire.
7. Hold the bottom of the head assembly so the photocell is facing up. Loosen the strain relief
marked DETECTOR. See Figure 2.
8. Cut the photocell cable ½ in. back from the spade lug and ½ in. back from the DETECTOR
strain relief.
Figure 1
Head Assembly Top
1720D Turbidimeter Photocell Assembly Replacement, continued
9. Pull the photocell wire out of the strain relief.
10. Remove the heat shrink tubing on the photocell stem to expose the nut holding the photocell
onto the assembly.
11. Using a 7/16 in. wrench, turn the nut counterclockwise several turns.
12. Remove the spade lug from the stem, and cut the wire attached to the photocell.
13. Remove the nut, flat washer, and lock washer from the photocell stem.
14. Pull the photocell assembly away from the lamp, removing the assembly from the
cap bottom.
15. Feed the wires and stem of the replacement photocell assembly (Cat. No. 52005-00) through
bottom hole of optical head. Make sure the outer shield drain wire of the cable is free from
the hole.
Figure 2
Head Assembly Bottom
2
1720D Turbidimeter Photocell Assembly Replacement, continued
16. On photocell stem, place a flat washer (Cat. No. 6959-12), a split washer (Cat. No. 16185-00)
and a hex nut (Cat. No. 15585-00).
17. After the hardware is in place, remove the red insulation sleeve from the spade lug
(Cat. No. 52073-00) and crimp it onto the shield wire.
18. Place spade lug between the flat washer and plastic, and tighten the nut until just snug with a
7/16 in. wrench. Do not over tighten!
19. Bend the spade lug 90° so it lays flat against the nut. Place a 2.0 in. length of heat shrink
tubing (Cat. No. 40707-00) over the photocell cable until it rests against the detector head.
20. Shrink tubing with a heat gun. Dress the cable so it lays between the lamp base mold feature
and inside edge of the optical head (Cat. No. 52179-00).
21. Run photocell assembly cable through strain relief marked DETECTOR, leaving about 5 in.
protruding. Tighten the strain relief.
22. Position the head assembly bottom next to the head assembly top. Thread the black and
red wire through the ferrite bead (Cat. No. 52620-00) before installing the wires in the
connector.
23. Install photocell wires into connector J2 in the head assembly top according to Table 1.
Table 1 Terminal Block J2 Wire Colors
Position
Wire Color
Wire Source
1
Black
Photocell
2
Red
Photocell
3
Shield
Photocell
24. Install the lamp wires into connector J3 according to Table 2.
Table 2 Terminal Block J3 Wire Colors
Position
Wire Color
Wire Source
1
Black
Lamp
2
Red
Lamp
3
1720D Turbidimeter Photocell Assembly Replacement, continued
When wiring is complete, reassemble the turbidimeter head assembly as follows:
1. Place five washers (Cat. No. 6956-12) on five Phillips-head screws (Cat. No. 5587-11).
2. Make sure the gasket (Cat. No. 52028-00) between the two components is in place and route
all wires so they do not come in contact with the lamp heatsink.
3. Position the head assembly top on the head assembly bottom. Before tightening the screws,
make sure no wires are pinched between the two halves.
4. Place the five screws and washers assembled in step 1 into the holes in the cap bottom
and tighten.
5. Place the 1720D head on the body. Restore power to the PS1201 which is supplying power
to the 1720D, and ensure the power LED is on.
Recalibrate the 1720D turbidimeter per the user manual.
For Technical Assistance, Price and Ordering
In the U.S.A.—Call 800-227-4224
© Hach Company, 1998. All rights reserved. Printed in the U.S.A.
dd/dp 6/98

