Automatic Fish Feeder (FF-03) Instruction Manual
advertisement

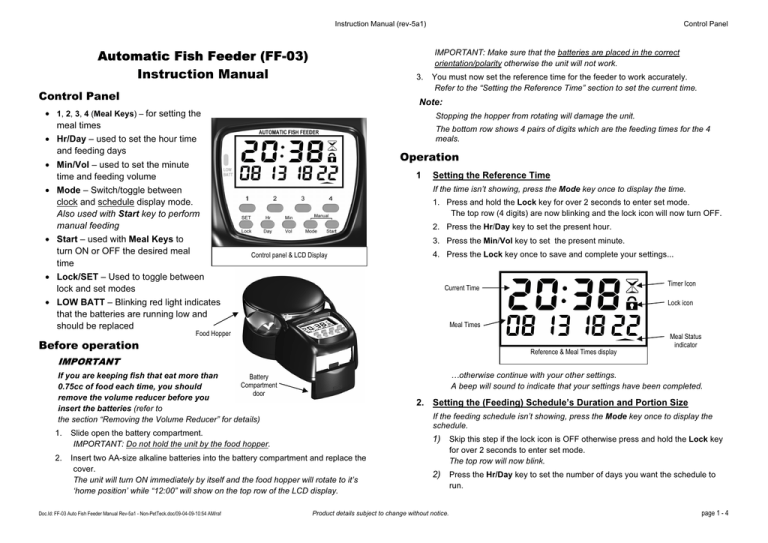
Instruction Manual (rev-5a1) Control Panel IMPORTANT: Make sure that the batteries are placed in the correct orientation/polarity otherwise the unit will not work. Automatic Fish Feeder (FF-03) Instruction Manual 3. Control Panel You must now set the reference time for the feeder to work accurately. Refer to the “Setting the Reference Time” section to set the current time. Note: • 1, 2, 3, 4 (Meal Keys) – for setting the meal times Stopping the hopper from rotating will damage the unit. The bottom row shows 4 pairs of digits which are the feeding times for the 4 meals. • Hr/Day – used to set the hour time and feeding days Operation • Min/Vol – used to set the minute time and feeding volume 1 Setting the Reference Time • Mode – Switch/toggle between clock and schedule display mode. Also used with Start key to perform manual feeding If the time isn’t showing, press the Mode key once to display the time. • Start – used with Meal Keys to turn ON or OFF the desired meal time 3. Press the Min/Vol key to set the present minute. 1. Press and hold the Lock key for over 2 seconds to enter set mode. The top row (4 digits) are now blinking and the lock icon will now turn OFF. 2. Press the Hr/Day key to set the present hour. Control panel & LCD Display • Lock/SET – Used to toggle between lock and set modes 4. Press the Lock key once to save and complete your settings... Timer Icon Current Time • LOW BATT – Blinking red light indicates that the batteries are running low and should be replaced Lock icon Meal Times Food Hopper Meal Status indicator Before operation Reference & Meal Times display IMPORTANT …otherwise continue with your other settings. A beep will sound to indicate that your settings have been completed. If you are keeping fish that eat more than Battery Compartment 0.75cc of food each time, you should door remove the volume reducer before you insert the batteries (refer to the section “Removing the Volume Reducer” for details) 2. Setting the (Feeding) Schedule’s Duration and Portion Size If the feeding schedule isn’t showing, press the Mode key once to display the schedule. 1. Slide open the battery compartment. IMPORTANT: Do not hold the unit by the food hopper. 1) Skip this step if the lock icon is OFF otherwise press and hold the Lock key 2. Insert two AA-size alkaline batteries into the battery compartment and replace the cover. The unit will turn ON immediately by itself and the food hopper will rotate to it’s ‘home position’ while “12:00” will show on the top row of the LCD display. 2) Press the Hr/Day key to set the number of days you want the schedule to Doc.Id: FF-03 Auto Fish Feeder Manual Rev-5a1 - Non-PetTeck.doc/09-04-09-10:54 AM/raf for over 2 seconds to enter set mode. The top row will now blink. Product details subject to change without notice. run. page 1 - 4 Instruction Manual (rev-5a1) Operation Setting the meal time in increasing order is a must (i.e. 4th meal-time > 3rd meal-time > 2nd meal-time > 1st meal-time) otherwise... ...the faulty meal-time setting and the remaining meals(s) will not be served. An alarm will sound when the schedule is finished. Set the duration to 0 (zero) to feed without the alarm. 3) Press the Min/Vol key to set the desired portion size. A value of 1 = 0.75cc of food so 2 = 1.5cc, 3 = 2.25cc, etc. Refer to the “Removing the Volume Reducer” section for larger portion-sizes. If you turn off the alarm, the feeding schedule will restart automatically. 4 4) Press the Lock key once to save and complete your settings… Manual feeding of your fish Under lock mode, press the Start and Mode keys together, once. Only 1 volume will be dispensed. …otherwise continue with your other settings. A beep will sound to indicate that your settings have been completed. Your schedule and quantity settings will not be affected. colon Duration of Schedule (in days) Portion Size Timer Icon Current Time Lock icon Feeding schedule and portion size display Meal Times Note: Meal Status indicator To avoid overfeeding: Check to see how much food your fish can eat in 5 to 10 minutes and use that as a guide. To turn schedule OFF: Set the Schedule Duration to zero (0). 3 Reference & Meal Times display 5 Setting the Meal Time(s) and Feeding Frequency Press the Mode key to toggle between the current time display and (feeding) schedule display. Under schedule display mode, the colon is not displayed. 1) Skip this step if the lock icon is OFF otherwise press and hold the Lock key for over 2 seconds to enter set mode. The top row (4 digits) are now blinking and the lock icon will now turn OFF. Note: 2) Press and hold the Start key and then the desired Meal Key to toggle ON or Off the meal time. Pressing the same will turn the meal OFF if it is already ON. Up to 4 meals can be turned ON. st nd a) On the top row, the 1 and 2 digits indicate the feeding duration (length of schedule in days) while the 4th digit is for the feeding volume. b) The bottom row shows the time in hours for the active meals. To activate a meal, refer to “Setting the (Feeding) Schedule’s Duration and Portion Size” section. 3) Press the Meal Key below the meal time to set the meal time if the digit is ON. 4) Press the Lock key once to lock and save your entries… …otherwise continue with your other settings. c) Below the meal time digits are the Meal-status Indicators. - No indicator means the time has already passed. - A blinking indicator means the time is the next meal time. - A solid indicator means the meal time has not been reached. Note: To stop feeding: Turn OFF all 4 meals and no digit will be displayed on the bottom row. The timer icon will also turn OFF. The feeding schedule will start automatically if any meal time is turned ON and will continue every day. Doc.Id: FF-03 Auto Fish Feeder Manual Rev-5a1 - Non-PetTeck.doc/09-04-09-10:54 AM/raf Reviewing the settings 6 End-Of-Schedule(EOS) Alarm • Your new Automatic Fish Feeder has an ALARM (a continuous beeping) to alert you to when your feeding schedule has ended. Product details subject to change without notice. page 2 - 4 Instruction Manual (rev-5a1) • The EOS alarm will start at 6:00am the next day to avoid disturbing anybody during the night. • You can press any key to turn off the alarm • The feeder will continue to feed even if the alarm is on. General Notes General Notes Package Contents Your Fish Feeder comes pre-assembled with the base already attached to the bottom of the unit. The accessories are placed in the food-hopper while the 2 pieces of foam padding are in the poly-bag that hold the unit. Pic. 1 – Mounting parts, shows the items included for installing it onto a fish-tank. Installing the unit a) The clock will only display in 24 hour format (military time). b) The schedule duration can be changed at any time but the previous st schedule will be replaced and start from the 1 day. 1 Attaching the Mounting Clamps 1. c) The meal time(s) and feeding-volume can be changed at any time and the new settings will be kept for the rest of the schedule. Slide the front mounting clamp in from the back towards the front. When it reaches the locking-stops (left picture), just push slightly harder and it will d) Once the schedule has started, the DAYS displayed will be deducted by 1 every day at 0:00(midnight() until the end is reached. It will then reset itself back to the number of DAYS you had originally entered. e) If the LOW BATT indicator(red light) blinks, the batteries are low and must Mounting Clamps Rear & Front Front clamp at End Push be replace as soon as possible. Thin spacers Locking stops Mounting Foam, 2pcs Thick spacers Mounting Base move to it’s final position (right picture). 2. Slide the rear mounting clamp in half way and turn the mounting base over. Suction cups 4pcs. Correct Pic. 1 – Mounting parts Doc.Id: FF-03 Auto Fish Feeder Manual Rev-5a1 - Non-PetTeck.doc/09-04-09-10:54 AM/raf WRONG Now, adjust the space between the clamps to the general thickness of the fish tank’s edge. Product details subject to change without notice. page 3 - 4 Instruction Manual (rev-5a1) 3. 2 Test the fit by placing it on the edge of the fish tank and squeezing the clamps together to achieve a snug fit. The unit should not look like the above-right picture. Attaching the unit to the Mounting Base 1. Line up the mounting posts with their corresponding holes on the mounting base. Connecting an Air Hose to the unit Removing the Volume Reducer The fish-feeder comes with the volume reducer already installed in your unit and effectively halves the portion sizes. Without it, a volume-setting of 1 will yield 1.5cc (2 gives 3.0cc while 3 will equal 4.5cc, etc). If you are keeping larger fish that require larger portions, please follow the instructions below to remove the Volume Reducer. 1. If there are no batteries in the unit then move on to step 2 otherwise remove the batteries first. 2. Holding the unit firmly with one hand and the food hopper with the other, gently pull off the hopper. Volume Reducer mounting holes 2. mounting posts Axle Index Carefully press the base into the unit securely. The unit can now be installed onto the fish tank. You should be able to see the Volume Reducer now (picture above). Note the axle index. Connecting an Air Hose to the unit To keep the fish-food from clumping together while in the hopper, an air-hose from your pump can be connected to the unit (as instructed below). 1. 3. Using a small flat-head screw-driver (as below), carefully and softly pry out the reducer one side at a time until it can be easily removed. Turn the unit upside-down and you will see the air-hose nozzle (right picture). Air-hose nozzle Pry from both sides 4. 2. Re-install the food-hopper back onto the feeder by aligning the hopper’s axle index to the feeder’s (see step 2 above) and pressing them together. Insert the air-hose through the mounting base hole and connect it to the airhose nozzle tightly (see illustration above). Doc.Id: FF-03 Auto Fish Feeder Manual Rev-5a1 - Non-PetTeck.doc/09-04-09-10:54 AM/raf Product details subject to change without notice. Rev-5a1 page 4 - 4


