Pico Protein Assay Quick Guide
LabChip® GXII Touch
Note: We highly recommend that first-time users read the full User Guide
for this assay before proceeding.
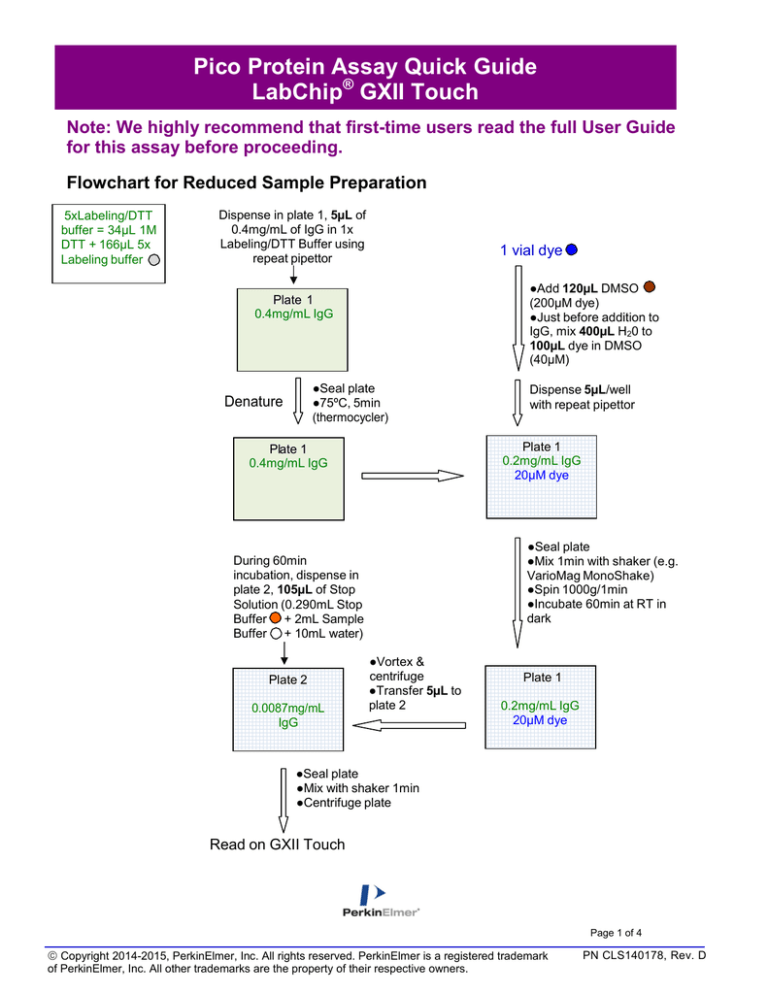
Flowchart for Reduced Sample Preparation
5xLabeling/DTT
buffer = 34µL 1M
DTT + 166µL 5x
Labeling buffer
Dispense in plate 1, 5µL of
0.4mg/mL of IgG in 1x
Labeling/DTT Buffer using
repeat pipettor
1 vial dye
●Add 120µL DMSO
(200µM dye)
●Just before addition to
IgG, mix 400µL H20 to
100µL dye in DMSO
(40µM)
Plate 1
0.4mg/mL IgG
●Seal plate
●75ºC, 5min
(thermocycler)
Denature
Plate 1
0.2mg/mL IgG
20µM dye
Plate 1
0.4mg/mL IgG
●Seal plate
●Mix 1min with shaker (e.g.
VarioMag MonoShake)
●Spin 1000g/1min
●Incubate 60min at RT in
dark
During 60min
incubation, dispense in
plate 2, 105µL of Stop
Solution (0.290mL Stop
Buffer + 2mL Sample
Buffer + 10mL water)
Plate 2
0.0087mg/mL
IgG
Dispense 5µL/well
with repeat pipettor
●Vortex &
centrifuge
●Transfer 5µL to
plate 2
Plate 1
0.2mg/mL IgG
20µM dye
●Seal plate
●Mix with shaker 1min
●Centrifuge plate
Read on GXII Touch
Page 1 of 4
Copyright 2014-2015, PerkinElmer, Inc. All rights reserved. PerkinElmer is a registered trademark
of PerkinElmer, Inc. All other trademarks are the property of their respective owners.
PN CLS140178, Rev. D
Pico Protein Assay Quick Guide
LabChip® GXII Touch
Flowchart for Nonreduced Sample Preparation
5xLB/1M NEM buffer
= 20µL 10M NEM in
DMSO + 14µL water
+ 166µL 5x Labeling
buffer
Dispense in plate 1, 5µL of
0.4mg/mL of IgG in 1x
Labeling buffer/200mM NEM
Buffer using repeat pipettor
●Add 120µL DMSO
(200µM dye)
●Just before addition to
IgG, mix 400µL H20 to
100µL dye in DMSO
(40µM)
Plate 1
0.4mg/mL IgG
●Seal plate
●75ºC, 5min
(thermocycler)
Denature
●Seal plate
●Mix 1min with shaker (e.g.
VarioMag MonoShake)
●Spin 1000g/1min
●Incubate 60min at RT in
dark
During 60min
incubation, dispense in
plate 2, 105µL of Stop
Solution (0.290mL Stop
Buffer + 2mL Sample
Buffer + 10mL water)
0.0087mg/mL
IgG
Dispense 5µL/well
with repeat pipettor
Plate 1
0.2mg/mL IgG
20µM dye
Plate 1
0.4mg/mL IgG
Plate 2
1 vial dye
●Vortex &
centrifuge
●Transfer 5µL to
plate 2
Plate 1
0.2mg/mL IgG
20µM dye
●Seal plate
●Mix with magnetic shaker 1min
●Centrifuge plate
Read on GXII Touch
Page 2 of 4
Copyright 2014-2015, PerkinElmer, Inc. All rights reserved. PerkinElmer is a registered trademark
of PerkinElmer, Inc. All other trademarks are the property of their respective owners.
PN CLS140178, Rev. D
Pico Protein Assay Quick Guide
LabChip® GXII Touch
Preparing Protein Ladder and Buffer
1. Add 4µL ladder
to 2µL of Pico 5x Labeling Buffer
and 4µL water.
2. Denature at 75ºC for 5min in eppendorf tube.
3. Vortex and spin down.
4. Add 5µL of 40µM reconstituted dye in water to 5µL of denatured ladder.
5. Incubate for 60min at room temperature (25ºC) in the dark.
6. Add 155µL diluted stop solution to reaction and vortex thoroughly and spin down.
Ladder
Tube
Buffer Tube
7. Transfer 120µL of prepared ladder to the provided 0.2mL Ladder Tube.
8. Insert the Ladder Tube into ladder slot on the LabChip GXII Touch instrument.
9. Add 750 µL of Protein Express Wash Buffer
provided with the reagent kit.
to the 0.75 mL Buffer Tube
10. Insert the Buffer Tube into the buffer slot on the LabChip GXII Touch instrument.
Reagent Placement
Preparing Protein Chip
1. Add 75 µL of Protein Gel Matrix solution to chip wells 2, 3, 7, 8, and 9,
and 120µL to well 10 using a reverse pipetting technique.
2. If the chip will be used to analyze multiple 96-well plates or will be in use
for up to 8 hours, add 120 µL of Pico Protein Express Lower Marker
(green cap) to chip well 4. If the chip will only be used to analyze one
96-well plate or a partial plate and then stored for future use, the marker
volume can be reduced to 50 µL.
3. Place the chip in the LabChip GX II Touch instrument to begin the assay.
Add Marker and Gel according
to the image above.
Chip Cleaning and Storage
Note: After use, the chip must be cleaned and stored in the chip container. The cleaning procedure
can be conducted the following day, when running overnight.
1. Remove reagents from each well using a vacuum.
2. Rinse and thoroughly aspirate each active well (1, 2, 3, 4, 7, 8, 9, and 10) twice with water.
3. Add 120 µL of molecular biology-grade water to active wells.
®
4. Make sure to cover all wells with Parafilm and store at RT.
Page 3 of 4
Copyright 2014-2015, PerkinElmer, Inc. All rights reserved. PerkinElmer is a registered trademark
of PerkinElmer, Inc. All other trademarks are the property of their respective owners.
PN CLS140178, Rev. D
Pico Protein Assay Quick Guide
LabChip® GXII Touch
Assay Specifications
Sizing Range
14 kDa – 200 kDa
1
Sizing Resolution
2
± 10% difference in molecular weight
Sizing Accuracy
± 20%
Assay Antibody Linear
Concentration Range
50pg/µL – 500 ng/µL (4 logs)
Antibody LOD in original
sample
50pg/µL
Assay Protein Linear
Concentration Range
10pg/µL – 100 ng/µL (4 logs)
Protein LOD in original sample
10pg/µL
Sensitivity of % Purity
0.1% of the total protein
Well to Well Signal Carryover
<0.5%
Sample Capacity per Chip
Prep
400 samples (four 96-well plates or one 384-well plate)
For Research Use Only
1
Resolution is defined as the height of the valley between two peaks to be no more than 50% of the maximum peak height.
Actual separation performance can depend on the sample and application.
2
Labeling efficiencies will vary from protein to protein.
For complete Pico Protein Assay User Guide, go to:
http://www.perkinelmer.com/labchipsystems
Page 4 of 4
Copyright 2014-2015, PerkinElmer, Inc. All rights reserved. PerkinElmer is a registered trademark
of PerkinElmer, Inc. All other trademarks are the property of their respective owners.
PN CLS140178, Rev. D


