F200 - Troubleshooting via External Buttons and LED
Thank you for purchasing a Falcon F200 monitoring appliance. It’s external
LED and two buttons have been programmed to help you troubleshoot and
reset the system. Use this guide to maximize this functionality.
If, after referencing this guide, you need further assistance with the F200,
please contact RLE Technologies via our website rletech.com/support/ or call us at 800.518.1519.
v1.1
Compatible with firmware v3.0 and above
(4/2015)
© Raymond & Lae Engineering, Inc. 2011. All rights reserved. RLE® is a registered trademark and Seahawk™, Falcon™, and Raptor™ are trademarks of Raymond & Lae Engineering, Inc. The products sold by Raymond & Lae Engineering, Inc. are subject to the limited warranty, limited liability, and other terms and conditions of sale set forth at http://rletech.com/RLE-Terms-and-Conditions.html.
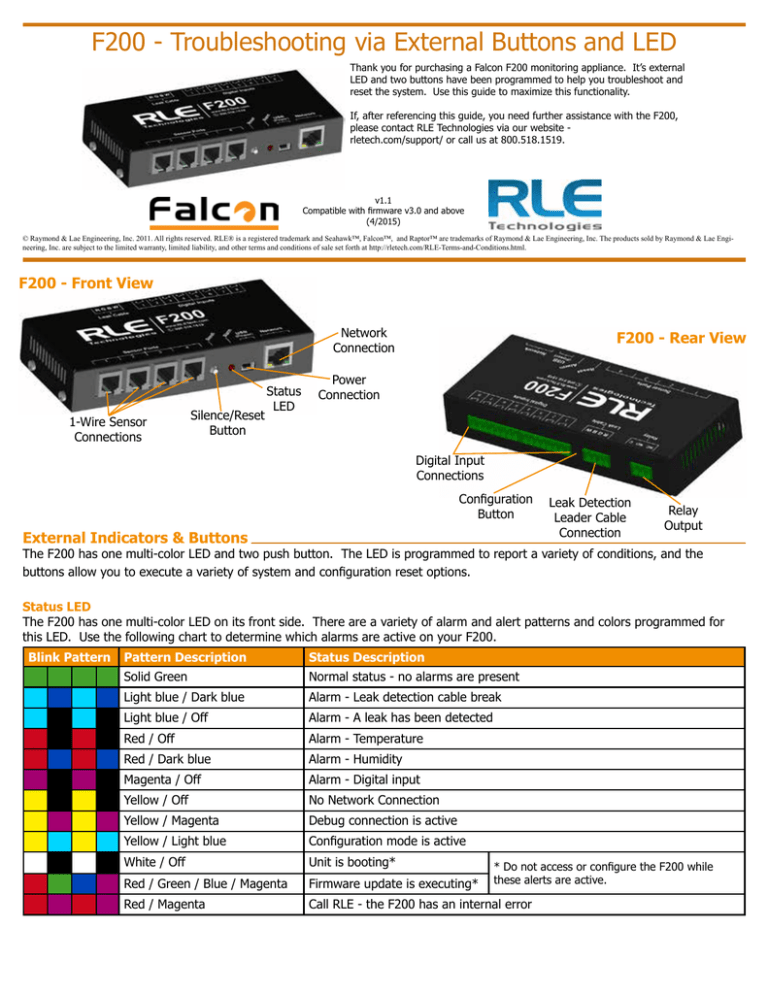
F200 - Front View
Network
Connection
1-Wire Sensor
Connections
Silence/Reset
Button
Status
LED
F200 - Rear View
Power
Connection
Digital Input
Connections
Configuration
Button
External Indicators & Buttons
Leak Detection
Leader Cable
Connection
Relay
Output
The F200 has one multi-color LED and two push button. The LED is programmed to report a variety of conditions, and the
buttons allow you to execute a variety of system and configuration reset options.
Status LED
The F200 has one multi-color LED on its front side. There are a variety of alarm and alert patterns and colors programmed for
this LED. Use the following chart to determine which alarms are active on your F200.
Blink Pattern
Pattern Description
Status Description
Solid Green
Normal status - no alarms are present
Light blue / Dark blue
Alarm - Leak detection cable break
Light blue / Off
Alarm - A leak has been detected
Red / Off
Alarm - Temperature
Red / Dark blue
Alarm - Humidity
Magenta / Off
Alarm - Digital input
Yellow / Off
No Network Connection
Yellow / Magenta
Debug connection is active
Yellow / Light blue
Configuration mode is active
White / Off
Unit is booting*
Red / Green / Blue / Magenta
Firmware update is executing*
Red / Magenta
Call RLE - the F200 has an internal error
* Do not access or configure the F200 while
these alerts are active.
Alarm Silence and System Reset Button
The alarm reset is located on the front of the unit, near the LED. When the audible alarm is active, push this button once to
silence the audible alarm. You’ll know which alarm is active and associated with the audible alarm because the LED will blink to
indicate a specific alarm condition.
There are several more reset functions assigned to this button. Press the button (and hold when indicated) to achieve the desired
functions:
Press Button and Release
LED Color
Action
One quick beep
Blinking LED error indicator Silence audible alarm
Press Button and Hold;
Release After
LED Color
Action
Two consecutive beeps
Green
Reset all alarms. If any alarms are currently active, they will
immediately re-alarm.
Three consecutive beeps
Red
Toggle the relay output
Four consecutive beeps
White
Reboot the F200
Configuration Button
There is also a small button on the back of the unit, between the terminal blocks for the digital inputs and leak detection leader
cable. This button needs to be accessed with the tip of a small object, like a paperclip - insert it into the hole and press the
button (and hold when indicated) to achieve the desired functions:
Press Button and Release
Action
One beep
Enable DHCP. The unit will remain this way until the IP is configured or the unit is rebooted.
This action also resets the F200’s NetBios name to the devices’s serial number, so you can
access the device on a local network by typing rle-serialnumber/ in your browser’s address
bar.
Press Button and Hold;
Release After
Action
Two consecutive beeps
Set a default Static IP. The unit will remain this way until the IP is configured or the unit is
rebooted.
Three consecutive beeps
Disables the administrator password.
Four consecutive beeps
Reset to all factory default settings
