15 lhs (7 .5 Kg) (approx.) Weight approx. 10 lbs (4.5Kg) Easy to carry
advertisement

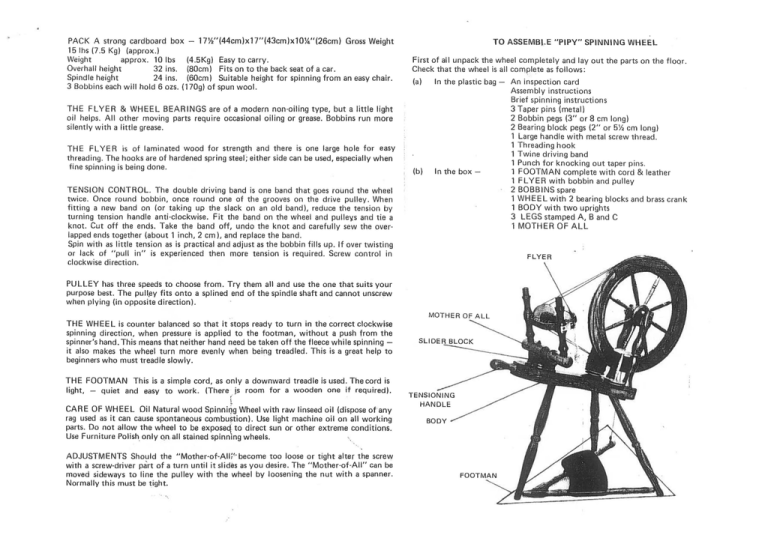
PACK A strong cardboard box - 17%"(44cm)x17"(43cm)x10~"(26cm) Gross Weight 15 lhs (7 .5 Kg) (approx .) Weight approx. 10 lbs (4.5Kg) Easy to carry. Overhall height 32 ins . (80cm) Fits on to the back seat of a car. Spindle height 24 ins. (60cm) Suitable height for spinning from an easy chair. 3 Bobbins each will hold 6 ozs. (170g) of spun wool. TO ASSEMBI.E "PIPY" SPINNING WHEEL First of all unpack the wheel completely and lay out the parts on the floor. Check that the wheel is all complete as follows : (a) In the plastic bag - (b) In the box- THE FLYER & WHEEL BEARINGS are of a modern non·oiling type, but a little light oil helps. All other moving parts require occasional oiling or grease. Bobbins run more silently with a little grease. THE FL YEA is of laminated wood for strength and there is one large hole for easy threading . The hooks are of hardened spring steel; either side can be used, especially when fine spinning is being done. TENSION CONTROL. The double driving band is one band that goes round the wheel twice . Once round bobbin, once round one of the grooves on the drive pulley. When fitting a new band on (or taking up the slack on an old band), reduce the tension by turning tension handle anti-clockwise. Fit the band on the wheel and pulleys and tie a knot. Cut off the ends. Take the band off, undo the knot and carefully sew the over· lapped ends together (about 1 inch, 2 em), and replace the band. Spin with as little tension as is practical and adjust as the bobbin fills up. If over twisting or lack of "pull in" is experienced then more tension is required . Screw control in clockwise direction. PULLEY has three speeds to choose from. Try them all and use the one that suits your purpose best. The pull~y fits onto a splined end of the spindle shaft and cannot unscrew when plying (in opposite direction). THE WHEEL is counter balanced so that it stops ready to turn in the correct clockwise spinning direction, when pressure is applied to the footman, without a push from the spinner's hand. This means that neither hand need be taken off the fleece while spinning it also makes the wheel turn more evenly when being treadled. This is a great help to beginners who must treadle slowly. THE FOOTMAN This is a simple cord, as only a downward treadle is used . The cord is light, - quiet and easy to work. (There js room for a wooden one if required). t CARE OF WHEEL Oil Natural wood Spinni~g Wheel with raw linseed oil (dispose of'any rag used as it can cause spontaneous combu~tion). Use light machine oil on all working parts. Do not allow the wheel to be exposeq to direct sun or other extreme conditions. Use Furniture Polish only Qn.all stained spinnmg wheels. '. ADJUSTMENTS Should the "Mother·of·AII:'· become too loose or tight alter the screw with a screw-driver part of a turn until it slides as you desire. The "Mother-of-All" can be moved sideways to line the pulley with the wheel by loosening the nut with a spanner. Normally this must be tight. An inspection card Assembly instructions Brief spinning instructions 3 Taper pins (metal) 2 Bobbin pegs (3" or 8 em long) 2 Bearing block pegs (2" or 5% em long) 1 Large handle with metal screw thread. 1 Threading hook 1 Twine driving band 1 Punch for knocking out taper pins. 1 FOOTMAN complete with cord & leather 1 FL YEA with bobbin and pulley 2 BOBBINS spare 1 WHEEL with 2 bearing blocks and brass crank 1 BODY with two uprights 3 LEGS stamped A, B and C 1 MOTHER OF ALL LEGS & FOOTPEDAL 1. Find legs marked A, B, & C. Place them loosely in holes marked A, Band Con the body with letters next to each other. 2. Fit the Footman Pedal with the pivot pins in the small holes at the bottom end of legs A and B. 3. Check that the Footman Pedal is the correct way up and will lie under the spinning wheel. 4. Push legs A, B and C home in their holes and lock in position by putting in the three taper pins from the outsiae and pushing them home. 5. Check that the foot pedal will swing up and down as for spinning. 6. Drive the taper pins in with a light hammer. This will lock the legs in their correct position and expand the top of the leg to make a tight fit. (It is possible to punch out the taper pins to remove legs at a later date if they are not glued in.) WHEEL & DRIVING BAND 1. Make the twine driving band into a double loop and place over the wheel. 2. Place the body and legs on the floor with the uprights in front of you and the footman leather by your right foot. 3. Place the wheel into the two slots in the uprights with the brass crank on your right. Make sure the bearing blocks are the right way up, i.e. the wheel axle is below the bearing block peg holes. Insert bearing block pegs from your far side. 4. Place the leather over the brass bolt on the crank. MOTHER OF ALL 1. Turn the wheel round so that the wheel itself is away from you. 2. Place the brass block on the MOTHER OF ALL into the slot on the body with the two brass arms facing towards the wheel. 3. Screw the threaded handle into the hole in the body. The handle screws right home and will then move the slider block towards you. By unscrewing the slider block moves away from you. This handle is used to determine the tension of the driving band. that hours of spinning can be done without ankle fatigue. Its compact design and be~utiful proportions make it ideal for "Spinning Circles" where many people meet to spm and talk in one room. TO REPLACE BOBBINS turn catch in clockwise direction, remove driving band from Bobbin and Pulley and lift out of brass arms. Pull the Pulley off splined shaft, remove bobbin and replace in the reverse order. (Should the Pulley prove stiff to move when new, place the small bearing knob on a block of wood and press the bobbin hard with your two thumbs, this should force the pulley to move). FLYER Press down with thumbs hard. FLYER 1. Put on the driving band, one strand on the bobbin and one strand on the pulley . 2. Put the flyer into the brass arms and pull the wire catch by your right hand over the flyer bearing to keep the flyer in place. 3. Start tread Iing - your wheel should run easily . ACCESSORIES 1. The two bobbin pins fit into the two holes on top of the body and the bobbins fit onto them . 2 . The threading hook fits into the hole on the side of the body. BOBBIN INFORMATION- "PIPY" SPINNING WHEEL THE SPINNING WHEEL is a Double Driving Band Wheel The Spinning Wheel is modelled on an old Irish wheel, which came into our possession at a sale of property following serious 'blitz' damage to houses in London, during the Second World War. The Wheel is turned from selected New Zealand timber, on traditional lines with modern engineering advantages. Experienced spinners find this wheel rurl6 so easily PULLEY TO PREPARE WOOL FOR SPINNING 1. WITH CARDERS Use hand carders to tease out the wool and free it from lumps and knots. Roll into a convenient "rolag" ready for spinning. (A woollen spin) 2. WITH STRONG COMB or FLICK CARDER Take a "lock" of the fleece in one hand and camb the ends free of dirt etc and tease them out ready for spinning (a worsted spin). 3. NO CARDERS If you are without carders you must start with long staple greasy wool - (preferably over 4" long/10cm). (a) Carefully detach a handful and tease it out with the fingers, removing all foreign matter until it looks like "candyfloss". Then roll it up like a breaking wave, with the fibres lying across the wave to form a rolag ready for spinning. (b)When experienced it is possible to spin direct from a small handful of fleece. Start from one edge of the clipped end and spin, allowing the spin to run a little into the wool in your hand as you draw it out to form the thread. TO SPIN on a Double Driving Band Wheel Before spinning spend some time practising treadling until the action is slow and even, making the wheel turn in a clockwise direction. It is easier t'o treadle fast to begin with but a slow even speed must be achieved before one can begin to spin. It may be easier to treadle with your shoe off. Do not attempt to spin until you are able to treadle slowly whilst reading a book or knitting. If possible it is much quicker and better to learn to spin with a hand spindle first (a stick through a potato will do). POINTS ABOUT DOUBLED DRIVING BAND SPINNING WHEELS 1. The band is one continuous band doubled. JOIN B 2. One loop sits in the bobbin groove, one in the drive pulley groove. 3. The drive pulley has three grooves (three gears). The largest is the one usually used for average spinning and plying. The smaller ones produce more twist (with the same rhythm) and are necessary as finer and finer yarn is desired. 4. The "pull in" (or the amount of twist) is controlled by increasing or decreasing the amount of slip the drive band has on the bobbin, less tension allows more slip and reduces pull in (or increases twist). more tension decreases the amount of slip and the bobbin winds on with more vigour giving more pull in (and yarn has less time to twist). It is important to sew the driving band ends together as neatly as possible to avoid a knot which will suddenly increase the 'pull in' while it passes round the bobbin. 5. Should more "pull in" be necessary (for bulky yarns) a thicker drive band should be used, giving maximum drive (large bearing area). Start by tying about 1 yard (1 metre) of knitting wool onto the bobbin shaft. Bring along the hooks on the flyer and thread through the hole. Treadle wheel in a clockwise direction holding on to the piece of wool -notice how it is becoming over twisted and the speed with which it is being pulled into the hole. If it is pulling in too fast loosen the tension of the driving band - if not pulling in fast enough tighten the driving band by turning the tension screw handle. When about 12" (30cm) of knitting wool is left, take prepared rolag and tie the end on to the end of the knitting wool. Hold on to this knot and start treadling slowly. Still pinching the knot with one hand, with the other hand pull and stretch the first section of the rolag for six inches or so (not so much that if breaks but sufficient to make the required thickness of yarn). Relax the first hand pinching the knot, and allow the twist to run into the drawn out part of the rolag. Then let the hand holding the rolag move towards the orifice at the same time the relaxed first hand gently slides up the twisted fibres to replace other hand and pinch the rolag so that the other hand can then draw out the next section of the rolag to the desired thickness. Adjust the tension so that the yarn is pulled in on to the bobbin when the hands move towards the orifice. Repeat these movements, getting into a rhythm. When the bobbin has filled a bit move to another hook and wind on in a different place. Keep moving to another hook so that the bobbin becomes evenly filled. Constantly adjust the tension as the bobbin fills up. Be careful not to allow the spin to run into the prepared wool before thinning it down to thread size. Join the new rolag on (prepared wool) by mingling the end with wool of the previous one before spinning right to the end. Tie a piece of thread the thickness you desire to spin -on to the top of your front maiden -You will then be able to use this as a gauge for the chosen batch of wool you are spinning. 6. A skilled spinner seldom finds it necessary to change the thickness of his band. However, bands do wear out with use and in putting on a new one care must be taken to see that the ply of the band yarn runs in the same direction as the cross in the band when going in the spinning direction -thus if you are a Z spinner you will need the ply of the driving band material to lie the opposite way to an S spinner. (This point is not vital but will make a difference to the length of time your band lasts). 7. With a doubled drive band wheel -while the foot is in motion the bobbin is revolving constantly. With a brake band wheel the bobbin stops revolving as the yarn winds on. It takes a little time to adjust to the different methods. All spinners are advised to dP.velop a good drafting technique (this means - draw back from the prepared rolag or combed fleece -do not push in). It is advisable to master spinning with one hand only, as this demands the proper drafting technique. The advantages of drafting are the lighter more even yarn produced . When lumps are desired they have to be pushed rather than pu lied. A double band spinning wheel is superior to a brake tension wheel so long as it is running true in all respects. It has greater flexibility and is less tirin(t to use (no brake to treaole against).


