.
Carburetor Information
U.S. CB750 Models 1969-1978
...|...Home...|...Garage...|...Carb Info Index...|...
Static and strobe timing an old houndog CB750
Note: Static timing is usually done when the timing has not been set at all such as after an engine rebuild or when the timing plate(s) are
replaced. This can be skipped if the bike will run well enough to go straight to strobe timing but some of what is done for static timing is also
done for strobe timing. In this case read through but for the most part only the last page would apply.
The first order of business is gathering the tools you'll need. Some things can be substituted such as the anolog multimeter. In it's place you
can use several test leads (wires with alligator clips at both ends), a D cell flashlight battery, and a bulb out of a cheapie Wally World
flashlight. I don't have a shot of this right now but when I have a chance I'll add this as well.
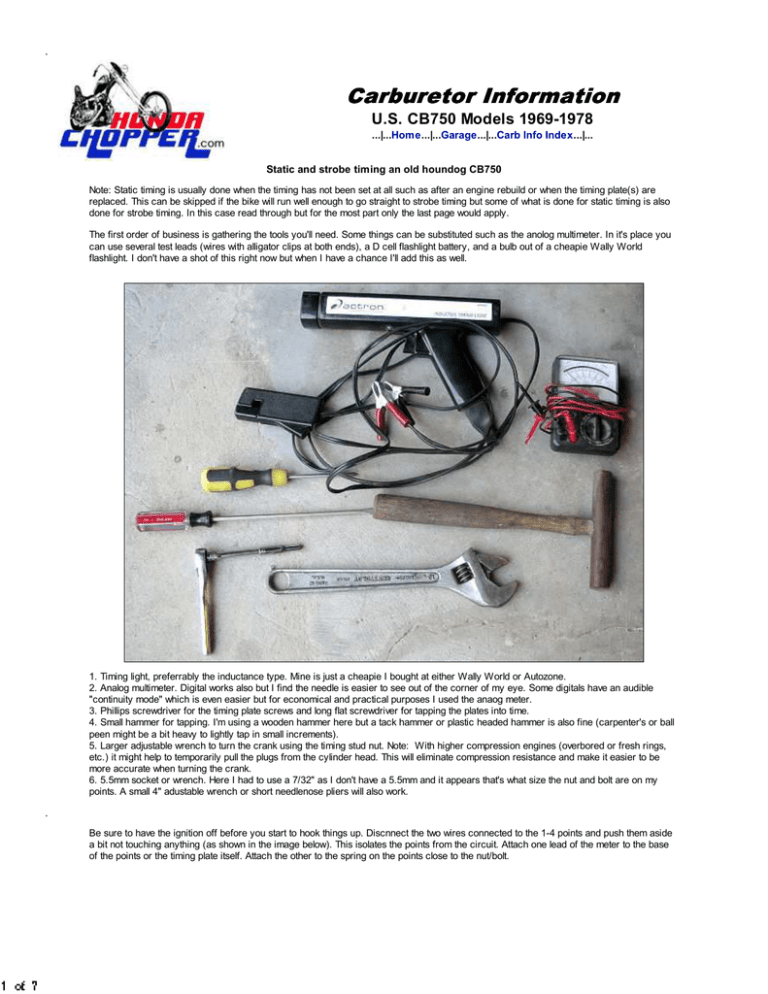
1. Timing light, preferrably the inductance type. Mine is just a cheapie I bought at either Wally World or Autozone.
2. Analog multimeter. Digital works also but I find the needle is easier to see out of the corner of my eye. Some digitals have an audible
"continuity mode" which is even easier but for economical and practical purposes I used the anaog meter.
3. Phillips screwdriver for the timing plate screws and long flat screwdriver for tapping the plates into time.
4. Small hammer for tapping. I'm using a wooden hammer here but a tack hammer or plastic headed hammer is also fine (carpenter's or ball
peen might be a bit heavy to lightly tap in small increments).
5. Larger adjustable wrench to turn the crank using the timing stud nut. Note: With higher compression engines (overbored or fresh rings,
etc.) it might help to temporarily pull the plugs from the cylinder head. This will eliminate compression resistance and make it easier to be
more accurate when turning the crank.
6. 5.5mm socket or wrench. Here I had to use a 7/32" as I don't have a 5.5mm and it appears that's what size the nut and bolt are on my
points. A small 4" adustable wrench or short needlenose pliers will also work.
.
Be sure to have the ignition off before you start to hook things up. Discnnect the two wires connected to the 1-4 points and push them aside
a bit not touching anything (as shown in the image below). This isolates the points from the circuit. Attach one lead of the meter to the base
of the points or the timing plate itself. Attach the other to the spring on the points close to the nut/bolt.
Turn the crank with the wrench slowly clockwise until the "F 1-4" mark just begins to show in the peephole as shown above. Set the meter to
OHMS, or "resistance" and in the "times" or X 1K ohms range. With the crank in this position the meter should read 0 ohms, or no
resistance.
Slowly turn the the crank clockwise again until the F mark (green arrow above) lines up with the index mark (red arrow above). Now it's time
for the tedious stuff...
.
Loosen the three screws that hold the entire timing plate in place. I have replaced mine with small bolts but you will likely have phillips screws.
Lightly tighten the timing plate screws to where they are just barely snugged up. You want to keep a little friction on the timing plate or it will
turn feely and it won't want to stay where you set it. Snug enough that the plate won't move on it's own but not so tight you are unable to
nudge it back and forth.
Use a long standard screwdriver and and nudge it all the way clockwise (image above). Try to avoid using the points themselves or their
mounting screws to tap as this could knock the points gap out of whack and you'd be spitting in the wind from there on out until the points are
gapped again. YUP! Done that, been there. You should be fairly safe using the screws (red arrows) or the screwdriver tits on the outside
edge of the timing plate (green arrows) as shown in the image below. Just make sure your screwdriver hand is steady before you get to
tapping. ;-)
.
The meter at this point should read 0 ohms (image below).
Okay, quick check: F mark for jugs 1-4 is lined up with the index mark and the meter reads 0 ohms. So far so good. Gently tap the plate
counter-clockwise until the needle on the meter finally moves showing inifinite resistance (the other end of the scale in the image below). This
is where the points begin to open and break contact.
To check how close you are turn the crank clockwise until the needle on the meter moves again, then turn the crank in the other direction
unitl it moves once more. Make note of where the F mark is when the needle moves in both directions. It should move right about the same
time the F mark and index mark line up. Bear in mind we are not shooting for sniper accuracy here, but getting in the ballpark so the bike will
fire up and run well enough to set the timing properly.
.
Once you have the timing plate set as close as you can for jugs 1-4 tighten down the timing plate screws, reconnect the two wires to the
points, and use the same process for the smaller timing adjustment plate for 2-3 points (image below).
Again, the screws for the 2-3 timing plate should be lightly snug, not loose and not tight. Turn the crank 180 degrees so the 2-3 F mark
shows through the peephole and are lined up.
Tap the plate all the way down (shown above) and then tap it back until the meter needle moves. Turn the crank a little both ways to check.
When it's as close as it will get tighten the screws, re-connect the wires and you're ready to fire it up and finish the timing. Oh, and if you
took the plugs out to make turning the crank easier now's a good time to put them back in. ;-)
This will only get you close and seldom does static timing hit dead on. These bikes are almost if not more than 30 years old, and as a result
many have weakened springs on the timing advance units. Often the timing will wind up a bit advanced even at idle which can make for rough
idling and hard starting, not to mention sluggish take-offs from a stop. On to strobe timing...
.
Now that the points timing is in the ballpark it's time to finish the job. Fire it up and bring the engine up to operating temperature (around the
block a few times just to let the neighbors know your're alive and well should do). Once it's warmed up and idling normally set the idle to about
900 rpm. This may be higher than you normally set the idle but it's what the specs call out and puts the advance closer to where it should be
for normal riding. I usually set my idle to aournd 500-600 rpm for normal riding but for tuneups I bump it up to the 800-900 range. If you don't
have a tach most dwell meters also serve as a tachometer and connects to the positive lead on your coils. If you don't have a tach or or
access to a dwell meter you will have to guestimate. If it's sitting there loping like a Harley chances are the idle is a little low. ;-) Bump it up till
it purrs smoothly but not where it's growling for you to put it in gear.
Connect the timing light inductance clamp to the #4 plug wire and hook the power cables to a 12 volt battery. Any 12 volt automotive or cycle
battery will do as long is it can provide 12 volts (meaning a dud won't work). The timing light draws very little power. Some even come with
built-in power supplies so if you're lucky eoungh to have one you're a step above me already. :-D
Again I'm statring with 1-4. Shut the engine down for a minute and carefully loosen the three screws on the timing plate to where they are just
snug enough to hold the plate in postion but not so tight you're not able to nudge the plate. Fire it up again and with the light aimed at the
peephole it should look like the image above. It might bounce arouund a little and that is normal. The idea is getting the F mark lined up with
the index mark most of the time. If the F appears left of, or before the index mark the timing is advanced and the plate will need to be nudged
clockwise. To the right of the index mark retarded and the plate needs to go counter-clockwise.
If it is still way off and you see only the edge of the T mark or a couple of marks next to each other with nothing stamped under them and the
4 nearby, um, Houston, we have a problem. It may be necessary to go back to square one, re-gap the points, and go through the static
timing steps again. I'm confident that you won't wind up there if you've taken your time and taken it one step at a time.
To check that the spark advance is working as it should while you've still got the light aimed reach up and crack the throttle some. Not to
redline or anything but rev it up some. If the spark advance is working you should see the two advance marks hovering under the index mark
(shown in the image avove) while revved and then returning to the F mark when it idles down again.
Once 1-4 is good to go shut the bike down tighten down the three timing plate screws and move on to 2-3. Move the timing light clip to the #3
plugwire, loosen the 2-3 timing plate screws to just snug and fire it up again. Repeat the same process nudging the 2-3 timing plate into
position. Remember, nudge the plate's edges, not the 2-3 timing plate screws or the points. Once there shut her down again. Tighten up the
screws, unhook the timing light, put the points cover back on, and the old houndog is ready to go. Time for a spin. You can put the tools up
when you get back. ;-)
Houndog750
.
Original Content Copyright 2009, all rights reserved
Exclusive permissions granted solely to hondachopper.com


