T 604.549.9379
F 604.549.9555
W f l u x w e r x . c o m
INSTALLATION: TRANSOM LED
power
feed
driver
driver
driver
drywall
If installing in DRYWALL, install
the drywall flange kit first. Refer
to separate drywall flange kit instruction sheet.
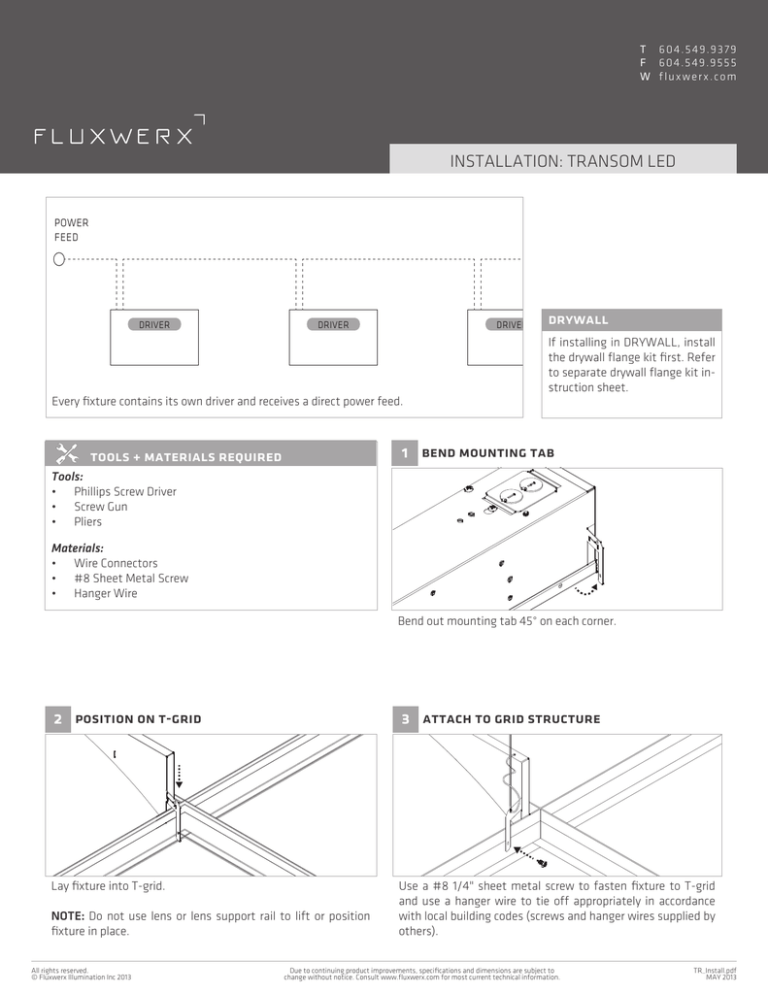
Every fixture contains its own driver and receives a direct power feed.
1 bend mounting tab
tools + materials required
Tools:
• Phillips Screw Driver
• Screw Gun
• Pliers
Materials:
• Wire Connectors
• #8 Sheet Metal Screw
• Hanger Wire
Bend out mounting tab 45° on each corner.
2 position on t-grid
3 attach to grid structure
Lay fixture into T-grid.
Use a #8 1/4" sheet metal screw to fasten fixture to T-grid
and use a hanger wire to tie off appropriately in accordance
with local building codes (screws and hanger wires supplied by
others).
NOTE: Do not use lens or lens support rail to lift or position
fixture in place.
All rights reserved.
© Fluxwerx Illumination Inc 2013
Due to continuing product improvements, specifications and dimensions are subject to
change without notice. Consult www.fluxwerx.com for most current technical information.
TR_Install.pdf
MAY 2013
installation: transom led
4 make electrical connections
5a optional flex whip (2 x 2 / 2 x 4)
Make all electrical connections to the fixture.
2 x 2 and 2 x 4 Luminaires:
Optional flex whip pre-installed. complete electrical connections in accordance with local building codes.
NOTES:
1. Wire 0-10VDC Dimming Leads as Class 1
2. For flex whip option, see Step 5A and 5B
5b optional flex whip (1x4)
6 remove protective film
1 x 4 Luminaires:
Optional Flex whip is prewired inside fixture. Remove packaging tape and insert snap-in fitting into wiring cover. Complete
electrical connections at other end of whip in accordance with
local building codes.
Remove dust protection film from the fixture after all building
furnishing is complete.
daylight sensor
The daylight sensor is a 0-10V continuous dim controller. All fixtures and 0-10V wall dimmers directly connected to the 0-10V
control wires from the Daylight sensor fixture will be controlled
as one zone. If separate daylight sensor zones are required that
are tied to one wall dimmer zone, an isolating diode is required
between daylight sensor fixture zones (field installed).
Contact factory.
All rights reserved.
© Fluxwerx Illumination Inc 2013
Due to continuing product improvements, specifications and dimensions are subject to
change without notice. Consult www.fluxwerx.com for most current technical information.
TR_Install.pdf
MAR 2013


