APRIL 2015
Splice / Dead-end Shunt
Be sure to read and completely understand this procedure before applying product. Be sure to select the
proper PREFORMEDTM product before application.
Step 1 GENERAL
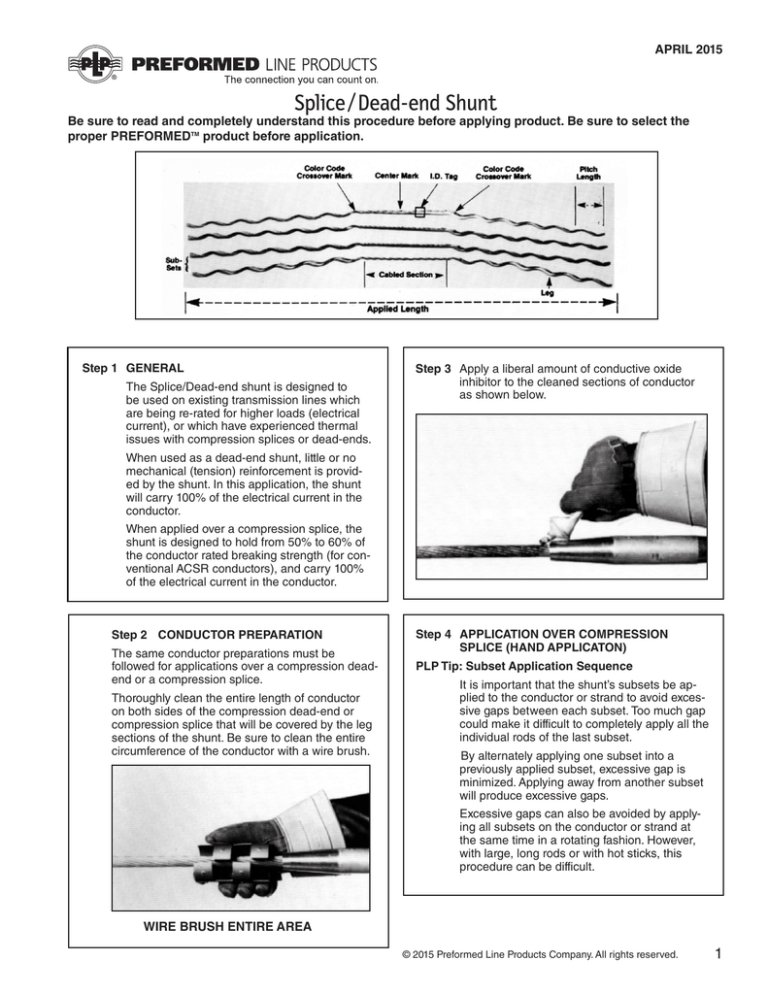
The Splice/Dead-end shunt is designed to
be used on existing transmission lines which
are being re-rated for higher loads (electrical
current), or which have experienced thermal
issues with compression splices or dead-ends.
When used as a dead-end shunt, little or no
mechanical (tension) reinforcement is provided by the shunt. In this application, the shunt
will carry 100% of the electrical current in the
conductor.
When applied over a compression splice, the
shunt is designed to hold from 50% to 60% of
the conductor rated breaking strength (for conventional ACSR conductors), and carry 100%
of the electrical current in the conductor.
Step 2 CONDUCTOR PREPARATION
The same conductor preparations must be
followed for applications over a compression deadend or a compression splice.
Thoroughly clean the entire length of conductor
on both sides of the compression dead-end or
compression splice that will be covered by the leg
sections of the shunt. Be sure to clean the entire
circumference of the conductor with a wire brush.
Step 3 Apply a liberal amount of conductive oxide
inhibitor to the cleaned sections of conductor
as shown below.
Step 4 APPLICATION OVER COMPRESSION
SPLICE (HAND APPLICATON)
PLP Tip: Subset Application Sequence
It is important that the shunt’s subsets be applied to the conductor or strand to avoid excessive gaps between each subset. Too much gap
could make it difficult to completely apply all the
individual rods of the last subset.
By alternately applying one subset into a
previously applied subset, excessive gap is
minimized. Applying away from another subset
will produce excessive gaps.
Excessive gaps can also be avoided by applying all subsets on the conductor or strand at
the same time in a rotating fashion. However,
with large, long rods or with hot sticks, this
procedure can be difficult.
WIRE BRUSH ENTIRE AREA
© 2015 Preformed Line Products Company. All rights reserved.
1
Step 5 Select one of the subsets that has the most
individual rods as the first subset to be
installed. If they all have the same number of
rods, select any subset.
Step 9 On the other side of the splice, apply only 1
or 2 wraps (pitches) of the second subset or
only enough to secure the subset from moving
excessively.
Position yourself so you face the splice and
determine which are the right and left sides
for identification purposes.
Position the center color mark of the cabled
section over the center of the automatic
(compression) splice as shown.
You will note that this side of the subset is
applying away from the first subset already
applied. This could create an excessive gap at
the leg ends if it is fully applied at this time.
DO NOT fully apply it yet.
POSITION CENTER COLOR MARK
SECURE THE SUBSET SO IT DOES NOT
MOVE EXCESSIVELY
Step 6 While holding the center section of the subset
more or less parallel to the splice, wrap the leg
on the conductor or strand beginning at the
crossover mark.
Step 10 Repeat Steps 8 and 9 until you come to the
last subset. Center the last subset and apply
the right side leg completely as before. The entire right side of the shunt should be complete.
WRAP LEG BEGINING AT THE CROSSOVER MARK
Step 7 This first subset should be completely applied
on both sides, making sure the leg ends are
snapped into place, before proceeding with the
application of remaining subsets.
CENTER THE LAST SUBSET AND APPLY THE
RIGHT LEG COMPLETING THE RIGHT SHUNT
Step 11 Completely apply this subset on the left side.
Note this subset now applies into the first subset originally applied, as shown by the arrow.
SNAP LEG ENDS INTO PLACE
Step 8 Select a subset that has the least amount of
individual rods for the next application and
center it over the splice next to the subset
already applied. Begin the leg application on
the right side so it applies into the subset
already applied as shown by the arrows. Apply
this side completely.
SELECT A SUBSET, BEGIN LEG
APPLICATION ON RIGHT SIDE & APPLY LEG
COMPLETELY TO THIS SIDE
2
APPLY SUBSET ON THE LEFT SIDE
Step 12 Determine which of the remaining unapplied
subsets will apply into the last one applied.
Wrap this subset completely.
Step 15 Use the beveled edges of the Applicator Ring to
snap the leg ends into place.
Use this procedure to wrap all the remaining
subsets one by one. Note you are applying the
subsets on the left side in the reverse order
from the right side.
Make sure all leg ends are snapped into place.
USE APPLICATOR RING TO SNAP
LEG ENDS INTO PLACE
WRAP REMAINING SUBSETS ONE
BY ONE MAKING SURE LEG ENDS ARE SNAPPED
INTO PLACE
Step 16 Select the second subset (least number of
individual rods), secure it with the holding tool
and center it over the splice behind the
previously applied subset. Use the Applicator
Ring to completely apply the leg on the right side
so it applies into the subset already applied.
Step 13 Completed application of splice shunt.
SNAP LEG ENDS INTO PLACE
COMPLETED APPLICATION
Step 17 Apply only 1 or 2 pitches on left side of splice to
secure this subset. A holding tool could also be
used to temporarily secure this subset. DO NOT
apply the rest of the left side at this time.
Step 14 APPLICATION OVER COMPRESSION SPLICE
(HOT STICK APPLICATION)
Read the Hand Application Steps 4 – 13
for guidance before attempting hot
stick application.
After proper conductor or strand preparation
(Step 4), select the first subset which has the
most individual rods. Position yourself so you’re
facing the splice and use a holding tool to
secure the subset and center it over the splice.
Use an Applicator Ring to wrap on the legs of
both sides of the subset.
USE APPLICATOR RING TO WRAP THE LEGS OF
THE SUBSET ON BOTH SIDES
APPLY 1 OR 2 PITCHES TO LEFT SIDE OF
SPLICE SECURING THIS SUBSET
Step 18 Repeat steps 16 & 17 with the remaining subsets until you are left with the last subset. Center,
secure and apply the right side as before and
then completely apply the left side of the legs
at this time. You will now have all subsets on the
right side completely applied and the first and
last subsets on the left side completely applied.
CENTER, SECURE & APPLY LAST SUBSET
THEN COMPLETELY APPLY LEFT SIDE LEGS
3
Step 19 To complete the application, wrap the remaining
subsets onto the conductor or strand in a
sequence that allows them to apply into the
subsets already applied. Once all leg ends
have been snapped into place, the application
is complete.
Step 21 Apply the legs of the shunt in subsets to the
conductor in the span and the conductor in
the jumper loop following Steps 4-13 for hand
application or Steps 14-19 for hot stick
application.
Step 22 APPLICATION OVER SUSPENSION CLAMP
Position the cabled sections of the shunt so that
they are evenly spaced around the outside of the
suspension clamp.
WRAP REMAINING SUBSETS ONTO
CONDUCTOR OR STRAND
Step 20 APPLICATION OVER COMPRESSION
DEAD-END
Position the cabled section of the shunt so that
it transitions smoothly from the conductor in
the span to the conductor in the jumper loop.
APPLICATION OF SHUNT OVER
SUSPENSION CLAMP
Step 23 Apply the legs of the shunt in subsets to the
conductor following Steps 4-13 for hand
application or Steps 14-19 for hot stick
application.
SHUNT TRANSITIONS
SMOOTHLY FROM BOTH THE SPAN TO
JUMPER LOOP CONDUCTORS
SAFETY CONSIDERATIONS
This application procedure is not intended to supersede any company construction or safety standards. This procedure is offered only to illustrate safe application for the individual. FAILURE TO FOLLOW THESE PROCEDURES MAY
RESULT IN PERSONAL INJURY OR DEATH.
This product is intended for a single (one time) use and for the specified application. Do not reuse or modify this product under any circumstances.
This product is intended for use by trained technicians only. This product should not be used by anyone who is not familiar with, and not trained to use it.
When working in the area of energized lines, extra care should be taken to prevent accidental electrical
contact.
For proper performance and personal safety, be sure to select the proper size PREFORMED product before application.
PREFORMED products are precision devices. To insure proper performance, they should be stored in cartons
under cover and handled carefully.
P.O. Box 91129, Cleveland, Ohio 44101 • 440.461.5200 • www.preformed.com • e-mail: inquiries@preformed.com
SP2734-4
4


