Circuits and Resistivity
advertisement

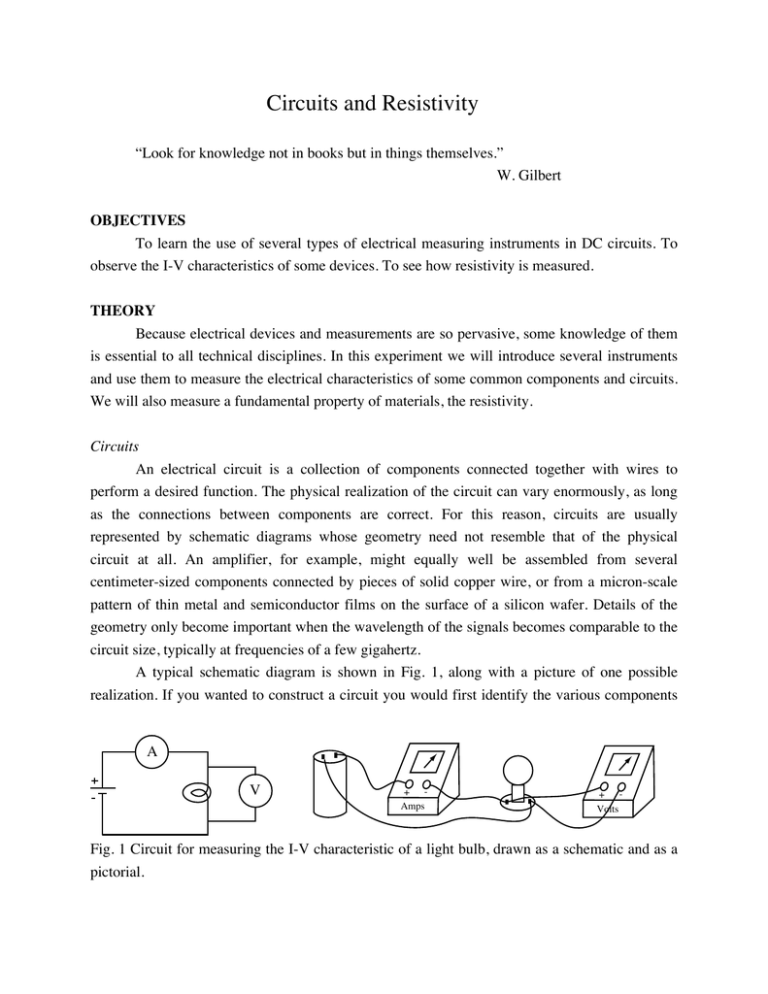
Circuits and Resistivity “Look for knowledge not in books but in things themselves.” W. Gilbert OBJECTIVES To learn the use of several types of electrical measuring instruments in DC circuits. To observe the I-V characteristics of some devices. To see how resistivity is measured. THEORY Because electrical devices and measurements are so pervasive, some knowledge of them is essential to all technical disciplines. In this experiment we will introduce several instruments and use them to measure the electrical characteristics of some common components and circuits. We will also measure a fundamental property of materials, the resistivity. Circuits An electrical circuit is a collection of components connected together with wires to perform a desired function. The physical realization of the circuit can vary enormously, as long as the connections between components are correct. For this reason, circuits are usually represented by schematic diagrams whose geometry need not resemble that of the physical circuit at all. An amplifier, for example, might equally well be assembled from several centimeter-sized components connected by pieces of solid copper wire, or from a micron-scale pattern of thin metal and semiconductor films on the surface of a silicon wafer. Details of the geometry only become important when the wavelength of the signals becomes comparable to the circuit size, typically at frequencies of a few gigahertz. A typical schematic diagram is shown in Fig. 1, along with a picture of one possible realization. If you wanted to construct a circuit you would first identify the various components A V + Amps + Volts Fig. 1 Circuit for measuring the I-V characteristic of a light bulb, drawn as a schematic and as a pictorial. A + - B C D ICD IAB + - (a) A IAB B C ICD D (b) Fig. 2 (a) Series connection of DC supply and two resistors. Here IAB = ICD, but VAB ! VCD unless the resistances are equal. (b) Parallel connection of two resistors across a DC supply. Now VAB = VCD, but IAB ! ICD unless the resistances are equal. and their connection points, using the manufacturers' data sheets if needed. You would then use wires to systematically join each component to the others according to the lines in the schematic drawing. The relative positions of the components need not resemble the schematic layout, but the circuit will work if the connections are correct. In discussing circuits, there are two general arrangements that are referred to by name, as drawn in Fig. 2 using resistors. In the series circuit the currents IAB and ICD must always be the same, since charge cannot accumulate between the components. The electric potential difference between A and B, VAB, will not be the same as VCD unless the elements are identical. For the parallel connection, the reverse is true: VAB = VCD because they are connected by a resistanceless wire, but the currents IAB and ICD are generally different. The distinction is useful if, for example, you want the same current to flow in two coils to generate a magnetic field. Connecting them in series guarantees that this will occur, regardless of the characteristics of the individual coils. Conversely, a group of devices which require the same voltage, such as light bulbs, would be connected in parallel with the power source. Electrical meters The potential difference between two points in a circuit can be measured with a voltmeter connected in parallel between the points, as shown in Fig. 3. An ideal voltmeter would have infinite resistance so that current flow in the circuit will not be affected by the additional path between the measuring points. Practical voltmeters, or the voltage input to a computer interface, have resistances of 1 - 10 M!, which may affect measurements in circuits with other large resistances. Current flow through a specified part of the circuit is measured by inserting an ammeter in series at the desired location, as shown in Fig. 3. An ideal ammeter would have zero resistance so the circuit would not be affected by insertion of the meter. Depending on their design and sensitivity, practical ammeters will add their internal resistance of 1 -10 ! into the circuit, which Circuits and Resistivity 2 A + - A C B D V IAB Fig. 3 Resistors connected in parallel across a DC supply. The ammeter is placed in series with one resistor to measure IAB, while the voltmeter is placed in parallel with the other resistor to measure VCD. may disturb low-resistance circuits. Incidentally, their low resistance also means that if an ammeter is connected directly across a source of voltage, such as a battery, a very large current will flow. This is likely to damage both the source and the meter. Meters are also available to determine DC resistance. They typically apply a known voltage to the component to be tested and measure the resulting current, displaying the ratio as the resistance in ohms. The component must be disconnected from the rest of the circuit to avoid interference from currents or voltages not supplied by the meter. I-V characteristics and resistivity One of the most basic properties of any electrical device is the amount of current I which flows when a known voltage V is applied to the device. A plot of the current as a function of the voltage is usually called the I-V characteristic of the device. The I-V characteristic is often a complicated curve, which may change as the temperature of the device changes, as light hits the device and so on. Sometimes these changes are used to sense temperature, light level or some other variable, but at other times any change is a nuisance. Whatever the I-V curve looks like, it is customary to define the ratio V/I as the resistance, R, of the device at a particular current, temperature, light level etc. When V is in volts and I in amperes, R is in ohms. There are many situations in which the I-V curve is simply a straight line through the origin. In other words, V = IR, where R is a constant. Such devices are said to obey Ohm’s Law, or to be “ohmic”. If the curve is also reasonably independent of external influences the device becomes particularly useful in electronics, and is simply called a “resistor”. For example, in later experiments it will be convenient to use the voltage across a known resistor to infer the current in a circuit. Resistance depends on both the geometry of the device and the material of which it is made. The resistivity is a more fundamental property of the material, since it is independent of the geometry of a particular specimen. Resistivity, !, is defined by Circuits and Resistivity 3 ! = E/j (1) where j is the current density in response to an applied electric field E. More practically, the measured resistance of a sample of length L and area A is related to the resistivity by ! = RA/L (2) This relationship assumes that the material has been shaped into a uniform cross-section and that the current is uniformly distributed across the area. When used in circuits, any combination of ohmic resistors is also ohmic, and could be replaced by an equivalent single resistor. Your text derives the effective resistance of series and parallel combinations of resistors R1 and R2, arriving at and Reff = R1 + R2 (series) (3) 1 1 1 = + R1 R2 Reff (parallel) (4) More complicated combinations can be worked out by successive applications of these two results. EXPERIMENTAL PROCEDURE Your lab station is equipped with a panel of mounted components, an adjustable voltage source, an analog ammeter, a digital multimeter and wires for easily connecting things. For this experiment we will use only the light bulb and the resistors on the panel. Connections are made to the terminals beside each component. The resistors are identified by their values in ohms, using an archaic color code which is explained in Fig. 4, and posted at the front of the lab room. The voltage source is usually referred to as a power supply. It contains circuitry which converts household power to an adjustable DC voltage. Connections are made through the terminals on top, and the desired output is set with the multi-turn knob. The ammeter is essentially selfexplanatory. Figure 5 illustrates the style of DMM used in the lab, with important features labeled. The function dial is used to select the type of measurement and sometimes the range, although many DMMs select the scale automatically. An input terminal usually labeled COM or Common is the reference for most measurements. The other terminals may be labeled with various Circuits and Resistivity 4 Color Black Brown Red Orange Yellow Green Blue Violet Gray White Digits 1 2 3 4 5 6 7 8 9 Multiplier 0 1 2 3 4 5 6 7 8 9 100 101 102 103 104 105 106 107 108 109 Fig. 4 The resistor color code. The last band specifies the relative accuracy of the value: Gold ±5%; Silver ±10%; No band ±20%. A 51k!, 10% resistor would be marked Green-BrownOrange-Silver. combinations of V, A and !, indicating their use for measuring voltage, current and resistance respectively. Wires from these terminals are connected into the circuit as needed for each function. Additional labels on the same or other terminals may be used to denote the inputs for other functions such as high current, high voltage, capacitance or frequency ranges when those are present. Other controls may be provided to select a specific measurement range or to hold a previous reading. I-V measurements The first experiment you should try is the measurement of the I-V characteristic of a resistor. Wire up the circuit of Fig. 1, replacing the light bulb with a 150! resistor and the battery with the power supply. Use the DMM to measure the voltage across the resistor. By varying the output of the power supply you will vary the current through the resistor. Plot current vs voltage as you go along to avoid the tedium of tabulating and then plotting data. Is the inverse of the slope of your line reasonably close to 150!? Circuits and Resistivity 5 Display shows function units and value HOLD RANGE 2000 MΩ LOGIC μA mA 2A Resistance Ω 2A DC voltage V mA AC voltage V DC current ranges On/off and function selector AC current ranges μA OFF Input for current measurements Input for resistance and voltage measurements ΩV COM AmA μA Common input for all functions Fig. 5 Controls and inputs for a general-purpose DMM typical of those used in the lab. When you finish with the resistor, replace it with the light bulb, and make a similar plot. The resistance of the bulb varies with the temperature of the filament and the temperature varies with the current, so we might expect some strange things to happen. Is the lamp ohmic? Bulk resistivity Next we will determine the electrical properties of some Play-Doh™. Because it does not come with wires attached, we will need to make our own connections. This is a bit complicated because chemical reactions between metal and Play-Doh may cause the contact resistance to change as current flows. To get around this problem, we will make a “4-probe” measurement as follows. Roll out a circular cylinder of Play-Doh, keeping the diameter as uniform as possible, and press the ends onto the two copper plates provided. Make the specimen long and skinny so the voltage will be big enough to measure easily. Connect the copper plates in series with the ammeter and power supply so you can pass current through the sample. Measure the voltage between two points a convenient distance apart on the cylinder surface, taking care not to deform the material. Changes in resistance at these contacts cannot affect the voltmeter reading since there is no current flow through the voltage contacts. Determine an I-V curve characteristic for your Play-Doh cylinder, and decide whether or not Play-Doh is ohmic. Circuits and Resistivity 6 Knowing the current, voltage and geometry you can derive the resistivity of Play-Doh from Eq. 2. Do this for the cylinder and for some other cross-sectional shapes and areas to see if the resistivity is indeed a constant of this material. You do not need a full I-V curve for every shape if you already know the material is ohmic. Resistor combinations As a last exercise, you should use the ohmmeter capability of the DMM to check the rules for series and parallel combinations of resistors, Eq. 3 and 4. Pick any two resistors from the left-hand column on the panel to be R1 and R2, and measure their values with the DMM. Are they within the specified tolerance of their marked values? Using the measured values, calculate the effective resistances for the series and parallel combinations of the two resistors. Measure the actual series and parallel resistances. Do the measurements agree with the calculation? Circuits and Resistivity 7


