• Absolute accuracy
• Easy to read, large clear graduations
• Hardened, stainless steel mounting
shank and measuring spindle are
corrosion proof
• Lapped spindle increasing resistance to wear
• Sturdy metal housing
• Rugged construction for great
durability
• Calibrations of all dial gauges are
traceable to national and international Standards.
In addition each model is characterized
by the following features:
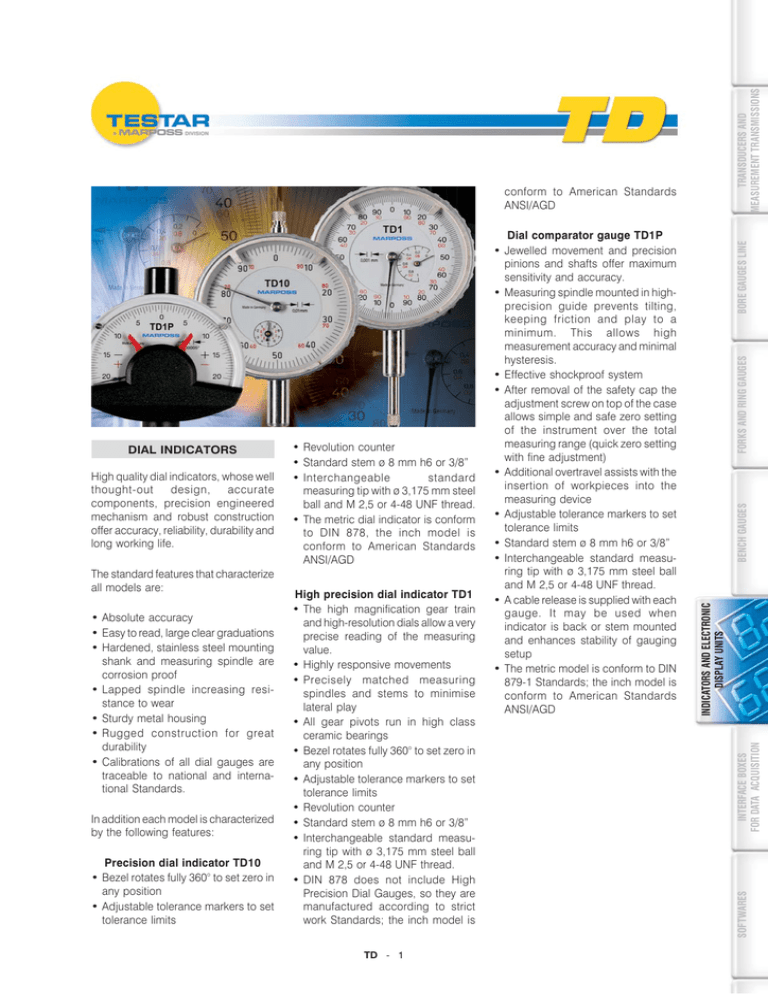
Precision dial indicator TD10
• Bezel rotates fully 360° to set zero in
any position
• Adjustable tolerance markers to set
tolerance limits
High precision dial indicator TD1
• The high magnification gear train
and high-resolution dials allow a very
precise reading of the measuring
value.
• Highly responsive movements
• Precisely matched measuring
spindles and stems to minimise
lateral play
• All gear pivots run in high class
ceramic bearings
• Bezel rotates fully 360° to set zero in
any position
• Adjustable tolerance markers to set
tolerance limits
• Revolution counter
• Standard stem ø 8 mm h6 or 3/8”
• Interchangeable standard measuring tip with ø 3,175 mm steel ball
and M 2,5 or 4-48 UNF thread.
• DIN 878 does not include High
Precision Dial Gauges, so they are
manufactured according to strict
work Standards; the inch model is
TD - 1
TRANSDUCERS AND
MEASUREMENT TRANSMISSIONS
FORKS AND RING GAUGES
BENCH GAUGES
INTERFACE BOXES
FOR DATA ACQUISITION
The standard features that characterize
all models are:
SOFTWARES
High quality dial indicators, whose well
thought-out design, accurate
components, precision engineered
mechanism and robust construction
offer accuracy, reliability, durability and
long working life.
• Revolution counter
• Standard stem ø 8 mm h6 or 3/8”
• Interchangeable
standard
measuring tip with ø 3,175 mm steel
ball and M 2,5 or 4-48 UNF thread.
• The metric dial indicator is conform
to DIN 878, the inch model is
conform to American Standards
ANSI/AGD
INDICATORS AND ELECTRONIC
DISPLAY UNITS
DIAL INDICATORS
Dial comparator gauge TD1P
• Jewelled movement and precision
pinions and shafts offer maximum
sensitivity and accuracy.
• Measuring spindle mounted in highprecision guide prevents tilting,
keeping friction and play to a
minimum. This allows high
measurement accuracy and minimal
hysteresis.
• Effective shockproof system
• After removal of the safety cap the
adjustment screw on top of the case
allows simple and safe zero setting
of the instrument over the total
measuring range (quick zero setting
with fine adjustment)
• Additional overtravel assists with the
insertion of workpieces into the
measuring device
• Adjustable tolerance markers to set
tolerance limits
• Standard stem ø 8 mm h6 or 3/8”
• Interchangeable standard measuring tip with ø 3,175 mm steel ball
and M 2,5 or 4-48 UNF thread.
• A cable release is supplied with each
gauge. It may be used when
indicator is back or stem mounted
and enhances stability of gauging
setup
• The metric model is conform to DIN
879-1 Standards; the inch model is
conform to American Standards
ANSI/AGD
BORE GAUGES LINE
conform to American Standards
ANSI/AGD
TRANSDUCERS AND
MEASUREMENT TRANSMISSIONS
TECHNICAL SPECIFICATIONS - HOW TO ORDER
TD10 metric
23
7.5
7.5
60
40
22
70
90
10
11.5
59.5
80
90
Ø4
h
6
.04
.45
.01
.02
0
.0001"
3
3
Made in Germany
15
20
20
h
6
.76
Ø .55
h
6
.23
.11
.86
10
15
4
5
.23
5
0,00005Ó
2.34
2
4
.64
.47
.68
.23
.37
2
Ø 3/8
Ø .15
TD1P
Made in Germany
.7
40
50
Ø 3/8 h6
Ø .15 h6
0
5
10
1
4.35
70
0
40
Ø4 h6
Ø 2.44
Ø .51
TD1
3.60
30
.1
Ø 14
Ø8 h6
.35
.51
.2
Ø 2.04
.001"
30
40
TD1P inch
Ø .31
1
Ø 2.28
20
Made in Germany
3.85
Ø 2.04
.04
20
30
50
.89
.51
.16
FORKS AND RING GAUGES
TD1
0
20
0,001mm
50
0
10
10
40
TD1 inch
.29
.29
10
0
TD1P
Made in Germany
6
6
6
10
0
h
6
0
Ø 2.28
70
20
.9
Ø .31
Ø .23
Ø .19
.29
.29
1.29
.47
60
30
80
20
50
1
Made in Germany
30
Ø8
0
40
0,8
0,2
TD10 inch
.9
BENCH GAUGES
TD1 metric
0,2
0,8
0,6
0,4
40
15
Ø 4 h6
15
0,001mm
1
33
16.5
1
33
16,5
BORE GAUGES LINE
Ø 8 h6
0,4
0,6
30
110.5
70
28
3
4 7
6
60
60
10
20
70
14
5
30
9
30
Ø .31 h6
.55
40
1
80
18
60
0
20
40
50
108
1
289
376
4
30
10
90
TD1
30
40
22
108
70
0,01mm
0
10
20
70
60
19.5
80
20
Made in
Germany
90
80
10
Ø 52
90
TD10
Ø 58
Ø 52
Ø 58
10
20
80
50
TD10 metric
Ø 62
Ø 13
9
13
0
90
MODEL
TD1P metric
22.8
Ø8
13
4
TD1 metric
23
Ø8
Ø6
Ø5
7.5
7.5
Ø .15 h6
MEAS. RANGE
RANGE PER
REVOLUTION
GRADUATION
(RESOLUTION)
SCALE READING
NUMBER OF
GRADUATIONS
ON THE SCALE
ORDER CODE
10 mm
1 mm
0,010 mm
0 - 100
100
0E31010100
INDICATORS AND ELECTRONIC
DISPLAY UNITS
INTERFACE BOXES
FOR DATA ACQUISITION
1 mm
0,2 mm
0,001 mm
0 - 100 - 0
200
0E31020200
0,100 mm
-
0,001 mm
50 - 0 - 50
100
0E31030200
TD10 inch
.250”
.100”
.001”
0 - 50 - 0
100
0E31111100
TD1 inch
.025”
.010”
.0001”
0-5-0
100
0E31121200
.004”
-
.00005”
20 - 0 - 20
40
0E31131300
BEZEL
STEM
DIAMETER
DIAMETER
CONTACT
THREAD
REPEATABILITY (fw)
ACCURACY (fe)
(*)
MEASURING
FORCE
(±10%) (N)
TD10 metric
58 mm
8 h6 mm
M 2,5
0,003 mm
0,015 mm
07 - 1,2
TD1 metric
58 mm
8 h6 mm
M 2,5
0,003 mm
0,005 mm
0,8 - 1,6
TD1P metric
62 mm
8 h6 mm
M 2,5
0,0005 mm
0,001 mm
1,2 - 1,4
TD10 inch
2 1/4”
3/8”
4-48 UNF
.0002”
.001”
0,6 - 1,4
TD1 inch
2 1/4”
3/8”
4-48 UNF
.00012”
.0004”
0,8 - 1,2
TD1P inch
2.44”
3/8”
4-48 UNF
.00002”
.00004”
1,2 - 1,4
TD1P metric
TD1P inch
MODEL
(*) Span of error being the plunger pressed in
For a full list of address locations, please consult the Marposs official website
D6L01300G0 - Edition 09/2007 - Specifications are subject to modifications
© Copyright 2007 MARPOSS S.p.A. (Italy) - All rights reserved.
SOFTWARES
MARPOSS,
and Marposs product names/signs mentioned or shown herein are registered
trademarks or trademarks of Marposs in the United States and other countries. The rights, if any, of
third parties on trademarks or registered trademarks mentioned in the present publication are
acknowledged to the respective owners.
Marposs has an integrated system to manage the Company quality, the environment
and safety, attested by ISO 9001, ISO 14001 and OHSAS 18001 certifications. Marposs
has further been qualified EAQF 94 and has obtained the Q1-Award.
TD - 2

