fdp instructions 2010 II.cdr
advertisement

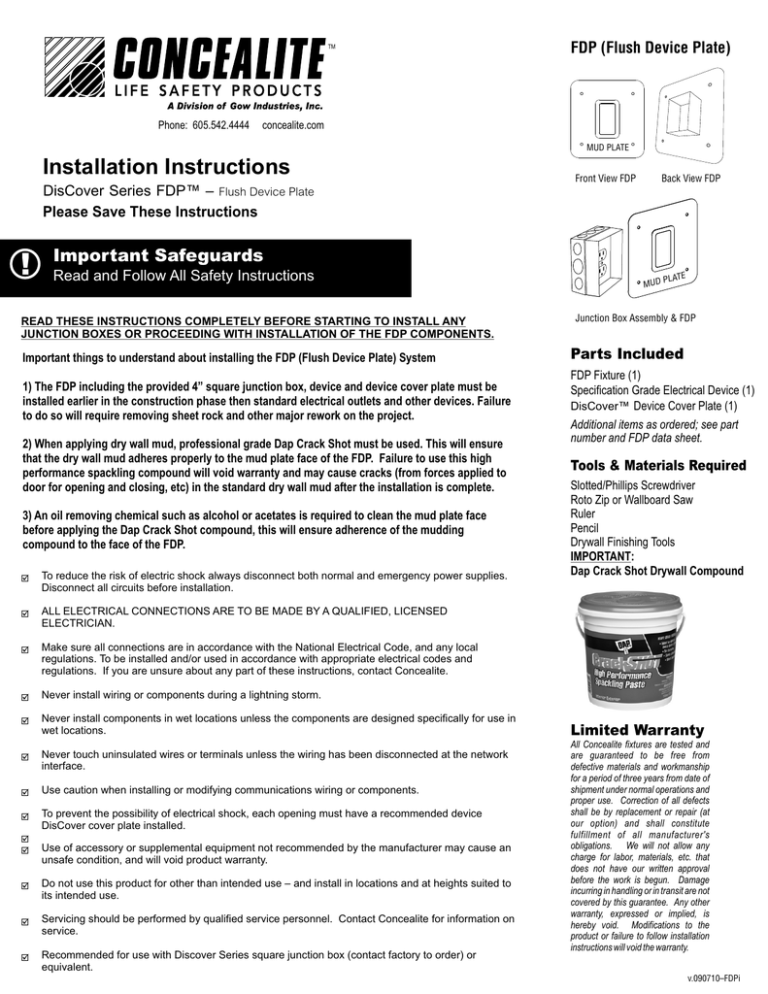
FDP (Flush Device Plate) TM Phone: 605.542.4444 concealite.com MUD PLATE Installation Instructions DisCover Series FDP™ – Flush Device Plate Front View FDP Back View FDP Please Save These Instructions ! Important Safeguards Read and Follow All Safety Instructions MUD READ THESE INSTRUCTIONS COMPLETELY BEFORE STARTING TO INSTALL ANY JUNCTION BOXES OR PROCEEDING WITH INSTALLATION OF THE FDP COMPONENTS. PLATE Junction Box Assembly & FDP Important things to understand about installing the FDP (Flush Device Plate) System Parts Included 1) The FDP including the provided 4” square junction box, device and device cover plate must be installed earlier in the construction phase then standard electrical outlets and other devices. Failure to do so will require removing sheet rock and other major rework on the project. FDP Fixture (1) Specification Grade Electrical Device (1) DisCover™ Device Cover Plate (1) Additional items as ordered; see part number and FDP data sheet. 2) When applying dry wall mud, professional grade Dap Crack Shot must be used. This will ensure that the dry wall mud adheres properly to the mud plate face of the FDP. Failure to use this high performance spackling compound will void warranty and may cause cracks (from forces applied to door for opening and closing, etc) in the standard dry wall mud after the installation is complete. 3) An oil removing chemical such as alcohol or acetates is required to clean the mud plate face before applying the Dap Crack Shot compound, this will ensure adherence of the mudding compound to the face of the FDP. To reduce the risk of electric shock always disconnect both normal and emergency power supplies. þ Tools & Materials Required Slotted/Phillips Screwdriver Roto Zip or Wallboard Saw Ruler Pencil Drywall Finishing Tools IMPORTANT: Dap Crack Shot Drywall Compound Disconnect all circuits before installation. ALL ELECTRICAL CONNECTIONS ARE TO BE MADE BY A QUALIFIED, LICENSED þ ELECTRICIAN. Make sure all connections are in accordance with the National Electrical Code, and any local þ regulations. To be installed and/or used in accordance with appropriate electrical codes and regulations. If you are unsure about any part of these instructions, contact Concealite. Never install wiring or components during a lightning storm. þ Never install components in wet locations unless the components are designed specifically for use in þ wet locations. Never touch uninsulated wires or terminals unless the wiring has been disconnected at the network þ interface. Use caution when installing or modifying communications wiring or components. þ To prevent the possibility of electrical shock, each opening must have a recommended device þ DisCover cover plate installed. þ Use of accessory or supplemental equipment not recommended by the manufacturer may cause an þ unsafe condition, and will void product warranty. Do not use this product for other than intended use – and install in locations and at heights suited to þ its intended use. Servicing should be performed by qualified service personnel. Contact Concealite for information on þ service. Recommended for use with Discover Series square junction box (contact factory to order) or þ equivalent. Limited Warranty All Concealite fixtures are tested and are guaranteed to be free from defective materials and workmanship for a period of three years from date of shipment under normal operations and proper use. Correction of all defects shall be by replacement or repair (at our option) and shall constitute fulfillment of all manufacturer's obligations. We will not allow any charge for labor, materials, etc. that does not have our written approval before the work is begun. Damage incurring in handling or in transit are not covered by this guarantee. Any other warranty, expressed or implied, is hereby void. Modifications to the product or failure to follow installation instructions will void the warranty. 1 v.090710–FDPi TM i FDP (Flush Device Plate) Installation Please Read All Instructions Before Proceeding Phone: 605.542.4444 INSTALLATION PHOTOS The Flush Device Plate system shall be Concealite DisCover Series FDP (Flush Device Plate) and will conform to UL Standards UL514D and be installed in accordance with all National Electrical Code requirements. The unit shall have a flush access door that rotates and allows access to the device. Please contact Concealite with any questions you have regarding installation of this fixture. Failure to follow published installation instructions or any modifications to the product may damage the unit and will void the warranty. (Step 1) INSTALLATION INSTRUCTIONS WARNING: to avoid fire, shock/electrocution, or injury – TURN OFF POWER at circuit breaker or fuse and test to ensure that power is off before wiring. Remove and discard the packaging materials. (Step 2) (Step 4) (Step 6) (Step 11) (Step 12) (Step 13) 2 (1) After you select the location for your device, mount the Concealite supplied 4” square metal junction box to the rear of the stud – the back of your junction box must be installed flush with the back of the stud (for 4" wall depth applications). For deeper wall installations contact factory. (2) A second stud (or blocking) must be mounted next to the open side of the box you just mounted 5.0 inches between studs. Please Note: The 5.0 inches is important so there is room to slide the FDP flush plate door assembly on for step #9 below. (3) Run your conduit and wire, or your rough-in wiring now. (4) Attach the FDP box sleeve to the box. If required to maintain wall fire rating, installation of Fire Wool (Roxul CavityRock® or equivalent), or a Fire Putty Pad (such as Passive Fire Protection [PFP] M1 Putty Pad) should be installed now, and according to manufactures instructions. Building/Electrical Inspector concerns for the fire integrity of the wall should also be addressed now. (5) Mark floor with dimensions for cutting wall covering. (6) Make all electrical device connections to the specification grade device provided. Install device and cover plate provided. Please Note: DEVICE COVER PLATE PROVIDED with the FDP (or ordered through Concealite) MUST BE USED – other market cover plates are not compatible. (7) Install wall covering (i.e. gypsum, lath & plaster, etc.) (8) Roto-Zip or saw the opening to the dimensions you marked in step # 5. Be sure to Roto-Zip or saw to the outer edges of the FDP box sleeve. (9) Slide the FDP flush plate door assembly inside the box sleeve. (10) Secure the FDP flush plate door assembly with 4 sheetrock screws. MAKE CERTAIN the screws are all going through the plate and into studs. This must be done to assure the plate will be held securely to the wallboard. Clean the exterior of the entire FDP mud plate including door and raised door frame with alcohol or other chemical to remove oil and grease, wait until dry. (11) Fiberglass tape the outside edges of the plate. (12) REQUIRED FOR PROPER INSTALLATION: Dap Crack Shot Drywall Compound Run your first coat of Dap Crack Shot Compound over the metal and feather out 12 inches in each direction. The metal ridge around the door is your finish height – the door itself shouldn't have any mud on it. Be sure to clean mud out of the gap between the door and the metal frame. (13) When dry apply the second coat Dap Crack Shot Compound out 20 inches, after drying sand if needed and run a finish coat. (14) Painting, Wallpaper or Other Wall Finishes: Open door fully and apply paint or wall paper to entire wall and cover the outer FDP door trim with wall finish. Wipe interior of door frame to clean excess paint and/or primer. Wait until finish has dried. After wall finish has dried, close flush FDP door and hand apply paint or other finish on door only using a brush or foam applicator. Allow to dry. Finish by cleaning around door edge to remove excess paint build up. NOTE: Any buildup of wall finish on either the door edge or the inside of the door frame will not allow the unit to operate properly, and is not covered by the warranty. v.090710–FDPi


