SAMSON SPLICING INSTRUCTIONS
8-Strand Class I End-For-End Splice
Class I ropes are made from any or all of the following fibers: olefin, polyester, or nylon.
g e t t i n g s ta r t e d
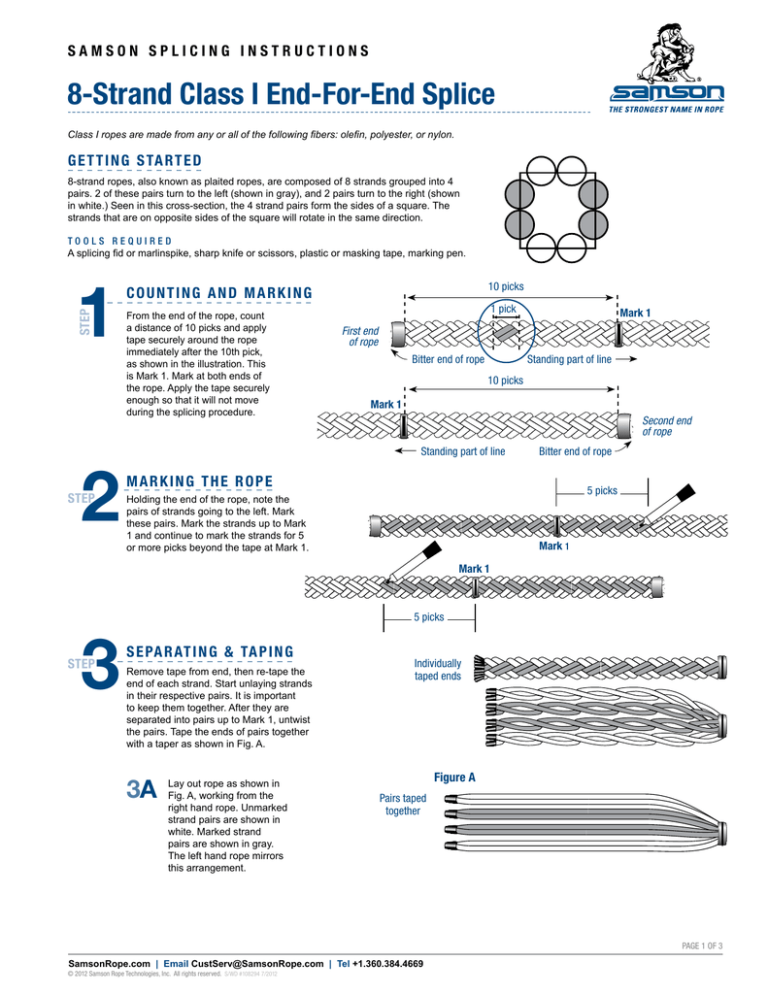
8-strand ropes, also known as plaited ropes, are composed of 8 strands grouped into 4
pairs. 2 of these pairs turn to the left (shown in gray), and 2 pairs turn to the right (shown
in white.) Seen in this cross-section, the 4 strand pairs form the sides of a square. The
strands that are on opposite sides of the square will rotate in the same direction.
Tools Required
A splicing fid or marlinspike, sharp knife or scissors, plastic or masking tape, marking pen.
step
1
2
step
10 picks
C O U NT i n g AND M AR K i n g
From the end of the rope, count
a distance of 10 picks and apply
tape securely around the rope
immediately after the 10th pick,
as shown in the illustration. This
is Mark 1. Mark at both ends of
the rope. Apply the tape securely
enough so that it will not move
during the splicing procedure.
1 pick
Mark 1
First end
of rope
Bitter end of rope
Standing part of line
10 picks
Mark 1
Second end
of rope
Standing part of line
Bitter end of rope
M AR K i n g T H E R O P E
5 picks
Holding the end of the rope, note the
pairs of strands going to the left. Mark
these pairs. Mark the strands up to Mark
1 and continue to mark the strands for 5
or more picks beyond the tape at Mark 1.
Mark 1
Mark 1
3
step
5 picks
SE PARATING & TA P ING
Remove tape from end, then re-tape the
end of each strand. Start unlaying strands
in their respective pairs. It is important
to keep them together. After they are
separated into pairs up to Mark 1, untwist
the pairs. Tape the ends of pairs together
with a taper as shown in Fig. A.
3A
Lay out rope as shown in
Fig. A, working from the
right hand rope. Unmarked
strand pairs are shown in
white. Marked strand
pairs are shown in gray.
The left hand rope mirrors
this arrangement.
Individually
taped ends
Figure A
Pairs taped
together
PAGE 1 OF 3
SamsonRope.com | Email CustServ@SamsonRope.com | Tel +1.360.384.4669
© 2012 Samson Rope Technologies, Inc. All rights reserved. S/WD #108294 7/2012
SAMSON SPLICING INSTRUCTIONS
8-Strand Class I End-For-End Splice
st
ep
4
j o i n i n g t h e pa i r s
To start, lay out the marked
and unmarked strands as
they appear in Fig. B.
4a
A2
A4
B4
A3
B3
Figure B
It is important that the next steps of the procedure
be followed carefully as shown in Fig. C.
step
A2
B2
Figure C
Example: A1 through B1
Unmarked B4 strands
go through unmarked
A4 strands. Keep
strands untwisted.
5
B1
B4
Unmarked A3 strands
go through unmarked
B3 strands.
A3
B1
B4
m a r r y i n g t h e r op e s
After the initial step has been
completed on all strands,
you should have something
that looks like Fig. D. Marry
the ropes as shown in Step
6. This part is preferably a
2-person job.
A1
A4
Marked A1 strands go
through marked B1 strands.
Marked B2 strands
go through marked
A2 strands.
B2
A4
B2
A2
Figure D
B1
A1
B3
step
6
B4
Finishing Marriage
Keep the ropes together snuggly.
Tie a piece of string tightly
around the splicing point as
shown in Fig. E. Remove both
pieces of tape from the rope.
B3
A1
A3
A2
B2
A4
Figure E
B1
A3
B3
A1
PAGE 2 OF 3
SamsonRope.com | Email CustServ@SamsonRope.com | Tel +1.360.384.4669
© 2012 Samson Rope Technologies, Inc. All rights reserved. S/WD #108294 7/2012
SAMSON SPLICING INSTRUCTIONS
8-Strand Class I End-For-End Splice
7
step
s ta r t i n g t h e t uck s
Beginning at the marriage, tuck marked pairs of strands under the nearest
unmarked pair. Then tuck an unmarked pair under the nearest marked pair.
Complete 1 full set of tucks in one direction with all the strands and then do another full
set of tucks on the other side of the marriage. Pull everything tight before proceeding.
Continue tucking the strands around the rope until you have completed
4 full tucks on each side of the marriage with all the strand pairs.
Next, select the strand closest to the marriage point in each pair.
Tape this strand and cut the excess off as shown below.
4 tucks
4 tucks
Marriage point
step
8
finishing the splice
Trim last tucked strands so all exposed
strands are similar in length after
their final tuck.
Splice the remaining single strands for 2 more
full tucks, tape and cut off as shown in Fig. F.
Finished splice
Figure F
DOCUMENT 8Strand_C1_End For End_AUG2012.pdf
SamsonRope.com | Email CustServ@SamsonRope.com | Tel +1.360.384.4669
© 2012 Samson Rope Technologies, Inc. All rights reserved. S/WD #108294 7/2012
PAGE 3 OF 3


