ADCP-80-534 Issue 1, January 2002
PowerWorx GMT “60e” Series
Power Distribution Panel
User Manual
FRONT VIEW
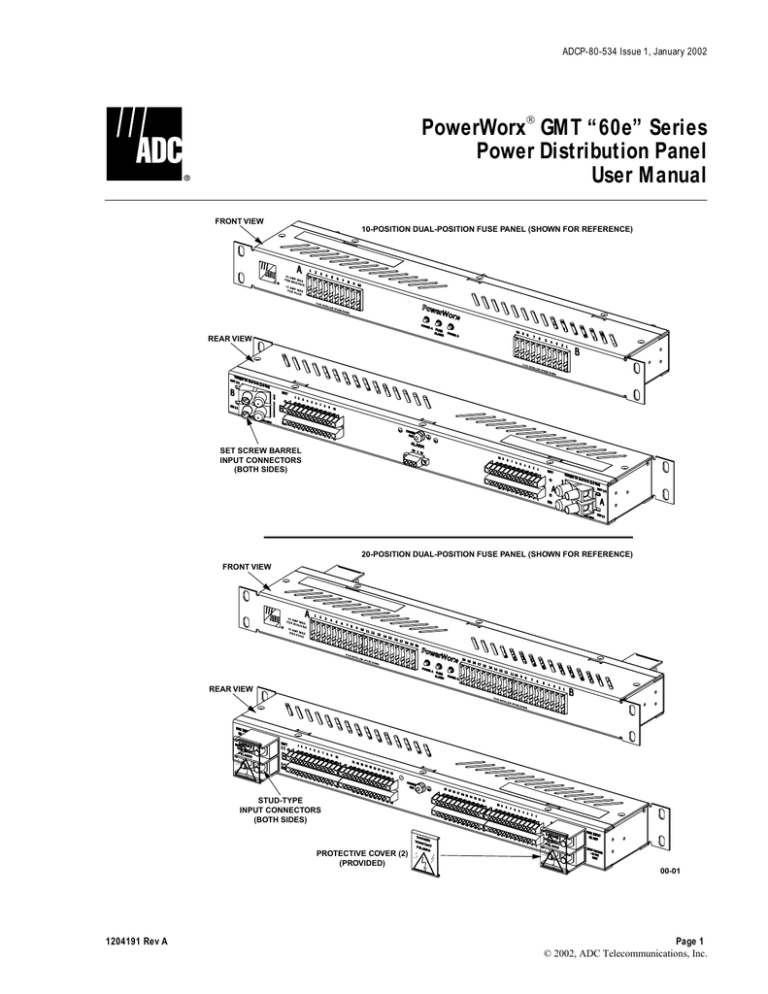
10-POSITION DUAL-POSITION FUSE PANEL (SHOWN FOR REFERENCE)
REAR VIEW
SET SCREW BARREL
INPUT CONNECTORS
(BOTH SIDES)
20-POSITION DUAL-POSITION FUSE PANEL (SHOWN FOR REFERENCE)
FRONT VIEW
REAR VIEW
STUD-TYPE
INPUT CONNECTORS
(BOTH SIDES)
PROTECTIVE COVER (2)
(PROVIDED)
00-01
1204191 Rev A
Page 1
© 2002, ADC Telecommunications, Inc.
ADCP-80-534 Issue 1, January 2002
Content
1
Page
TOOLS AND ACCESSORIES .............................................................. 4
2
SPECIFICATIONS ..................................................................... 6
3
INSTALLATION....................................................................... 7
4
5
3.1
Unpack and Inspection............................................................ 7
3.2
Install Fuse Panel in Rack ......................................................... 8
3.2.1
19-Inch Rack (Standard).................................................... 8
3.2.2
23-Inch/600 mm Rack ..................................................... 9
CABLE ROUTING .................................................................... 10
4.1
Ground Wire ................................................................. 10
4.2
Input Power Cables ............................................................. 11
4.2.1
Barrel-Type Input Connectors ............................................... 11
4.2.2
Stud-Type Input Connectors ................................................ 12
4.3
Output Wires ................................................................. 13
4.4
Alarm Wires.................................................................. 14
INSTALL/REPLACE FUSES .............................................................. 15
6
INSTALL DESIGNATION CARD ASSEMBLY.................................................... 16
7
ACCESSORIES ...................................................................... 17
8
7.1
Cable Management Bar .......................................................... 17
7.2
Protective Guard Cover .......................................................... 18
7.2.1
Barrel-Type Input Connectors ............................................... 18
7.2.2
Stud-Type Input Connectors ................................................ 19
7.3
Fuse Puller .................................................................. 20
7.4
Designation Pins and Designation Holder .............................................. 21
CUSTOMER INFORMATION AND ASSISTANCE ................................................. 22
INTRODUCTION
This manual contains installation and cabling procedures for the PowerWorx GMT “60e”
Series Power Distribution Panels (both barrel and stud-type input connector panels).
Page 2
© 2002, ADC Telecommunications, Inc.
ADCP-80-534 Issue 1, January 2002
Revision History
ISSUE
DATE
REASON FOR CHANGE
Issue 1
1/02
Original
Trademark Information
PowerWorx, ADC and ADC Telecommunications are registered trademarks of ADC
Telecommunications, Inc.
Admonishments
Important safety admonishments are used throughout this manual to warn of possible hazards
to persons or equipment. An admonishment identifies a possible hazard and then explains what
may happen if the hazard is not avoided. The admonishments — in the form of Dangers,
Warnings, and Cautions — must be followed at all times. These warnings are flagged by use
of the triangular alert icon (seen below), and are listed in descending order of severity of injury
or damage and likelihood of occurrence.
Danger: Danger is used to indicate the presence of a hazard that will cause severe personal
injury, death, or substantial property damage if the hazard is not avoided.
Warning: Warning is used to indicate the presence of a hazard that can cause severe personal
injury, death, or substantial property damage if the hazard is not avoided.
Caution: Caution is used to indicate the presence of a hazard that will or can cause minor
personal injury or property damage if the hazard is not avoided.
Page 3
© 2002, ADC Telecommunications, Inc.
ADCP-80-534 Issue 1, January 2002
1
TOOLS AND ACCESSORIES
Table 1. Tools Required
TOOLS
PICTURE
REMARKS
Phillips Screwdriver
00-17
Straight Screwdriver
00-19
Torque Wrench
Torque to 16.0 lb-in (2.0 Nm)
Nut Driver
00-18
Page 4
© 2002, ADC Telecommunications, Inc.
ADCP-80-534 Issue 1, January 2002
Table 2. Accessories
ACCESSORY
PICTURE
REMARKS
Cable Management Bar
Section 7.1, “Cable
Management Bar” on Page
17.
4-40 SCREWS
00-15
Protective Rear Guard
Kit
Section 7.2, “Protective Rear
Guard Cover” on Page 18.
STAR WASHERS (4)
STANDOFFS (4)
PROTECTIVE COVER
SCREWS (4)
00-21
Fuse Puller
Section 7.3, “Fuse Puller” on
Page 20.
17095-A
Extender Brackets (2)
23-Inch/600 mm
Section 3.2.2, “23-Inch/600
mm Rack” on Page 9.
EXTENDER
BRACKETS
00-14
SCREWS
STAR WASHERS
Ring Lug
Section 4.1, “Ground Wire”
on Page 10.
00-16
Ground Lug
Section 4.2.2, “Stud-Type
Input Connectors” on Page
12.
00-26
Fuses
GMT Type with
Indicator (Black)
Dummy (White)
Section 5, “Install/Replace
Fuses” on Page 15.
00-24
GMT (BLACK)
Designation Pins and
Designation Holders
DUMMY (WHITE)
DESIGNATION HOLDER (2)
DESIGNATION PINS (10)
Section 7.4, “Designation
Pins and Designation
Holder” on Page 21.
00-37
Page 5
© 2002, ADC Telecommunications, Inc.
ADCP-80-534 Issue 1, January 2002
2
SPECIFICATIONS
Table 3 lists the specifications for the GMT “60e” series fuse panel.
Table 3. Fuse Panel Specifications
PARAMETER
SPECIFICATION
REMARKS
Physical
Weight
4.0 lbs (1.81 kg)
Dimensions (H × W × D)
1.75 × 17.12 × 3.0 inches
(4.44 × 43.48 × 7.62 cm)
Color
Putty White
Rack mounting
19- inch (48.3 cm)
23-inch (58.4 cm)/600 mm ETSI
EIA or WECO (extender brackets
required for 23-inch/600 mm
mounting)
Rack spaces required
1 rack space
1.75 Inches (4.45 cm)
Allow one rack space directly
above and below fuse panel
Operating voltage
–48Vdc
–42 to –56 Vdc tolerance
Maximum input current
60 Amps per bus
15 Amps max per fuse position
Fuse type
GMT
Fuse positions
10 position single feed
20 position single feed
10/10 position dual feed
20/20 position dual feed
Maximum fuse size
15 Amps
Input terminal size
Set screw barrel-type
2-hole compression (stud) type
Up to #6 AWG wire (13.55 mm )
2
Up to #2 AWG wire (25 mm )
Output terminal type
Set screw barrel terminal strip
16 – 20 AWG wire
2
(1.0 – 0.5 mm )
Alarm terminal type
Set screw barrel terminal strip
16 – 20 AWG wire
2
(1.0 – 0.5 mm )
Alarm contact current
1 Amp maximum
Resistive load
Grounding connections
Single post
#6 AWG wire (13.55 mm )
Electrical
barrel-type and stud-type input
connectors
2
2
Environmental
Operating temperature
–5° C to +55° C
Humidity range
–45° C to +85° C
Altitude range
Up to 13,000 ft. (3.96 km) above
sea level
Fire rating
All components UL94 or better
Acoustic noise
0 dBA above ambient
Heat dissipation
20 watts maximum at 60 Amps
Heat dissipation (no load)
1 watt
Agency Approvals
UL, CE, CSA
Page 6
© 2002, ADC Telecommunications, Inc.
No condensation
Fully loaded
ADCP-80-534 Issue 1, January 2002
3
INSTALLATION
Warning: Never install fuse panel in a wet location or during a lightning storm. When
installing or modifying power lines, disconnect input power to “Bus A” and “Bus B” before
working with uninsulated lines or terminals.
3.1 Unpack and Inspection
Unpack and inspect fuse panel for damage. See Figure 1. For future orders, do not accept
product if shipping container is damaged. Do not throw away accessory package (Refer to
Table 2).
MAKE SURE BOX IS NOT DAMAGED
00-05
Figure 1. Unpack Fuse Panel
Page 7
© 2002, ADC Telecommunications, Inc.
ADCP-80-534 Issue 1, January 2002
3.2 Install Fuse Panel in Rack
3.2.1
19-Inch Rack (Standard)
Install the fuse panel (if necessary) in the rack as shown in Figure 2. Make sure to allow one
rack unit of space (as per UL specifications) above fuse panel.
STAR WASHER (4)
12-24 SCREW (4)
ONE RACK SPACE
ONE RACK SPACE
NOTE: ALLOW ONE RACK UNIT OF
SPACE DIRECTLY ABOVE AND BELOW
FUSE PANEL
00-02
Figure 2. Install the Fuse Panel in 19-Inch Rack
Page 8
© 2002, ADC Telecommunications, Inc.
ADCP-80-534 Issue 1, January 2002
3.2.2
23-Inch/600 mm Rack
Caution: When attaching the mounting brackets to the rack, use hardware provided with
extender bracket kit.
Attach the extender brackets (if ordered separately) and install the fuse panel, as shown in Figure 3.
1
INSTALL EXTENDER BRACKETS
EXTENDER
BRACKET (2)
2
BRACKETS INSTALLED
STAR WASHER (4)
12-24 SCREW (4)
3
INSTALL FUSE PANEL IN RACK
ALLOW ONE RACK SPACE
DIRECTLY ABOVE AND BELOW
FUSE PANEL
STAR WASHER (4)
12-24 SCREW (4)
00-11
Figure 3. Install Fuse Panel in 23-Inch Rack
Page 9
© 2002, ADC Telecommunications, Inc.
ADCP-80-534 Issue 1, January 2002
4
CABLE ROUTING
Warning: Never install fuse panel in a wet location or during a lightning storm. When
installing or modifying power lines, disconnect Bus A and Bus B before working with
uninsulated lines or terminals.
4.1 Ground Wire
Figure 4 shows the ground lug location for the fuse panel.
Note: Ground fuse panel according to local practice.
6 AWG WIRE
00-06
Figure 4. Ground Wire Connection
Page 10
© 2002, ADC Telecommunications, Inc.
ADCP-80-534 Issue 1, January 2002
4.2 Input Power Cables
4.2.1
Barrel-Type Input Connectors
Caution: Do not access inside barrel connectors, Warranty will be voided.
STRIP CABLE JACKET
BACK 1.27 CM (0.5 INCHES)
BARE
WIRE
22
18
JACKET
24
20
16
0
IN-LB
#6 AWG WIRE
TORQUE TO 16.0 LB-IN.
(2.0 Nm)
SOURCE "B"
#6 AWG WIRE
SOURCE "A"
TIGHTEN SCREW(S)
TO SECURE CABLE(S).
TORQUE TO 16.0 LB-IN
(2.0 Nm)
BATT (-)
RED/BLACK
WIRE (#6 AWG)
RTN (+)
BLACK WIRE
(#6 AWG)
00-07
!
CAUTION: DO NOT
ACCESS INSIDE BARRELS,
WARRANTY WILL BE VOIDED.
Figure 5. Input Power Wire Connection (Barrel-Type Input Connectors)
Page 11
© 2002, ADC Telecommunications, Inc.
ADCP-80-534 Issue 1, January 2002
4.2.2
Stud-Type Input Connectors
Connect the input power as shown in Figure 6.
2-HOLE LUG TERMINAL
(ORDERED SEPARATELY)
HEAT SHRINK TUBING
(2-INCH LENGTH)
#6 AWG
COPPER WIRE
STRIP BACK 7/8 INCH
OF INSULATION.
APPLY NO-OX GEL
OR SIMILAR CONDUCTIVE
MATERIAL.
WASHER
NUT
APPLY NO-OX GEL
OR SIMILAR CONDUCTIVE
MATERIAL TO BOTH SIDES
(-)
RED/BLACK
WIRE (#6 AWG)
RTN (+)
BLK WIRE
(#6 AWG)
USE NUT DRIVER TO
TIGHTEN NUTS
00-29
Figure 6. Connect Input Power Wires (Stud-Type Input Connectors)
Page 12
© 2002, ADC Telecommunications, Inc.
ADCP-80-534 Issue 1, January 2002
4.3 Output Wires
Connect and route the output wires as shown in Figure 7. Note, barrel-type input connector
fuse panel shown for reference. Connect output wires to the stud-type input connector fuse
panel in the same manner. If using cable management bar (ordered separately), refer to Section
7.1, “Cable Management Bar.”
STRIP JACKET ON CABLE
BACK 1.27 CM (0.5 IN)
ROUTE WIRES FROM CONNECTOR POSITION 1 TO CHASSIS 1,
ROUTE WIRES FROM CONNECTOR POSITION 2 TO CHASSIS 2.
CONTINUE ROUTING REMAINING WIRES IN SAME MANNER.
16-20 AWG WIRE
CONNECTOR
POSITION 1
CONNECTOR
POSITION 10
22
18
24
20
16
0
IN-LB
TORQUE TO 16.0 LB-IN
(2.0 Nm)
SOURCE "B"
(OUTPUT WIRES)
TIGHTEN SCREW(S) TO
SECURE WIRE(S)
TORQUE TO 16.0 LB-IN
(2.0 Nm)
BATT (-)
RED/BLACK WIRE
(16-20 AWG)
RTN (+)
BLACK WIRE
(16-20 AWG)
00-08
USE CABLE TIES
OR LACING
FOR CABLE
MANAGEMENT
SOURCE "A"
(OUTPUT WIRES)
Figure 7. Output Wire Connection
Page 13
© 2002, ADC Telecommunications, Inc.
ADCP-80-534 Issue 1, January 2002
4.4 Alarm Wires
Connect wires for alarm as shown in Figure 8. Note, barrel-type input connector fuse panel
shown for reference.
NOTE, NORMALLY CLOSED (NC)
CIRCUIT SHOWN FOR EXAMPLE
STRIP JACKET ON CABLE
BACK 1.27 CM (0.5 IN)
TO
ALARM
00-09
TIGHTEN SCREW(S)
TO SECURE WIRE(S)
Figure 8. Alarm Wire Connection
Page 14
© 2002, ADC Telecommunications, Inc.
ADCP-80-534 Issue 1, January 2002
5
INSTALL/REPLACE FUSES
Install or replace the GMT fuse as shown in Figure 9.
Caution: When replacing fuses, always replace the fuse with the same type and rating as the
one removed.
FUSE PULLER
1
USING FUSE PULLER, REMOVE
FUSE, AS REQUIRED
00-34
2
USING FUSE PULLER,
INSTALL FUSE AS SHOWN.
NOTE FUSE ORIENTATION
Figure 9. Fuse Installation
Page 15
© 2002, ADC Telecommunications, Inc.
ADCP-80-534 Issue 1, January 2002
6
INSTALL DESIGNATION CARD ASSEMBLY
Attach the designation card (provided) to the fuse panel, to one of the fuse panel mounting
brackets, or to a part of the rack. Figure 10 shows the designation card assembly attached to
the fuse panel.
PLASTIC
COVER
REMOVE ADHESIVE BACKING
ON DESIGNATION CARD HOLDER
AND AFFIX TO PANEL
DESIGNATION
CARD
DESIGNATION
CARD HOLDER
Figure 10. Designation Card Assembly Installation Example
Page 16
© 2002, ADC Telecommunications, Inc.
00-32
ADCP-80-534 Issue 1, January 2002
7
ACCESSORIES
7.1 Cable Management Bar
Install the cable management bar as shown in Figure 11.
CABLE MANAGEMENT BAR
00-12
4-40 SCREWS (6)
Figure 11. Cable Management Bar
Page 17
© 2002, ADC Telecommunications, Inc.
ADCP-80-534 Issue 1, January 2002
7.2 Protective Guard Cover
7.2.1
Barrel-Type Input Connectors
Install the protective rear guard cover as shown in Figure 12.
STAR WASHER (4)
STANDOFF (4)
SCREW (4)
PROTECTIVE COVER
TO
ALARM
00-10
TIGHTEN SCREWS (4)
TO SECURE PROTECTIVE
COVER
Figure 12. Install Protective Guard Cover
Page 18
© 2002, ADC Telecommunications, Inc.
ADCP-80-534 Issue 1, January 2002
7.2.2
Stud-Type Input Connectors
Install the protective rear guard kit as shown in Figure 13.
"SOURCE B"
INPUT WIRES
"SOURCE A"
INPUT WIRES
STAR WASHER (4)
STANDOFF (4)
PROTECTIVE COVER
SCREW (4)
PROTECTIVE COVER (2)
(PROVIDED)
INSTALL OVER
INPUT CABLE
CONNECTORS
00-31
Figure 13. Install Protective Guard Cover
Page 19
© 2002, ADC Telecommunications, Inc.
ADCP-80-534 Issue 1, January 2002
7.3 Fuse Puller
Use fuse puller (recommended) to remove blown fuse. See Figure 14.
GMT FUSE
GMT FUSE
FUSE PULLER
FUSE PULLER
00-35
TOP VIEW
Figure 14. Fuse Puller
Page 20
© 2002, ADC Telecommunications, Inc.
ADCP-80-534 Issue 1, January 2002
7.4 Designation Pins and Designation Holder
Designation pins and designation pin holders are available to ensure proper fusing (Figure 15).
REMOVE ADHESIVE STRIP ON BACK
OF DESIGNATION HOLDER
1
2
3
AFFIX TO FUSE PANEL,
AS SHOWN
INSERT DESIGNATION PIN(S),
AS REQUIRED
DESIGNATION HOLDER
DESIGNATION PIN (10)
DESIGNATION HOLDER
INSTALLED
00-36
Figure 15. Designation Pins and Designation Holder
Page 21
© 2002, ADC Telecommunications, Inc.
ADCP-80-534 Issue 1, January 2002
8
CUSTOMER INFORMATION AND ASSISTANCE
PHONE:
EUROPE
Sales Administration: +32-2-712-65 00
Technical Assistance: +32-2-712-65 42
U.S.A. OR CANADA
Sales: 1-800-366-3891 Extension 73000
Technical Assistance: 1-800-366-3891 Extension 73475
ELSEWHERE
Sales Administration: +1-952-938-8080
Technical Assistance: +1-952-917-3475
SYSTEM INTEGRATION DIVISION (SID)
+1-952-294-3600
WRITE:
U.S.A.
ADC TELECOMMUNICATIONS, INC
PO BOX 1101,
MINNEAPOLIS, MN 55440-1101, USA
U.S.A.
ADC EUROPEAN CUSTOMER SERVICE, INC
BELGICASTRAAT 2,
1930 ZAVENTEM, BRUSSELS, BELGIUM
PRODUCT INFORMATION AND TECHNICAL ASSISTANCE:
WWW.ADC.COM
technical@adc.com
13944-G
Contents herein are current as of the date of publication. ADC reserves the right to change the contents without prior notice.
In no event shall ADC be liable for any damages resulting from loss of data, loss of use, or loss of profits and ADC further
disclaims any and all liability for indirect, incidental, special, consequential or other similar damages. This disclaimer of
liability applies to all products, publications and services during and after the warranty period. This publication may be
varified at any time by contacting ADC's Technical Assistance Center.
© 2002, ADC Telecommunications, Inc.
All Rights Reserved
Printed in U.S.A.
Page 22


