Matrix Operations Using Mathcad
advertisement
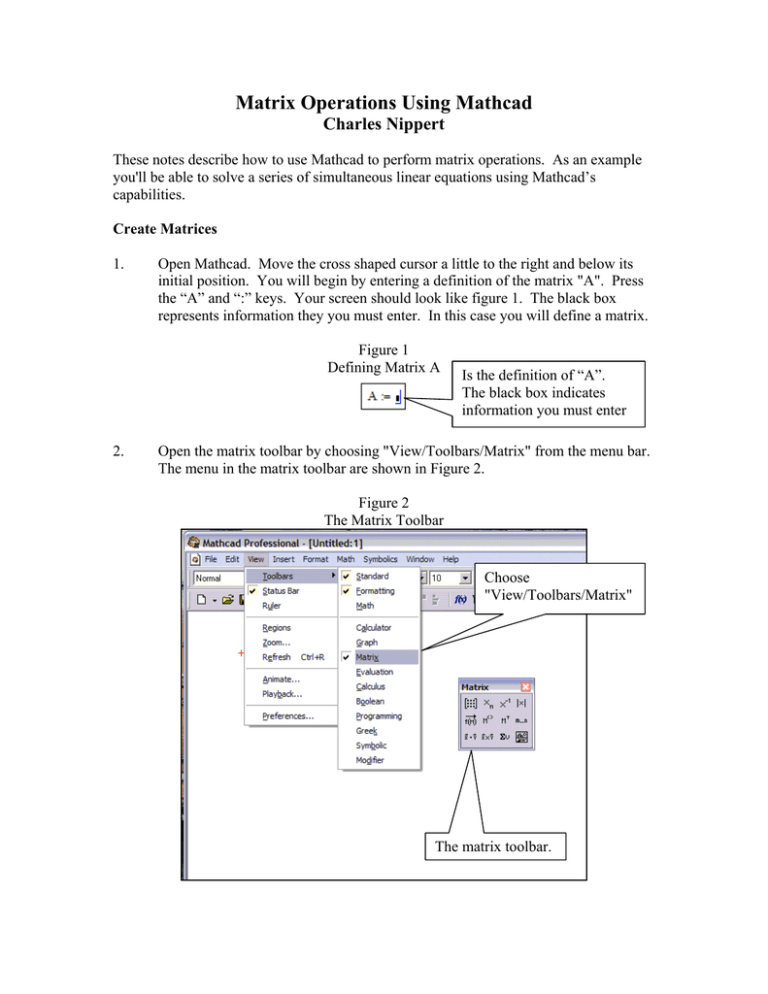
Matrix Operations Using Mathcad Charles Nippert These notes describe how to use Mathcad to perform matrix operations. As an example you'll be able to solve a series of simultaneous linear equations using Mathcad’s capabilities. Create Matrices 1. Open Mathcad. Move the cross shaped cursor a little to the right and below its initial position. You will begin by entering a definition of the matrix "A". Press the “A” and “:” keys. Your screen should look like figure 1. The black box represents information they you must enter. In this case you will define a matrix. Figure 1 Defining Matrix A 2. Is the definition of “A”. The black box indicates information you must enter Open the matrix toolbar by choosing "View/Toolbars/Matrix" from the menu bar. The menu in the matrix toolbar are shown in Figure 2. Figure 2 The Matrix Toolbar Choose "View/Toolbars/Matrix" The matrix toolbar. 2. Choose the button that looks like a matrix ( ) from the matrix toolbar. The "Insert Matrix" dialog box should appear. Enter "4" for the number of rows and “2” for the number of columns. The dialog box should she appear as shown in figure 2. Figure 2 The Insert Matrix Dialog Box 3. Click "OK". The dialog box will disappear and the cross cursor will be replaced on an empty 4 x 2 matrix. The black box placeholder shows the location of each and element in the matrix. Your screen should appear like Figure 3A. The blue inverted L cursor will appear around the upper left element. As you type numbers they will appear in the element surrounded by the inverted L cursor. Use the arrow buttons to move the inverted L cursor from one element to another. Enter all the elements so that your matrix looks like Figure 3B. Figure 3B Figure 3A The Completed Matrix The Empty “A” Matrix 4. Move the mouse cursor to a place just below the matrix you have created and click the left mouse button. The red cross cursor will appear. Create a second 4x2 matrix called "B" and defined as shown in figure 4. Figure 4 The “B” Matrix Simple Matrix Operations 5. Matrix addition and subtraction can be performed by using the “+” and “-“ operators. As an example, add the vector “A” to the vector “B”. Move the mouse cursor to somewhere below the definition of vector “B” and click the left mouse button. Type “A+B=” (use the equals key to create the “=” symbol). Immediately after you press the equals key, Mathcad performs the operation and displays the result to the right of the =. The result is shown in figure 5A. Move your cursor below this result and type A-B=”. Again the result is shown (figure 5B). Multiplication of a matrix by a scalar is done in the same way. Type the keys “2*A=” and the result should appear like figure 5C. Figure 5B Figure 5C Figure 5A A-B 2A A+B 6. The transpose of a matrix is formed by interchanging the rows and columns of a matrix. Create a new matrix “C” that is the transpose of matrix “A”. Press the "C", ":" and, the "A" keys. The equation "C = A” should appear on your screen with the inverted L cursor around the A as shown in figure 6A. Move the mouse cursor to the transpose button ( ) on the matrix toolbar and click it. The transpose superscript should appear a shown a Figure 6B. Show the transpose of A by moving the mouse cursor below your equation and pressing the “C” and “=” keys. If your matrix A is the same as shown earlier, your result should look like figure 6 B. Figure 6A Entering A Definition Figure 6B Transpose Of A Matrix Figure 6B C Is The Transpose Of A 7. Matrix multiplication can be performed using the ordinary multiplication symbol. Move the mouse cursor to a space below the definition of matrix C and click the left mouse button. Press the keys “A”, “*”, “C” and, “=”. After the equals key is pressed the product of A and C will appear to the right of the =. If you defined matrix A with the values given earlier, your answer should be the same as shown in figure 7 Figure 7 An Example Of Matrix Multiplication n The formula for matrix the product of multiplication is d jk = ∑ a jlclk . l =1 Inverse of a matrix 8. You will now find the inverse of a square matrix. First define a square 3x3 matrix D using the approach you used in step 1 and 2 except that you will enter “3” for the number of rows and columns in the Insert Matrix Dialog Box. Create a matrix with the values shown in Figure 8. Figure 8 The Matrix D 9. Define a second matrix, E, that is the inverse of matrix D. Begin by pressing the “E”, “=” and “D” keys. The inverted L cursor appears around the D as shown in Figure 9A. You can use the “^” symbol to create an exponent (remember that X^Y represents XY in Excel, Basic and many other software applications). After you press the “^” key, a superscript block is creates as shown in Figure 9B. Press the “-“ and “1” keys in that order. Your formula should look like Figure 9C Figure 9A Figure 9B Figure 9C 10. Display the contents of matrix E by typing “E” and “=” somewhere below the definition of E. If you entered the values shown in Figure 8, your matrix should look like figure 10. Figure 10 Matrix E Is The Inverse Of D 11. You can prove that E is the inverse of D by multiplying D and E. Move the cursor below your work on the Mathcad worksheet. Press the “D”. “*” , “E” and “=” keys. As soon as you press the “=” key, the result should appear as shown in Figure 11. Figure 11 The Product Of D Times E Is The Identity Matrix
