SolarMount®/S-5!™ Clamp Sets
Mounting PV Modules to Standing-Seam Metal Roofs
Installation Sheet 220
Thank you for using UniRac products. SolarMount®/S-5!™
clamp sets attach PV modules directly to standing seam metal
roofs. No rails or roof penetrations are necessary.
Please review these instructions thoroughly before installing
your array.
When an array is attached to a standingseam metal roof, the roof becomes a structural member of the array. It must be
properly secured so that it can support the array
under live load conditions, including wind uplift
loads. The installer is solely responsible for ensuring that
the roof, its rafters or purlins, connections, and other structural support members can withstand design wind forces.
The installer is also solely responsible for:
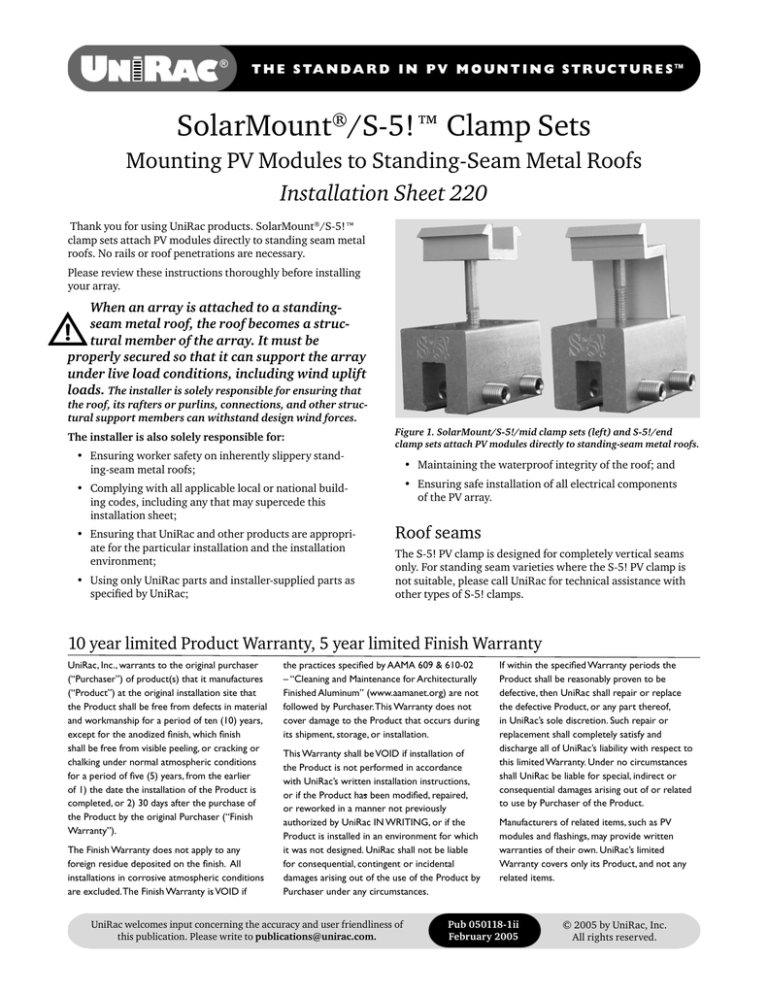
Figure 1. SolarMount/S-5!/mid clamp sets (left) and S-5!/end
clamp sets attach PV modules directly to standing-seam metal roofs.
• Ensuring worker safety on inherently slippery standing-seam metal roofs;
• Maintaining the waterproof integrity of the roof; and
• Ensuring safe installation of all electrical components
of the PV array.
• Complying with all applicable local or national building codes, including any that may supercede this
installation sheet;
• Ensuring that UniRac and other products are appropriate for the particular installation and the installation
environment;
• Using only UniRac parts and installer-supplied parts as
specified by UniRac;
Roof seams
The S-5! PV clamp is designed for completely vertical seams
only. For standing seam varieties where the S-5! PV clamp is
not suitable, please call UniRac for technical assistance with
other types of S-5! clamps.
10 year limited Product Warranty, 5 year limited Finish Warranty
UniRac, Inc., warrants to the original purchaser
(“Purchaser”) of product(s) that it manufactures
(“Product”) at the original installation site that
the Product shall be free from defects in material
and workmanship for a period of ten (10) years,
except for the anodized finish, which finish
shall be free from visible peeling, or cracking or
chalking under normal atmospheric conditions
for a period of five (5) years, from the earlier
of 1) the date the installation of the Product is
completed, or 2) 30 days after the purchase of
the Product by the original Purchaser (“Finish
Warranty”).
The Finish Warranty does not apply to any
foreign residue deposited on the finish. All
installations in corrosive atmospheric conditions
are excluded. The Finish Warranty is VOID if
the practices specified by AAMA 609 & 610-02
– “Cleaning and Maintenance for Architecturally
Finished Aluminum” (www.aamanet.org) are not
followed by Purchaser. This Warranty does not
cover damage to the Product that occurs during
its shipment, storage, or installation.
This Warranty shall be VOID if installation of
the Product is not performed in accordance
with UniRac’s written installation instructions,
or if the Product has been modified, repaired,
or reworked in a manner not previously
authorized by UniRac IN WRITING, or if the
Product is installed in an environment for which
it was not designed. UniRac shall not be liable
for consequential, contingent or incidental
damages arising out of the use of the Product by
Purchaser under any circumstances.
UniRac welcomes input concerning the accuracy and user friendliness of
this publication. Please write to publications@unirac.com.
If within the specified Warranty periods the
Product shall be reasonably proven to be
defective, then UniRac shall repair or replace
the defective Product, or any part thereof,
in UniRac’s sole discretion. Such repair or
replacement shall completely satisfy and
discharge all of UniRac’s liability with respect to
this limited Warranty. Under no circumstances
shall UniRac be liable for special, indirect or
consequential damages arising out of or related
to use by Purchaser of the Product.
Manufacturers of related items, such as PV
modules and flashings, may provide written
warranties of their own. UniRac’s limited
Warranty covers only its Product, and not any
related items.
Pub 050118-1ii
February 2005
© 2005 by UniRac, Inc.
All rights reserved.
Installation Sheet 220
SolarMount®/S-5!™ Clamp Sets
Parts
Recommended
torque (ft.-lbs.)
Wrench
3/
16˝
S-5! clamp w/ 2 sets screws
allen
10 – 13
SolarMount end clamp w/ hexhead bolt
7/
12 – 15
SolarMount mid clamp w/ hexhead bolt
7/
12 – 15
16˝
16˝
Stainless steel hardware can seize up, a
process called galling. To significantly reduce its likelihood, (1) apply lubricant to
bolts, preferably an anti-seize lubricant, available
at auto parts stores, (2) shade hardware prior to
installation, and (3) avoid spinning on nuts at high
speed. See Installation Supplement 910, Galling
and Its Prevention, at www.unirac.com.
Layout and required attachments
Always mount PV modules in landscape mode. In other words,
the long edges of the modules, which will take the clamps,
must be perpendicular to the seams of the roof.
An S-5!/end clamp set consists of one S-5! PV clamp with set
screws and one SolarMount end clamp with mounting bolt.
An S-5!/mid clamp set consists of one S-5! PV clamp with set
screws and one SolarMount mid clamp with mounting bolt.
Use one clamp set wherever the long edge of a module crosses
a standing seam. Even a very small PV module must be secured
by no fewer than four attachments.
Mid clamp sets
End clamp sets
Assembly
Loosely assemble all clamp sets on the ground. On the roof,
follow these steps.
1. On the roof, begin with the lowest row of modules. Use
a chalk line or other means to precisely align and mark
clamp positions for the bottom edge of the row. Attach
and tighten S-5!/end clamp sets to these positions.
Tighten the set screw to 10 foot-pounds. Tightening
each set screw will affect the other, so retighten both,
again to 10 foot-pounds .
Tightening the set screws may tilt the S-5! on the seam.
Place and secure modules to bring the clamp back to the
proper orientation. For any particular type of seam,
use the experience of the first four or five connections to
develop your technique.
Figure 2. Align and install the lower S-5!/end clamp sets first, followed by the first row of PV modules and the first row of S-5!/mid
clamps. Work up the slope of the roof.
2. Position the lowest row of modules and loosely clamp
them in place with the SolarMount end clamps. Position the next row of clamp sets to support the upper
side of the first row of modules. Use S-5!/mid clamp
sets between rows of modules.
Never substitute an S-5!/mid clamp set where an
S-5!/end clamp set is required. Use mid clamp sets
between modules only.
3. Securely fasten the S-5! PV clamp, while observing the
caution in Step 1. Once a module row is supported on
both the upper and lower sides,
fully torque the hexhead bolts on
the SolarMount clamps on the
lower set of clamps.
A SolarMount end clamp
should lean slightly into the
module (Fig. 3).
4. Continue this procedure for each
row of modules. For the top edge
of the highest row, use S-5!/end
clamp sets.
Figure 3. Lean the SolarMount end clamp slightly into the
module. Avoid perpendicular orientation and never allow
the clamp to lean away from the module.
Page
2
UniRac, Inc.
www.unirac.com
3201 University Boulevard SE, Suite 110
Albuquerque NM 87106-5635 USA
505.242.6411
505.242.6412 Fax


