STEMSEL Beginners Project 7: Musical Buzzer
Problem
We want to make a musical instrument with our microchip. How can we make our microchip
make sounds, and how can we change the sound to different musical notes?
Background
Have you ever wondered how you hear sound? Sound is made when something moves
backwards and forwards very quickly, which is called vibration. When we speak, our vocal
cords vibrate back and forth. Speakers have a diaphragm that vibrates, and musical
instruments cause vibrations in many different ways, like the strings on a guitar, the reed of a
saxophone, or the skin of a drum. Click the following video link to learn more about sound
and hearing: http://www.youtube.com/watch?v=_ovMh2A3P5k.
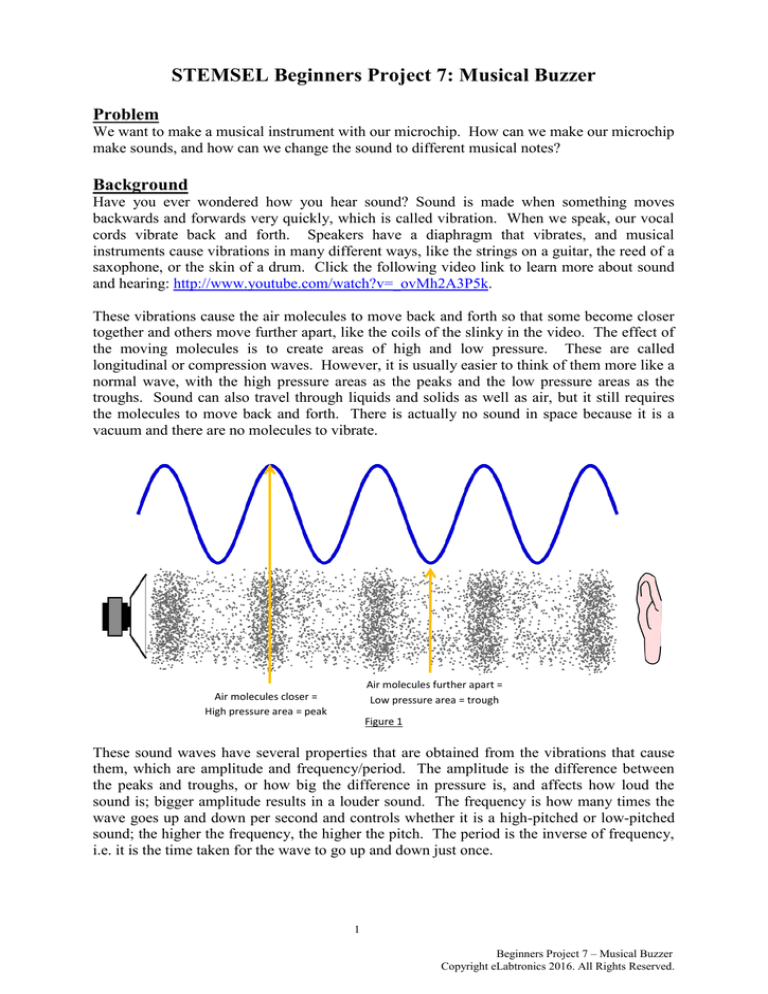
These vibrations cause the air molecules to move back and forth so that some become closer
together and others move further apart, like the coils of the slinky in the video. The effect of
the moving molecules is to create areas of high and low pressure. These are called
longitudinal or compression waves. However, it is usually easier to think of them more like a
normal wave, with the high pressure areas as the peaks and the low pressure areas as the
troughs. Sound can also travel through liquids and solids as well as air, but it still requires
the molecules to move back and forth. There is actually no sound in space because it is a
vacuum and there are no molecules to vibrate.
Air molecules further apart =
Low pressure area = trough
Air molecules closer =
High pressure area = peak
Figure 1
These sound waves have several properties that are obtained from the vibrations that cause
them, which are amplitude and frequency/period. The amplitude is the difference between
the peaks and troughs, or how big the difference in pressure is, and affects how loud the
sound is; bigger amplitude results in a louder sound. The frequency is how many times the
wave goes up and down per second and controls whether it is a high-pitched or low-pitched
sound; the higher the frequency, the higher the pitch. The period is the inverse of frequency,
i.e. it is the time taken for the wave to go up and down just once.
1
Beginners Project 7 – Musical Buzzer
Copyright eLabtronics 2016. All Rights Reserved.
Wavelength
High frequency, short period, high pitch
Amplitude
Low frequency, long period, low pitch
Figure 2
When the vibrations reach your ears, they cause your eardrum to vibrate and send signals to
your brain which it interprets as sound. Humans can hear sounds ranging in frequency from
20Hz to about 20,000Hz (20 to 20,000 waves per second), although the older you get the
harder it is to hear the high sounds, due to the bones in your ear growing and through damage
caused to the ears. If you listen to music that’s too loud, you can permanently damage your
ears and won’t be able to hear as well.
Ideas
What have we got in our kits that can make a noise? Yes, the buzzer. When power is sent to
the buzzer, a small piece of metal moves to push the air and make the noise. If we leave the
buzzer on for a long time, it vibrates the metal at a set frequency to make just one tone. How
can we control the buzzer so that it makes different sounds? If sound is a wave, how can we
make a wave using our buzzer, and how can we control the frequency of our wave? Is there
something in our kits that we can use to adjust a value?
Plan
In order to make the buzzer play the tones that we want, we need to be able to control the
way it vibrates. Normally when we turn it on, it will vibrate at a set frequency, but if we
could change the frequency or the period of the vibration we could control the sound. By
turning the buzzer on and off really fast with the desired period it is possible to make the
vibrations we need. By doing this, the action of the buzzer will look like a series of waves,
with the peaks being when the buzzer is on, and the troughs when the buzzer is off.
Buzzer on
Buzzer off
Time delay =
half the period
Period
Figure 3
Finally, is there a way we can adjust the period? It is possible to do this by adjusting the time
the buzzer is on and off, but what if we want to control it while the program is running? A
potentiometer will allow us to finely adjust the period.
2
Beginners Project 7 – Musical Buzzer
Copyright eLabtronics 2016. All Rights Reserved.
Design the Circuit
Use ezCircuit Designer to construct an input/output (I/O) diagram. Remember to right click
to rename the components.
Figure 4
Build the Circuit
Use the ezCircuit Designer I/O diagram to connect the hardware. Remember that black wires
go in negative, red wires go in positive, and white wires go in the pin designated on the
circuit design.
Figure 5
3
Beginners Project 7 – Musical Buzzer
Copyright eLabtronics 2016. All Rights Reserved.
Programming
Now that the circuit is complete, click the Send to Corechart button. After you have used the
test routine to check the buzzer, delete it so that we can start writing our own program.
1. First we will make the buzzer play just one tone. Looking at the plan, in order to make
our wave we first need to make it go up, i.e. turn the buzzer on. Use an OnOffPin icon to
turn the buzzer on.
2. Now we need to leave the buzzer on for half of our selected period. Use a TimeDelay
icon to leave the buzzer on for 15 ten thousandths of a second.
3. Now it is time for our wave to go back down to the trough. Use an OnOffPin icon and a
TimeDelay icon to turn the buzzer off for 15 ten thousandths of a second. You may want
to copy and paste the first time delay, since the on time should always be equal to the off
time.
4. If there is just one wave, we won’t be able to hear the sound at all since it will be too
fast. Add a GoTo START icon at the end of the program so our wave continues over and
over.
5. Send the program to chip and test it. Try adjusting the time delays to different values
and see if you can hear the difference in the tones.
Figure 6
4
Beginners Project 7 – Musical Buzzer
Copyright eLabtronics 2016. All Rights Reserved.
We have made our buzzer play one tone, but a musical instrument should be able to play
many different notes. We don’t want to have to reprogram the microchip every time we want
to change the note, so like we said in our plan we will use the potentiometer to change the
time delay, and hence the period and the note.
6. First we need to get the period from the potentiometer. Use an AnalogIn icon to save the
POT value as Period.
7. Change the TimeDelay icons to delay for ‘Period’ ten thousandths of a second.
Currently, this will set the delay to any number between 0 and 255. However, this delay
will actually be too long, so we need some way to shorten it. If you send this program to
the chip you can hear the effect. Can you think of a way to shorten the delay?
8. Just below the AnalogIn icon, place a Divide icon (Numbers -> Divide) and use it to
divide the Period by 25, saving the result as Period again. This will mean our delay can
be anything between 0 and 10 ten thousandths of a second, meaning we should be able to
hear 11 tones (0/25=0 and 255/25=10).
9. Send the program to chip again. You should now be able to hear the distinct tones as
you turn the dial.
Figure 7
5
Beginners Project 7 – Musical Buzzer
Copyright eLabtronics 2016. All Rights Reserved.
Extension
Our buzzer currently plays just a few tones. How could we make it play music?
To make the buzzer play a specific note, we would need to make it vibrate at the correct
frequency, which would take some very specific timing. A middle-A note has a frequency of
440Hz, which corresponds to a period of about 0.00227 seconds, or almost 23 ten
thousandths of a second. However, since the period is the complete time for the wave to go
up and down, the buzzer should actually be on for only half that time, i.e. on for 11 ten
thousandths then off for 11 ten thousandths.
If you play a musical instrument, you know that music can be quite complex, requiring you to
play the right note for the right duration, which makes music quite difficult to play on
microchips. To play the notes accurately, we would need even shorter delays to get the right
period, and complicated loops to play the notes for specific lengths of time. For the A-note
mentioned above, if each wave only takes 23 ten thousandths of a second, then it will take
440 of these waves for the note to last for just one second!
Summary
All sound is made from vibrations, which then travel through a medium like air or water to
our ears. The amplitude and frequency of the sound waves affect the loudness and pitch of
the sound. Loud sounds can damage our ears, meaning we can’t hear as well, so it is
important not to turn your music up too loud. In this project we used the potentiometer to
control the frequency of a sound played on a buzzer. There are other ways we can use waves
and microchips together to make cool things, and we will be learning more about this in the
next project, the light dimmer.
6
Beginners Project 7 – Musical Buzzer
Copyright eLabtronics 2016. All Rights Reserved.


