The Pitch Diameter of Pipe Taper Thread
advertisement

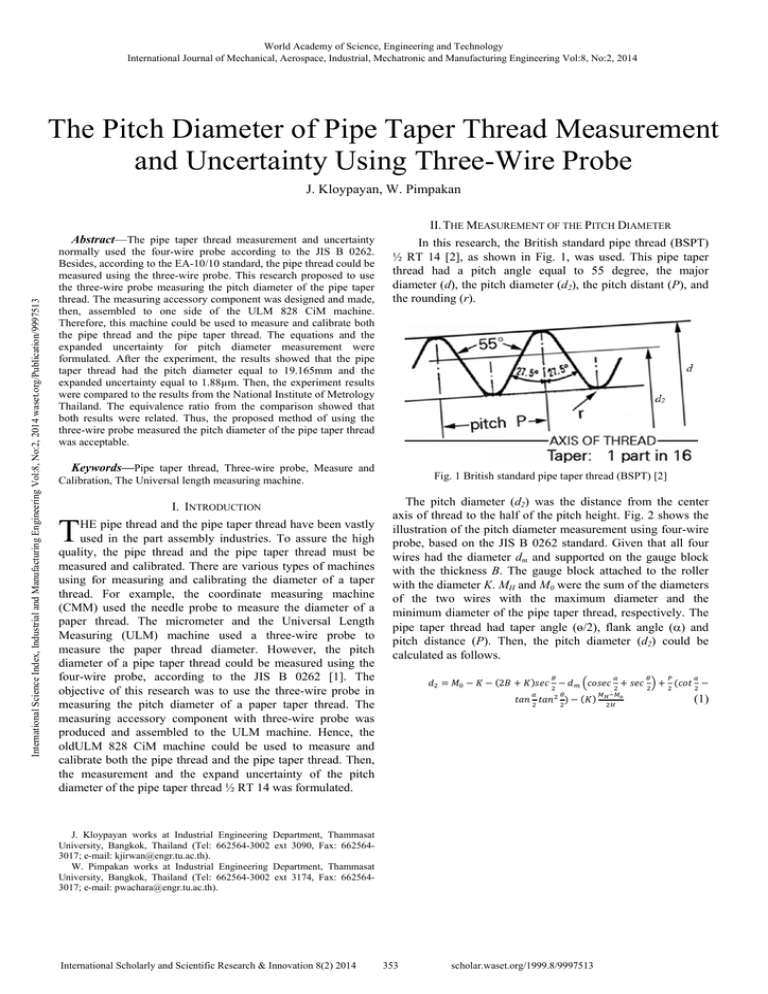
World Academy of Science, Engineering and Technology International Journal of Mechanical, Aerospace, Industrial, Mechatronic and Manufacturing Engineering Vol:8, No:2, 2014 The Pitch Diameter of Pipe Taper Thread Measurement and Uncertainty Using Three-Wire Probe J. Kloypayan, W. Pimpakan II. THE MEASUREMENT OF THE PITCH DIAMETER International Science Index, Industrial and Manufacturing Engineering Vol:8, No:2, 2014 waset.org/Publication/9997513 Abstract—The pipe taper thread measurement and uncertainty normally used the four-wire probe according to the JIS B 0262. Besides, according to the EA-10/10 standard, the pipe thread could be measured using the three-wire probe. This research proposed to use the three-wire probe measuring the pitch diameter of the pipe taper thread. The measuring accessory component was designed and made, then, assembled to one side of the ULM 828 CiM machine. Therefore, this machine could be used to measure and calibrate both the pipe thread and the pipe taper thread. The equations and the expanded uncertainty for pitch diameter measurement were formulated. After the experiment, the results showed that the pipe taper thread had the pitch diameter equal to 19.165mm and the expanded uncertainty equal to 1.88µm. Then, the experiment results were compared to the results from the National Institute of Metrology Thailand. The equivalence ratio from the comparison showed that both results were related. Thus, the proposed method of using the three-wire probe measured the pitch diameter of the pipe taper thread was acceptable. In this research, the British standard pipe thread (BSPT) ½ RT 14 [2], as shown in Fig. 1, was used. This pipe taper thread had a pitch angle equal to 55 degree, the major diameter (d), the pitch diameter (d2), the pitch distant (P), and the rounding (r). Keywords—Pipe taper thread, Three-wire probe, Measure and Calibration, The Universal length measuring machine. I. INTRODUCTION T HE pipe thread and the pipe taper thread have been vastly used in the part assembly industries. To assure the high quality, the pipe thread and the pipe taper thread must be measured and calibrated. There are various types of machines using for measuring and calibrating the diameter of a taper thread. For example, the coordinate measuring machine (CMM) used the needle probe to measure the diameter of a paper thread. The micrometer and the Universal Length Measuring (ULM) machine used a three-wire probe to measure the paper thread diameter. However, the pitch diameter of a pipe taper thread could be measured using the four-wire probe, according to the JIS B 0262 [1]. The objective of this research was to use the three-wire probe in measuring the pitch diameter of a paper taper thread. The measuring accessory component with three-wire probe was produced and assembled to the ULM machine. Hence, the oldULM 828 CiM machine could be used to measure and calibrate both the pipe thread and the pipe taper thread. Then, the measurement and the expand uncertainty of the pitch diameter of the pipe taper thread ½ RT 14 was formulated. Fig. 1 British standard pipe taper thread (BSPT) [2] The pitch diameter (d2) was the distance from the center axis of thread to the half of the pitch height. Fig. 2 shows the illustration of the pitch diameter measurement using four-wire probe, based on the JIS B 0262 standard. Given that all four wires had the diameter dm and supported on the gauge block with the thickness B. The gauge block attached to the roller with the diameter K. MH and M0 were the sum of the diameters of the two wires with the maximum diameter and the minimum diameter of the pipe taper thread, respectively. The pipe taper thread had taper angle (ө/2), flank angle (α) and pitch distance (P). Then, the pitch diameter (d2) could be calculated as follows. 2 (1) J. Kloypayan works at Industrial Engineering Department, Thammasat University, Bangkok, Thailand (Tel: 662564-3002 ext 3090, Fax: 6625643017; e-mail: kjirwan@engr.tu.ac.th). W. Pimpakan works at Industrial Engineering Department, Thammasat University, Bangkok, Thailand (Tel: 662564-3002 ext 3174, Fax: 6625643017; e-mail: pwachara@engr.tu.ac.th). International Scholarly and Scientific Research & Innovation 8(2) 2014 353 scholar.waset.org/1999.8/9997513 World Academy of Science, Engineering and Technology International Journal of Mechanical, Aerospace, Industrial, Mechatronic and Manufacturing Engineering Vol:8, No:2, 2014 2 (2) III. THE EXPANDED UNCERTAINTY OF THE PITCH DIAMETER International Science Index, Industrial and Manufacturing Engineering Vol:8, No:2, 2014 waset.org/Publication/9997513 The EA-10/10 standard was applied when the pitch diameter of the pipe thread was measured using the three-wire probe, as shown in Fig. 4 [3]. Given that A1 and A2 were the rake correction and the correction for the elastic compression of the probing element, respectively. The δ was the form deviation. According to the EA-10/10 standard, the pitch diameter (d2) of the pipe thread and also the component uncertainty were shown in (3) and (4). ⁄ 1 ⁄2 cot (3) Fig. 2 The pitch diameter measurement of the pipe taper thread using four-wire probe based on JIS B 0262 (4) This research proposed to measure the pitch diameter (d2) of the pipe taper thread with the three-wire probe, so the expanded uncertainty of the EA-10/10 standard was modified. Fig. 3 The pitch diameter measurement of the pipe taper thread using three-wire probe In this research, the three-wire probe was used to measure the pitch diameter. Fig. 3 showed the illustration of the pitch diameter measurement using three-wire probe. Given that all three wires had diameter dm, fit into the pipe taper thread with the pitch diameter (d2), taper angle (ө/2), flank angle (α) and pitch distance (P). When the three-wire probe was used, there were no gauge block and roller, as shown in Fig. 3. The measuring accessory component with three-wire probe composed with two sides. One side with one wire was aligned vertically when the pitch diameter measured. Another side with two wires was aligned parallel with the surface of the pipe taper thread, with the taper angle (ө/2). Therefore, the term to in (1) was divided by 2, which equal . When measured with the three-wire probe, the probe could be set at any height (H) of the pipe taper thread. The length (l) was the sum of the diameters of two wires with the diameter of the taper thread at the height (H). So, the pitch diameter (d2), when measured with the three-wire probe, was as shown in as follows. Fig. 4 The pitch diameter measurement of the pipe thread using three-wire probe, based on EA-10/10 standard [3] The component uncertainty of the pitch diameter (U(d2)) was the square root of the sum square of the uncertainty of each factor (ui(y)), when i = 1,2,3…n, as shown in (4) and (5). The uncertainty of each factor (ui(y)) was the product of the sensitivity coefficient ( ) and the uncertainty of the factor ( ), as shown in (6). The sensitivity coefficient was calculated as in (7) [4], [5]. ∑ (5) x International Scholarly and Scientific Research & Innovation 8(2) 2014 354 scholar.waset.org/1999.8/9997513 (6) World Academy of Science, Engineering and Technology International Journal of Mechanical, Aerospace, Industrial, Mechatronic and Manufacturing Engineering Vol:8, No:2, 2014 ; , ,….., (7) ∂ α P cot 2 2 ∂ According to (2) as the pitch diameter of the pipe taper thread measured using the three-wire probe, the component uncertainty were calculated as in (8). The sensitivity coefficient of each factor (dm, P, α/2, ө/2 and H) was calculated as follow. International Science Index, Industrial and Manufacturing Engineering Vol:8, No:2, 2014 waset.org/Publication/9997513 2 2 2 2 1 2 2 2 2 α 2 sec θ α tan tan 2 2 2 2 2 2H tan 2 2 2 . 2 2 2 2 2 2 2 θ 2 . 2 2 2 2 2 2 Then, the expanded uncertainty (U95%) was calculated as the product of the factor k and the component uncertainty (U(d2)), as shown in (9). Given that the factor k was equal to 2 with the 95 percent confidence level [4], [5]. (9) % /2 Table I showed the expanded uncertainty, the uncertainty and the sensitivity of each factor for the pitch diameter of the pipe taper thread when measured with the three-wire probe. 2 2 θ 2 2 2 2 2 2 2 2 2 2 2 2 2 2 cosec 2 (8) 2 d 2 2 IV. THE EXPERIMENT AND THE RESULT 2 2 2 2 2 2 2 2 . 2 In this research, the measuring accessory component was produced and assembled to one side of the ULM 828 CiM machine, as shown in Figs. 5 and 6 [6]. This component could be tilt along with the taper angle of the pipe taper thread. Next, the measuring components on both side had to set zero as shown in Fig. 6. Then, the three-wire probe was assembled onto both of the measuring components and ready to measure. 2 2 2 2 2 2 . 2 TABLE I THE EXPANDED UNCERTAINTY AND THE UNCERTAINTY AND THE SENSITIVITY COEFFICIENT OF EACH FACTOR Factors of Uncertainty Equation Sensitivity coefficient Uncertainty of length, u(l) 1 - Uncertainty of Repeatability, u(lx) u(lx) = √ - Uncertainty of machine standard , u(ls) u(ls) = 1 - Uncertainty of resolution machine, u(lis) 1 u(lis) = - Uncertainty of temperature),u(ΔT) √ . Δ . . √3 Uncertainty of the calibrated value of the diameter of the probing element, u(dm)= 2 2 u(dm) 1 Uncertainty associated with the pitch measurement, u(P) /√3 u(P) = Standard uncertainty of measurement of the flank angle, u δ Uncertainty of taper, u Uncertainty of machine measuring height , u(H) Standard uncertainty associated with the error resulting from the use of an approximate equation for the rake correction , u(A1) Uncertainty associated with corrections due to the measurement force and the approximations inherent in the experimental equation used to correct for the elastic compression of the probing elements, u(A2) Accounts for imperfections of the calibrated thread gauge, such as form deviations, and further instrument or procedure dependent contributions, which have not been taken into account so far , Component Uncertainty ; 2 u = u δ 2 2 2 √ 2 2 = 2 √ . u(H)= u(A1) /√3 + . = 2 /√3 √ 2 1 √ = . √ 1 [3] 1 2 2 Expanded Uncertainty(U95%) International Scholarly and Scientific Research & Innovation 8(2) 2014 k U95% = k 355 scholar.waset.org/1999.8/9997513 . 2 2 . 1 wV 0 u(A2)= 2 2 2 2 2 2 . . 2 2 . 2 2 International Science Index, Industrial and Manufacturing Engineering Vol:8, No:2, 2014 waset.org/Publication/9997513 World Academy of Science, Engineering and Technology International Journal of Mechanical, Aerospace, Industrial, Mechatronic and Manufacturing Engineering Vol:8, No:2, 2014 Fig. 5 Probe design Position of Measuring Fig. 8 The position and alignment of the pipe taper thread when measured Fig. 6 Setting probe to zero In this experiment, the length (l) was equal to 19.420 mm. and the flank angle (α) equaled to 55 degree. The taper angle (ө/2) equaled to 1.7899 degree according to the pipe taper thread standard (tan ө = 1/16). The pitch distance (P) equaled to 1.815mm. The wire diameter of the three-wire probe was equal to 1.1mm. When substituted the above data in (2), the pitch diameter of the pipe taper thread was calculated as follow. 19.420 0.001 Fig. 7 The pitch diameter of the pipe taper thread measuring with the three-wire probe Fig. 7 showed the equipment when it was set with the pipe taper thread. Fig. 8 showed the position and the alignment of the pipe taper thread when measured. The measured position could be set at any height (H). When the first position, which assume was on X axis, was finished measuring, the thread was rotated around Z axis 90 degree and was measured again, which assume was on Y axis. International Scholarly and Scientific Research & Innovation 8(2) 2014 1.1 2 . . 4.074 . 1.933 0.5173 0.031=19.165 mm Table II showed the uncertainty budget of the pitch diameter of the pipe taper thread. The uncertainty terms came from several factors such as the operator (repeatability), the equipment (tolerance, the expanded uncertainty of machine, and the resolution of standard) and the environment (temperature). The expanded uncertainty of the pitch diameter of the pipe taper thread was equal to 1.88μm with 95 percent confidence level. 356 scholar.waset.org/1999.8/9997513 World Academy of Science, Engineering and Technology International Journal of Mechanical, Aerospace, Industrial, Mechatronic and Manufacturing Engineering Vol:8, No:2, 2014 International Science Index, Industrial and Manufacturing Engineering Vol:8, No:2, 2014 waset.org/Publication/9997513 TABLE II THE UNCERTAINTY BUDGET OF THE PIPE TAPER THREAD Quantity standard probability Sensitivity Uncertainty uncertainty distribution coefficient contribution (µm) (µm) 0.12 rectangular 1.00 0.12 u(lx) 0.08 normal 1.00 0.08 u(ls) 0.00 rectangular 1.00 0.00 u(lis) 0.58 rectangular 0.23 0.13 u( ) 0.18 rectangular 3.17 0.55 0.40 rectangular 0.97 0.39 0.64 rectangular 0.33 0.21 U95% 0.76 rectangular 0.06 0.05 0.30 0.40 0.24 0.17 - rectangular rectangular rectangular rectangular ‐ - 0.06 1.00 1.00 1.00 K=2 0.30 0.40 0.24 0.17 0.94 1.88 meant that these results were related. Therefore, the method of using the three-wire probe measured the pitch diameter of the pipe taper thread was acceptable. ACKNOWLEDGMENTS This work was supported by Industrial Engineering Department, Engineering Faculty Thammasat University. Their support is greatly appreciated. REFERENCES [1] [2] [3] [4] [5] [6] V. THE ANALYSIS From the experiment, the results showed that the pitch diameter of the pipe taper thread was equal to 19.165mm. and the expanded uncertainty was equal to 1.88µm. These results were compared to the results from the National Institute of Metrology (NIMT). Then, the equivalence ratio (EN) as shown in (10) was calculated. If the EN was less than 1, it meant that those results were related [7]. [7] JIS B 0262, “Measuring Method of Pitch Diameter of Taper screw Plug Gauge and Inspection.” JIS Handbook, pp.187-206, 1998. ISO 7-1, “Dimensions, Tolerances and Designation,” Pipe Thread Where Pressure-Tight Joints are Made on the Threads, 1994. EA-10/10, “Guidelines on the Determination of Pitch Diameter of Parallel Probing,” EA European Co-Operation for Accreditation, 1999. EA-4/02, “Expression of the Uncertainty of Measurement in Calibration,” EA European Co-Operation for Accreditation, 1999. Thomas M. Adams, “A2LA Guidelines for the Estimation of the Uncertainty of Dimension Calibration and Testing Results,” 2002 J. Kloypayan, W. Pimpakan, “Measuring Accessory Component Design and Analysis for Taper Thread Measurement,” International Congress on natural Science and Engineering, pp. 180-186, 2013. J. Buajarern, K. Naoi, “Asia Pacific Metrology Program Intercomparison of high precision Roundness measurement,” APMP.L-S4 Roundness intercomparison Protocol, Version 3, pp. 16, 2012-2013. (10) were the pitch diameter and the Given that and expanded uncertainty, respectively, from the experiment. The and were the pitch diameter and the expanded uncertainty, respectively, from the NIMT. The result showed that the EN was equal to 0.36 as shown in Table III. So, the pitch diameter and the expanded uncertainty from the experiment were acceptable. Positio n d2 TABLE III THE EQUIVALENT RATIO Value of experiment Value of NIMT Pitch Expanded Pitch Expanded Diamete Uncertaint Diamete Uncertaint r y r y (mm) (µm) (mm) (µm) 19.165 1.88 19.164 2.00 Equivalenc e ratio (EN) 0.36 VI. CONCLUSION This research used three-wire probe method in measuring the pitch diameter of the pipe taper thread. The measuring accessory component was made and assembled to one side of the ULM 828 CiM machine. The pitch diameter measuring equation and the expanded uncertainty was formulated. The results showed that the pitch diameter was equal to 19.165mm. The expanded uncertainty was equal to 1.88µm. When compared to NIMT results, the EN was equal to 0.36, which International Scholarly and Scientific Research & Innovation 8(2) 2014 357 scholar.waset.org/1999.8/9997513


