Build a Water Bottle Membranophone
6th to 12th grade
20 minutes prep, 30 minutes activity
A clean empty water bottle, any size
(bottles with ridges are best)
Scissors
Latex, rubber, or vinyl gloves
Rubber band
Hole punch
1 straw
Construction paper
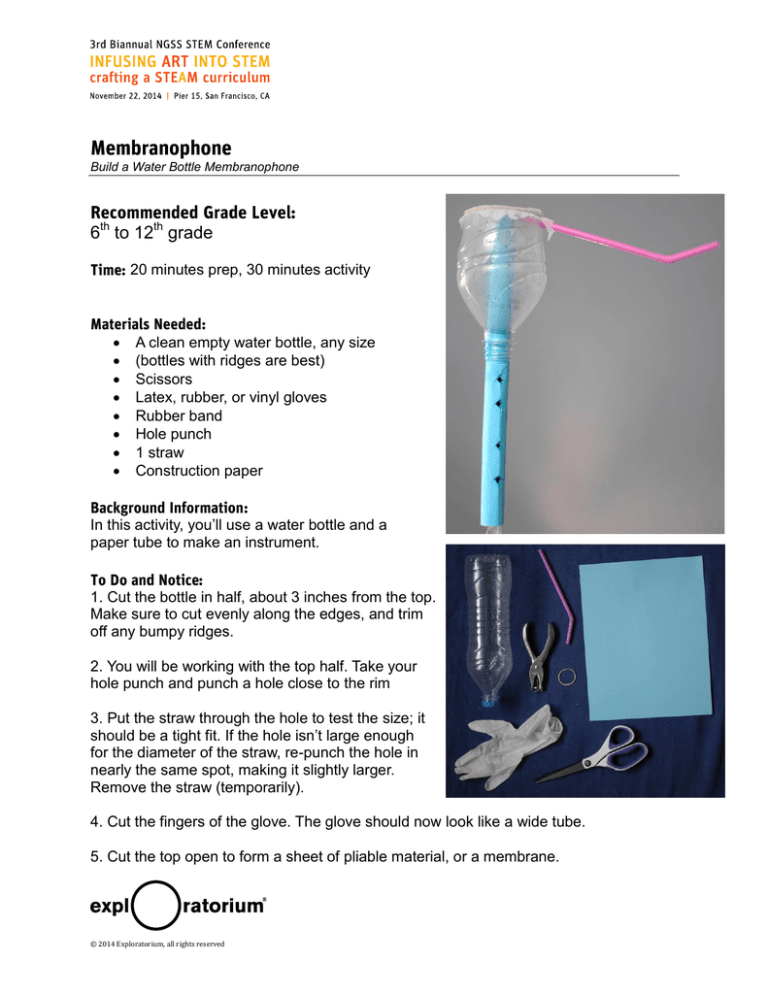
In this activity, you’ll use a water bottle and a
paper tube to make an instrument.
1. Cut the bottle in half, about 3 inches from the top.
Make sure to cut evenly along the edges, and trim
off any bumpy ridges.
2. You will be working with the top half. Take your
hole punch and punch a hole close to the rim
3. Put the straw through the hole to test the size; it
should be a tight fit. If the hole isn’t large enough
for the diameter of the straw, re-punch the hole in
nearly the same spot, making it slightly larger.
Remove the straw (temporarily).
4. Cut the fingers of the glove. The glove should now look like a wide tube.
5. Cut the top open to form a sheet of pliable material, or a membrane.
© 2014 Exploratorium, all rights reserved
6. Stretch the membrane over the opening, making sure the punched hole on the side of
the bottle isn’t hidden by the excess glove material.
7. Attach the membrane to the bottle with a rubber band. Wrap the rubber band around
the bottle several times, making sure the membrane is taut.
8. Twist off the bottle top. Roll a piece of construction paper into a tube on a flat surface.
Make the tube as tight and as straight as possible.
9. Put the rolled tube into the large open hole on the bottle where the cap had been. Let
go of the tube when it barely touches the bottom of the membrane. It should fit securely
in the hole.
10. Insert the straw in the hole on the side of the bottle and blow into the straw; your
bottle membranophone should play!
11. Try adjusting the position of the paper tube. Find a position you like and tape the
paper tube so it stays in place.
As you blow into the straw, you’re creating a lot of pressure in the space between the
outer wall of the construction-paper tube and the inner wall of the water bottle. That
pressure forces the membrane to rise, allowing air to flow into the top of the tube and
escape out the bottom. As the air escapes, the membrane returns to its initial position.
But you’re continuing to blow air into your membranophone, so the membrane rises and
falls very rapidly over and over. If you place your finger over the top of the membrane,
you can feel it vibrate. These vibrations produce sound.
To make different sounds, add finger holes. To do this, pinch the paper tube slightly and
cut out a diamond shape; repeat to make more finger holes. Opening or covering the
finger holes changes the pitch of the sound because opening a hole has the same effect
as shortening the length of the pipe. The “shorter” the pipe, the higher the pitch.
© 2014 Exploratorium, all rights reserved
Build a Harmonica with household materials
5th- 8th grade
Asking questions and defining problems
Planning and carrying out investigations
Designing solutions
Obtaining, evaluating, and communicating
information
10 minutes prep, 15 minutes activity
2 popsicle sticks
1 big rubber band
2 smaller rubber bands
masking tape
The blowing air makes the rubber band and sticks vibrate, and that vibration makes the
sound.
1. Wrap masking tape about 10 times around each end of the two sticks.
2. Stretch the longer rubber band around the length of one of the sticks.
3. Place the other stick on top and secure the ends by wrapping the shorter
bands around each end.
4. Blow through the middle and make a beautiful sound.
As you blow across the rubber band it vibrates. The vibrating rubber band
causes the sticks and surrounding air to vibrate; that vibration is
translated through the air to our ears.
© 2014 Exploratorium, all rights reserved
Try different sized “big” rubber bands. Try covering your ears, can you still hear it?
© 2014 Exploratorium, all rights reserved
Hear Silent Sounds of Vibrating Objects
6th -12th grades
Asking question sand defining problems
Planning and carrying out investigations
Designing solutions
Obtaining, evaluating, and communicating
information
10 minutes prep, 15 minutes activity
Scissors
String
Wire hanger, and/or spoon, and/or cake rack
You hear sounds when vibrations get inside your ears and
stimulate nerves to send electrical signals to your brain.
1. With your scissors, cut a piece of string about 3 to 4 feet long.
2. Hold the two ends of the string in one hand. The rest of the
string will make a loop.
3. Lay the loop over the hook part of the hanger. Push the two
ends through the loop, and pull them all the way through the
other side (this is easier to undo than a knot).
4. Wrap the loose ends of the string two or three times around
the first fingers on each hand.
5. Swing the hanger so it gently bumps against the leg of a table,
or against a door. What did it sound like? Probably not much.
© 2014 Exploratorium, all rights reserved
6. Now put your first fingers over the opening of your ears (don’t
put your fingers into your ear). Lean over and gently bump the
hanger again. What did it sound like?
When you bump the hanger into the wall, the hanger starts to vibrate. The vibrating hanger
makes the string vibrate. To reach your ears, the vibrations in the string must push on the air
molecules to make sound waves that travel through the air, but the string doesn’t push on
very many air molecules. So, sound vibrations don’t travel easily from the string into the air.
When your fingers are covering your ears, the sound can take a more direct route to your
ears. Rather than traveling through the air, the vibrations can travel through your hands and
through the bone of your skull directly to the fluid inside your cochlea, in your inner ear.
Instead of traveling from solid to air and back to solid, the vibrations move from one solid (the
string) to another (your bones), and then into the fluid of your cochlea. As a result the sound
you hear is much louder and richer.
Try this with other items from your kitchen or classroom.
© 2014 Exploratorium, all rights reserved


