FULLY RECESSED MOUNTING OPTION
FOR LITE2 SERIES
EMERGENCY UNITS AND REMOTE FlXTURES
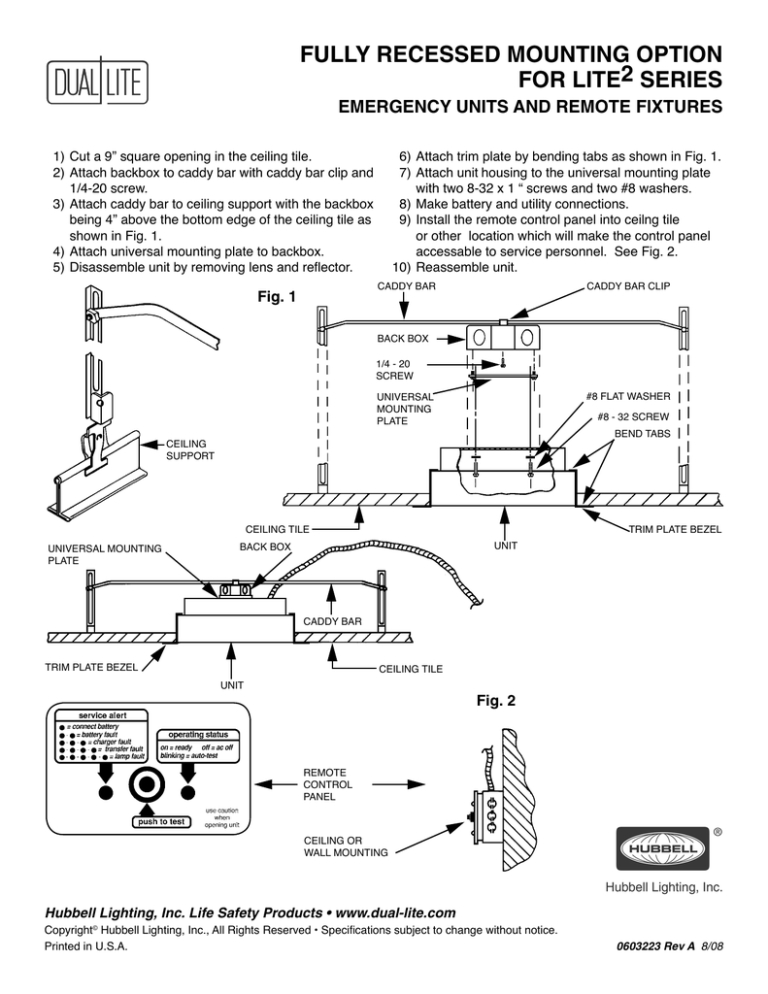
1)Cut a 9” square opening in the ceiling tile.
2)Attach backbox to caddy bar with caddy bar clip and
1/4-20 screw.
3)Attach caddy bar to ceiling support with the backbox
being 4” above the bottom edge of the ceiling tile as
shown in Fig. 1.
4)Attach universal mounting plate to backbox.
5)Disassemble unit by removing lens and reflector.
Fig. 1
6)Attach trim plate by bending tabs as shown in Fig. 1.
7)Attach unit housing to the universal mounting plate
with two 8-32 x 1 “ screws and two #8 washers.
8)Make battery and utility connections.
9)Install the remote control panel into ceilng tile
or other location which will make the control panel
accessable to service personnel. See Fig. 2.
10)Reassemble unit.
CADDY BAR
CADDY BAR CLIP
BACK BOX
1/4 - 20
SCREW
#8 FLAT WASHER
UNIVERSAL
MOUNTING
PLATE
#8 - 32 SCREW
BEND TABS
CEILING
SUPPORT
TRIM PLATE BEZEL
CEILING TILE
UNIVERSAL MOUNTING
PLATE
UNIT
BACK BOX
CADDY BAR
TRIM PLATE BEZEL
CEILING TILE
UNIT
Fig. 2
REMOTE
CONTROL
PANEL
CEILING OR
WALL MOUNTING
Hubbell Lighting, Inc. Life Safety Products • www.dual-lite.com
Copyright© Hubbell Lighting, Inc., All Rights Reserved • Specifications subject to change without notice.
Printed in U.S.A. 0603223 Rev A 8/08

