Application Specification
114-25038
AMPMODU* Short Point
Contacts and Housings
10 NOV 15 Rev K
NOTE
All numerical values are in metric units [with U.S. customary units in brackets]. Dimensions are in millimeters [and inches].
Unless otherwise specified, dimensions have a tolerance of ±0.13 [±.005] and angles have a tolerance of ±2°. Figures and
illustrations are for identification only and are not drawn to scale.
1. INTRODUCTION
This specification covers the requirements for application of AMPMODU Short Point contacts and housings for
cable-mount applications. These components mate with printed circuit (pc) board mounted 0.64 mm [.025 in.]
square or round posts that are 4.29 to 6.58 mm [.169 to .259 in.] in length.
The contacts are available in duplex 30m gold, 15m gold, or 100m tin. Each contact features a locking lance to
engage the housing and two spring members to engage the mating post contact. The contact is available in
three sizes: 32-28, 26-22, and 24-20 AWG. Strip-form contacts are designed for automatic machine application
and loose-piece contacts are designed for hand tool application.
The housing is made of flame retardant black thermoplastic. Each housing has double row contact cavities with
in-row and row-to-row centerline spacing on 2.54 mm [.100 in.], and are available in 4- to 52-position
configurations. They can be mounted side-to-side or end-to-end while maintaining the same centerline spacing.
NOTE
AMPMODU Short Point contacts can also be used in single row, 2- through 25-position AMPMODU MTE housings. These
housings are available with plain exterior surfaces which allow for continuous 2.54 mm [.100 in.] centerline spacing with
guiding ribs to mate with shrouded pc board headers or with polarizing ribs and latches for free-hanging assemblies. For more
information on the MTE housing, see Application Specification 114-25026.
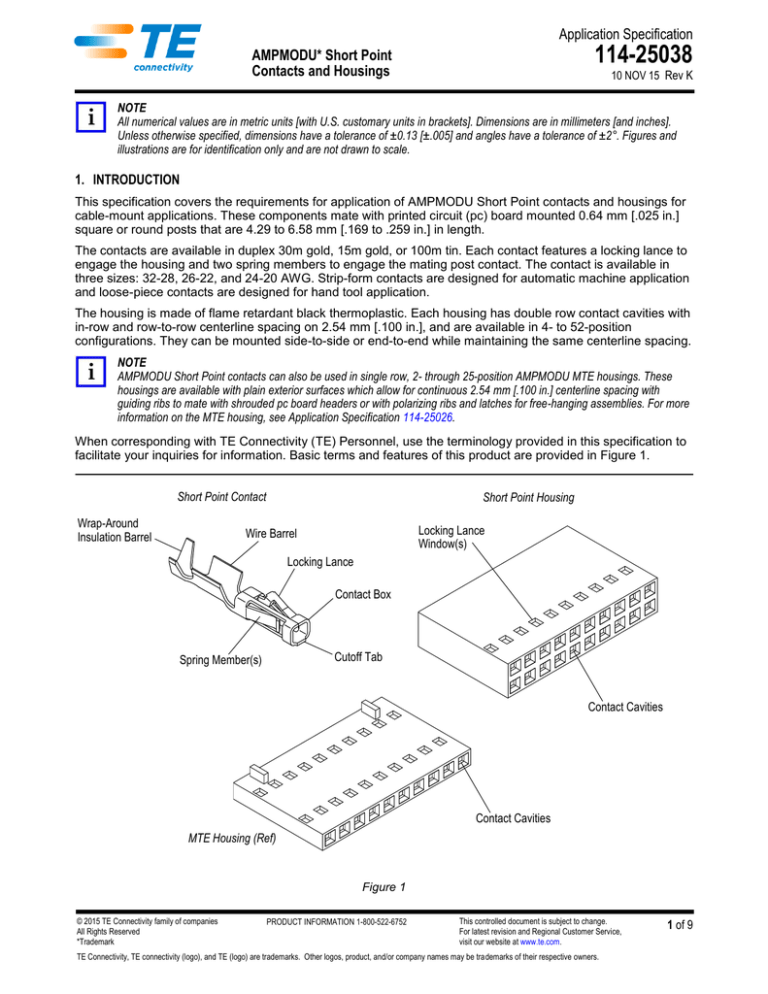
When corresponding with TE Connectivity (TE) Personnel, use the terminology provided in this specification to
facilitate your inquiries for information. Basic terms and features of this product are provided in Figure 1.
Short Point Contact
Wrap-Around
Insulation Barrel
Short Point Housing
Locking Lance
Window(s)
Wire Barrel
Locking Lance
Contact Box
Cutoff Tab
Spring Member(s)
Contact Cavities
Contact Cavities
MTE Housing (Ref)
Figure 1
© 2015 TE Connectivity family of companies
All Rights Reserved
*Trademark
PRODUCT INFORMATION 1-800-522-6752
This controlled document is subject to change.
For latest revision and Regional Customer Service,
visit our website at www.te.com.
TE Connectivity, TE connectivity (logo), and TE (logo) are trademarks. Other logos, product, and/or company names may be trademarks of their respective owners.
1 of 9
114-25038
2. REFERENCE MATERIAL
2.1. Revision Summary
Updated document to corporate requirements
Added new table in Figure 3 for hand tool crimp information
Changed tool part number in table in Figure 6
2.2. Customer Assistance
Reference Product Base Part Number 104479 and Product Code 0548 are representative of AMPMODU Short
Point contacts and housings. Use of these numbers will identify the product line and help you to obtain product
and tooling information when visiting www.te.com or calling the number at the bottom of page 1.
2.3. Drawings
Customer drawings for product part numbers are available from www.te.com. Information contained in the
customer drawing takes priority.
2.4. Specifications
Application Specification 114-25026 provides product description and application requirements for AMPMODU
MTE housings which can be used with AMPMODU Short Point contacts.
Product Specification 108-1472 provides product performance and test information.
2.5. Instructional Material
Instruction sheets (408-series) provide product assembly instructions or tooling setup and operation procedures
and customer manuals (409-series) provide machine setup and operating procedures. Instructional material
available that pertains to this product are:
408-3295
408-7424
408-7497
408-8040
408-8059
408-8547
408-9453
408-9816
409-5842
409-5852
409-5878
409-10012
409-10029
409-10047
Preparing Reel of Contacts for Applicator Tooling
Checking Terminal Crimp Height or Gaging Die Closure
Recommended Procedures for •Crush" Crimp Technique
Heavy Duty Miniature Quick-Change Applicators (Side-Feed Type)
General Preventative Maintenance for Applicators
CERTI-CRIMP* II Straight Action Hand Tools
Extraction/Lance Reset Tools 843996-2, -3, -4, and -5
Handling Reeled Products
AMP-O-LECTRIC* Model •G" Terminating Machines 354500-[ ]
AMPOMATOR* CLS III-G Lead-Making Machine 122500-[ ]
AMPOMATOR CLS IV+ Lead-Making Machine 356500-[ ]
AMP-O-MATIC* Side-Feed Stripper-Crimper III Machine 1320895-[ ]
Stripping Modules 1490501-[ ] and 1490503-[ ]
AMP 3K* Terminating Machines 1725950
3. REQUIREMENTS
3.1. Storage
A. Ultraviolet Light
Prolonged exposure to ultraviolet light may deteriorate the chemical composition used in the product
material.
B. Reeled Contacts
When using reeled contacts, store coil wound reels horizontally and traverse wound reels vertically.
Rev K
2 of 9
114-25038
C. Shelf Life
The product should remain in the shipping containers until ready for use to prevent deformation to
components. The product should be used on a first in, first out basis to avoid storage contamination that
could adversely affect performance.
D. Chemical Exposure
Do not store product near any chemical listed below as they may cause stress corrosion cracking in the
material.
Alkalies
Amines
Ammonia
Carbonates
Citrates
Nitrites
Phosphates Citrates
Sulfur Nitrites
Sulfur Compounds
Tartrates
NOTE
Where the above environmental conditions exist, phosphor-bronze contacts are recommended.
3.2. Wire Selection and Preparation
The contacts will accept solid or stranded wire sizes 32 through 20 AWG with a maximum insulation diameter
of 1.52 mm [.060 in.]. Note that there are overlapping wire sizes for two of the contact sizes.
Proper strip length is necessary to properly insert the wire into the contact. The strip length of the wire is shown
in Figure 2.
CAUTION
When stripping the wire, care must be used to avoid scraping, nicking, or cutting the conductor. Care must also be used when
handling the wire during stripping and crimping to prevent cracking or breaking of the conductor and insulation.
NOTE: Not to Scale
3.18-3.96 [.125-.156]
Strip Length
1.52 [.060] Max
Insulation Diameter
Wire Conductor
(Stranded Shown)
CONTACT SIZE
WIRE SIZE (AWG)
32
32-28
30
28
26
26-22
24
22
24
24-20
22
20
Figure 2
Rev K
3 of 9
114-25038
3.3. Crimped Contact Requirements
The contact must be crimped to the wire according to instructions packaged with applicable tooling.
NOTE
Wire stripping tool jaws may leave corrugated indentations on the surface of the wire insulation. This is especially severe with
cross-linked polyethylene (high temperature) insulation. If these indentations occur at the location of the wire seal, leakage
may result. Insulation surface within 8.89 [.350] from the tip of the contact must be smooth and free of indentations. See
Figure 3.
A. Crimped Configuration and Location
The wire barrel will be crimped in the F-crimp configuration where the tips of the wire barrel will turn
inward and capture all wire strands. The insulation barrel will be crimped to the O-crimp configuration
where the tips of the insulation barrel will overlap and capture the wire insulation and form the insulation
support. The effective crimp length (excluding bellmouths) over the length of the wire barrel shall be within
the limits shown in Figure 3.
B. Wire Barrel Seam
The wire barrel seam shall be completely closed with no portion of the conductors protruding from the
seam. See Figure 3.
C. Crimp Height and Width
The crimp applied to the wire portion of the contact is the most compressed area and is the most critical in
assuring optimum performance. The crimp applied to the contact must be within the range specified for
each wire size as specified in Figure 3.
D. Bellmouth
The front and rear bellmouths caused by extrusion of the contact metal during the crimping process shall
be within the limits provided in Figure 3.
E. Cutoff Tab and Burr
The front cutoff tab must not extend beyond the contact box and the rear cutoff tab must not extend
beyond the insulation barrel more than the limits specified in Figure 3.
Burrs resulting from the shearing of the cutoffs must not exceed the limits shown in Figure 3.
F. Flash
Flash that may appear on either side of the crimped contact shall not exceed the maximum limit specified
in Figure 3.
G. Conductor Location
The conductor of the wire must be flush or within the protrusion limit specified from the front of the wire
barrel. Both insulation and conductor must be visible in the transition area between the insulation barrel
and wire barrel. No insulation must be in the wire barrel. See Figure 3.
H. Locking Lance
Inspection of several uncrimped contacts will provide a visual reference for the contact. The height of the
locking lance, measuring from the contact box, must be within the specified limit provided in Figure 3.
Rev K
4 of 9
114-25038
Wire Barrel Seam is Closed
with No Visible Strands
Wire Insulation and Conductor
Visible in this Area
Insulation Barrel Wraps
Around But Does Not
Penetrate Insulation
Insulation Barrel
(O Crimp)
Insulation Barrel Arms
Do Not Overlap
-0/+0.81 [-.000/+.032]
Wire Protrusion Limit
Wire Barrel
(F Crimp)
2.16 [.085] Min
Effective Crimp Length
0.25 [.010] Max
Front Bellmouth
0.13 [.005] Min
Rear Bellmouth
X
0.25 [.010] Max
Rear Cutoff Tab
(See View A)
X
0.51-0.69 [.020.027] Locking
Lance Height
Section X-X
Wire Barrel Crimp
Width (See Table)
0.15 [.006] Max
Front Cutoff Tab
(See View A)
View A
0.08 [.003] Max
Burr Allowance
.20 [.008] Max
Wire Barrel Flash
Wire Barrel Crimp
Height (See Table)
CRIMP CONTACT INFORMATION USING APPLICATORS
CONTACT
CONTACT SIZE
32-28
26-22
24-20
WIRE SIZE (AWG)
WIRE BARREL CRIMP
HEIGHT (±0.05 [±.002])
32
0.61 [.024]
30
0.61 [.024]
28
0.66 [.026]
26
0.76 [.030]
24
0.81 [.032]
22
0.91 [.036]
24
0.69 [.027]
22
0.79 [.031]
20
0.89 [.035]
CRIMP WIDTH (Ref)
WIRE BARREL
INSULATION BARREL
0.84 [.033]
1.40 [.055]
1.07 [.042]
1.58 [.062]
1.40 [.055]
1.58 [.062]
Figure 3 (cont’d)
Rev K
5 of 9
114-25038
CRIMP CONTACT INFORMATION USING HAND TOOLS
CONTACT
HAND CRIMPING
TOOL
WIRE SIZE RANGE
(AWG)
NEST
WIRE CRIMP
HEIGHT
±0.05 [.002]
32-28
0.03-0.09 [32-28]
0.58 [.023]
26-22
0.12-0.38 [26-22]
0.79 [.031]
0.20 [24]
0.74 [.029]
0.30-0.60 [22-20]
0.74 [.029]
91518-1 (408-8547)
91601-1 (408-8547)
24-20
CRIMP WIDTH (REF)
WIRE BARREL
INSULATION
BARREL
1.07 [.042]
1.40 [.055] “O”
1.40 [.055]
1.57 [.062] “O”
Figure 3 (end)
I. Vertical and Horizontal Straightness
Crimped contacts must be straight and aligned within the tolerance shown in Figure 4.
J. Twist or Roll
The twist or roll of the crimped portion of the contact in relation to the uncrimped portion of the contact
may not exceed the limits shown in Figure 4.
Horizontal Straightness
Datum Line
Twist or Roll
3°
Max
1.91 [.075] Max
Bend Limit
0.25 [.010] Max
Bend Limit
Vertical Straightness
3°
Max
No Damage or
Distortion Permitted
in this Area
Datum Line
Figure 4
3.4. Placement of Crimped Contact in Housing
The contact must be inserted into the contact cavity of the housing with the locking lance oriented toward the
locking lance window of the housing. When fully inserted, the locking lance will engage the housing and
prevent backing out during mating of the connectors. See Figure 5.
Rev K
6 of 9
114-25038
Locking Lance
Window of Housing
Contact Cavity
of Housing
Contact
Locking
Lance
Wire
Figure 5
3.5. Repair and Replacement
The contacts and housings are not repairable. Any defective or damaged contacts or housings must be
discarded. Contacts must not be reused by removing the wire.
NOTE
If a damaged contact is apparent before the contacts are inserted into the housing, cut the wire in back of the contact and
reterminate the wire end. If contacts or housing are damaged after insertion, the wire must be cut directly in back of the
housing and reterminated with new contacts and housing. See Section 5, TOOLING.
4. QUALIFICATIONS
AMPMODU Short Point contacts and housings do not require agency evaluation.
5. TOOLING
The contacts can be terminated to wire using a hand crimping tool or semi-automatic machine. The wire size
range of the contact will determine the tooling to be used. After a contact is crimped, it can be inserted into the
housing without the use of a tool. Tooling part numbers and instructional material packaged with the tooling are
shown in Figure 6.
5.1. Extraction/Lance Reset Tool
This tool is designed to release the contact locking lance through the locking lance window of the housing
without overstressing the locking lance. It can also be used to reset locking lances that have been deformed.
5.2. Hand Crimping Tools
Hand crimping tools have been designed for prototype and low-volume application of loose-piece contacts.
5.3. Power Units
The power units are semi-automatic machines used to assist in the application of the strip-form contacts.
Power unit includes the power source used to supply the force or power to the applicator.
5.4. Applicators
Heavy-duty quick-change miniature applicators have been designed for high-volume production. The
applicators are adjustable for the full wire size range of strip-form contacts.
Rev K
7 of 9
114-25038
Extraction/Lance Reset
Tools 843996-[ ]
(408-9453)
WIRE SIZE
RANGE (AWG)
32-28
AMP-O-LECTRIC Model “G”
Terminating Machines 354500-[
] (409-5842) with Stripping
Module 1490501-[ ] or
1490503-[ ] (409-10029)
AMP 3K Terminating Machines
1725950-[ ] (409-10047)
26-22
24-20
HAND CRIMPING
TOOL
91518-1 (408-8547)
91601-1 (408-8547)
Heavy Duty Miniature QuickChange Applicator (408-8040)
(Refer to Table)
AMPOMATOR CLS III-G
Lead-Making Machines
122500-[ ] (409-5852)
AMPOMATOR CLS IV+
Lead-Making Machines
356500-[ ] (409-5878)
AMP-O-MATIC Side-Feed
Stripper-Crimper III Machines
1320895-[ ] (409-10012)
APPLICATOR FOR POWER UNIT
WIRE SIZE
RANGE
(AWG)
AMP-O-MATIC
Stripper Crimper III Machine
AMPOMATOR
CLS III-G
MACHINE
AMP-O-LECTRIC
Model “G” MACHINE
AMPOMATOR
CLS IV+
MACHINE
AMP 3K
MACHINE
-1 and -3
-2
-2 and -3
-1
-[ ]
-1 and -2
-[ ]
32-28
466980-1
N/A
567296-1
567296-2
567296-3
567296-1
567296-3
26-22
466981-1
567879-1
567297-1
N/A
567297-3
567297-1
567297-3
24-20
466982-1
N/A
567298-1
567298-2
567298-3
567298-1
567298-3
Figure 6
Rev K
8 of 9
114-25038
6. VISUAL AID
The illustration below shows a typical application of this product. This illustration should be used by production
personnel to ensure a correctly applied product. Applications which do not appear correct should be inspected
using the information in the preceding pages of this specification and in the instructional material shipped with
the product or tooling.
INSULATION BARREL (O-CRIMP)
MUST WRAP AROUND BUT NOT
PENETRATE INSULATION
WIRE BARREL (F-CRIMP) MUST BE
CLOSED AND FOLDED INWARD
WITH NO PROTRUDING OR VISIBLE
WIRE STRANDS IN SEAM
WIRE CONDUCTOR MUST BE FLUSH
WITH OR EXTEND SLIGHTLY FROM
FRONT OF WIRE BARREL
INSULATION BARREL ARMS
MUST NOT OVERLAP
CONTACTS MUST BE
STRAIGHT AND NOT
DEFORMED IN ANY WAY
LOCKING LANCE MUST
NOT BE DEFORMED
WIRE INSULATION AND
CONDUCTOR MUST BE
VISIBLE IN THIS AREA
HOUSING MUST NOT BE
CRACKED OR BROKEN
CONTACT LOCKING
LANCE MUST
ENGAGE HOUSING
FIGURE 7. VISUAL AID
Rev K
9 of 9


