TECHNICAL DATA SHEET
TOLLERANCES ACCORDING ASTM D3917
The ASTM D3917 specification defines tolerances applicable to pultruded profiles with traditional geometric shapes
as: C, H, Angles, Hollow profiles, Rods, etc. based on thermosetting resins.
Custom shapes based on customer design can have different tolerances and must be agreed in the
supply contract phase.
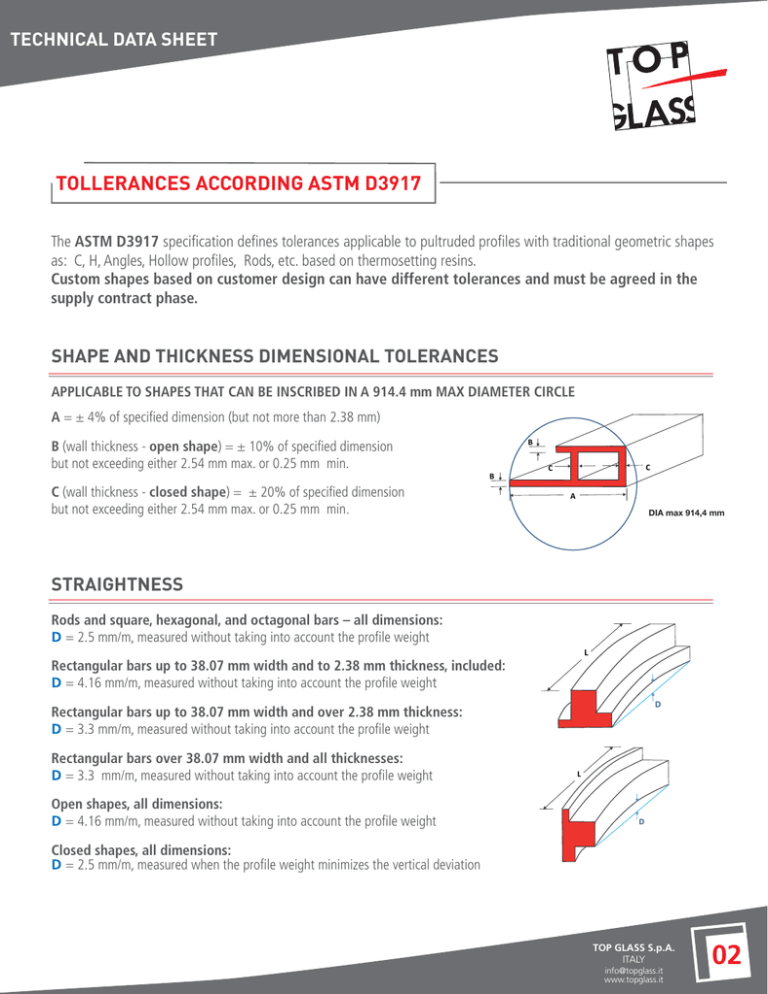
SHAPE AND THICKNESS DIMENSIONAL TOLERANCES
APPLICABLE TO SHAPES THAT CAN BE INSCRIBED IN A 914.4 mm MAX DIAMETER CIRCLE
A = ± 4% of specified dimension (but not more than 2.38 mm)
B (wall thickness - open shape) = ± 10% of specified dimension
but not exceeding either 2.54 mm max. or 0.25 mm min.
B
B
C (wall thickness - closed shape) = ± 20% of specified dimension
but not exceeding either 2.54 mm max. or 0.25 mm min.
C
C
A
DIA max 914,4 mm
STRAIGHTNESS
Rods and square, hexagonal, and octagonal bars – all dimensions:
D = 2.5 mm/m, measured without taking into account the profile weight
L
Rectangular bars up to 38.07 mm width and to 2.38 mm thickness, included:
D = 4.16 mm/m, measured without taking into account the profile weight
D
Rectangular bars up to 38.07 mm width and over 2.38 mm thickness:
D = 3.3 mm/m, measured without taking into account the profile weight
Rectangular bars over 38.07 mm width and all thicknesses:
D = 3.3 mm/m, measured without taking into account the profile weight
Open shapes, all dimensions:
D = 4.16 mm/m, measured without taking into account the profile weight
L
D
Closed shapes, all dimensions:
D = 2.5 mm/m, measured when the profile weight minimizes the vertical deviation
TOP GLASS S.p.A.
ITALY
info@topglass.it
www.topglass.it
02
TECHNICAL
DATA SHEET
DATA SHEET
The ASTM D3917 specification defines tolerances applicable to pultruded profiles with traditional geometric shapes
as: WC, H, Angles, Hollow profiles, Rods, etc. based on thermosetting resins.
Custom shapes based on customer design can have different tolerances and must be agreed in the
supply contract phase.
TWIST
LENGTHS OVER 6.096 m ARE NOT CONSIDERED IN THIS STANDARD
BARS and OPEN SHAPES :
All dimensions and thickness: permitted Y = 3.28°/m twist up to 6.096 m in length
L
CLOSED SHAPES:
All dimensions and thicknesses : permitted Y = 3.28°/m twist up to 6.096 m in
length, but not more than 7° total
Y
THE MEASUREMENT MUST BE DONE KEEPING ONE SIDE OF THE PROFILE
WELL FIXED ON A FLAT SURFACE AND MEASURING THE ANGLE DEVIATION
ON THE OPPOSITE SIDE WHEN THE PROFILE WEIGHT MINIMIZES THE TWIST.
FLATNESS (FLAT SURFACES)
BARS, SOLID SHAPES AND OPEN SHAPES
PERMITTED A VERTICAL DEVIATION OF 0.008 mm x W (mm)
FOR ALL DIMENSIONS IN TERMS OF WIDTH AND THICKNESS
EXAMPLE:
IF “W” = 120 mm, THE VERTICAL DEVIATION “D” IS: 0.008 x120 = 0.96 mm.
D
CLOSED SHAPES
– Thickness up to 4.75 mm included, D= 0.012 mm x W (mm)
– Thickness over 4.76 mm, D= 0.008 mm x W (mm)
D
Copyright by TOP GLASS S.p.A. © All rights reserved 2/2015
THE MEASUREMENT MUST BE DONE ON THE LOWER THICKNESS FACE
ANGULARITY
Leg thickness up to 19.02 mm included = 2°
THE STANDARD DOES NOT APPLY TO THICKNESS OVER 19.02 mm
Angle
END CUT ANGULARITY = MAX ± 1°
Angle
TOP GLASS S.p.A.
ITALY
info@topglass.it
www.topglass.it
02


