HOW TO USE A DIAL CALIPER
advertisement

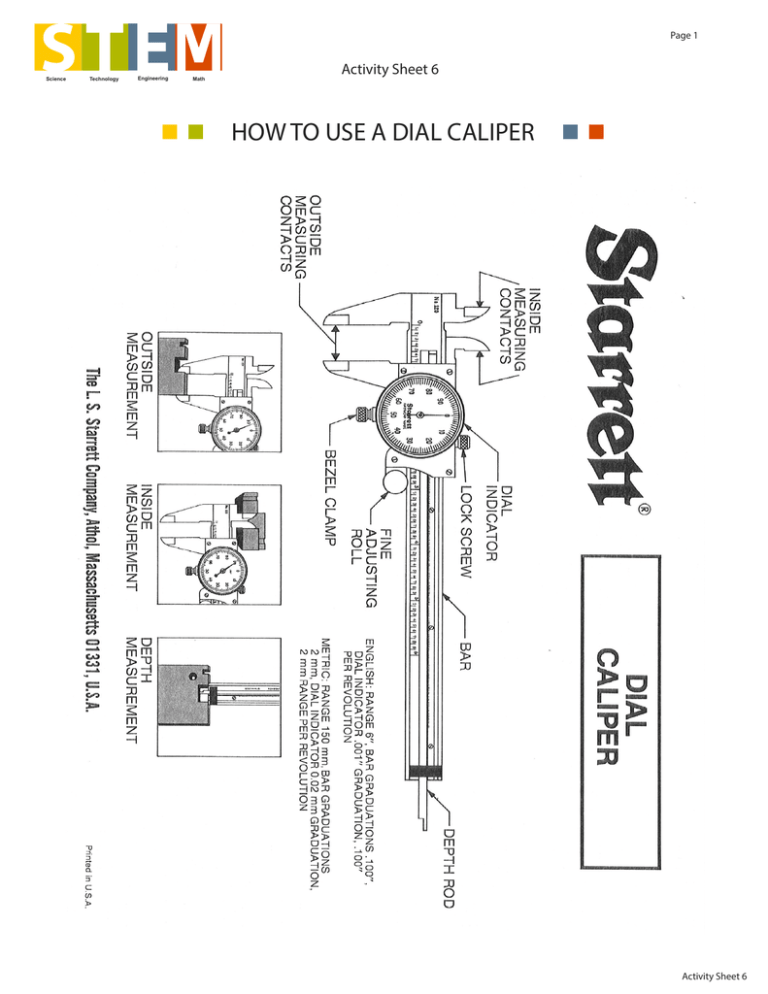
Page 1 Science Technology Engineering Math Activity Sheet 6 HOW TO USE A DIAL CALIPER Activity Sheet 6 Page 2 Science Technology Engineering Math Activity Sheet 6 HOW TO USE A DIAL CALIPER - Continued The manufacturing industry uses numerous measuring instruments to insure quality. These instruments, such as micrometers, calipers, and gages, are often used to measure parts for accuracy. Even the slightest variation of size can cause a part not to fit properly or not to work properly. A dial caliper is one type of precise measuring instrument used in the manufacturing industry. Several types of measurements can be taken with a dial caliper. The outside measuring contacts can measure the outside diameter, the length, the height, or the thickness of a part. The inside measuring contacts can measure the inside diameter of a part. The depth rod at the end of the bar can measure the depth of a part. The dial caliper on the adjacent page has a range from .001” to 6”. The dial caliper is a relatively simple instrument to use. Setting the Dial Caliper to Zero Before a dial caliper is used to measure a part, it should be checked to make sure its zero setting is correct. This can be accomplished quickly in a few short steps. 1. Wipe clean with a cloth the blades of the outside measuring contacts. 2. Close the contacts and hold with light pressure. 3. The dial indicator should be on 0. 4. If the dial indicator is not on 0, loosen the bezel clamp. Rotate the bezel so that the dial indicator is pointing to 0. 5. Tighten the bezel clamp. Using the Dial Caliper 1. For outside dimensions, place the outside measuring contacts around the object to be measured. Close the moveable jaw around the object. You should apply just enough pressure that the contacts can hold the object, but do not squeeze the jaws too tightly. This can give false measurement. For inside dimensions, place the inside measuring contacts inside the object to be measured. Once again, light pressure must be applied so that the inside measuring contacts are placed firmly in the object. See the illustration on the previous page. 2. To read the measurement of the caliper, the bar must be read first and the dial. The bar is divided into inches and those inches are divided into tenths. The dial is divided into thousandths. The reading on the bar is added to the reading on the dial. For example, if a part is measured 1.531, the bar would read 1.5 and the dial would read .031. These numbers are added together. A picture of dial caliper illustrates this on the next page. Sources The L.S. Starrett Company and Brown and Sharpe Activity Sheet 6 Page 3 Science Technology Engineering Math Activity Sheet 6 HOW TO USE A DIAL CALIPER - Continued The caliper on the right is measuring an object that is 1.531 inches. - Large scale lines on the bar = 1.000” -Small scale lines on the bar = 0.100” - Dial indicator on the caliper = 0.001 This caliper measurement would be added as follows: 1.000” 0.500” 0.031” The sum of the three numbers equals the measurement. Look at the following pictures of calipers. Determine the measurement each caliper is displaying. Caliper #1 Add the three dimensions: large scale, small scale, and dial indicator. Large Small Dial Total Activity Sheet 6 Page 4 Science Technology Engineering Math Activity Sheet 6 HOW TO USE A DIAL CALIPER - Continued Caliper #2 Add the three dimensions: large scale, small scale, and dial indicator. Large Small Dial Total Caliper #3 Add the three dimensions: large scale, small scale, and dial indicator. Large Small Dial Total Activity Sheet 6 Page 5 Science Technology Engineering Math Activity Sheet 6 HOW TO USE A DIAL CALIPER - Continued Caliper #4 Add the three dimensions: large scale, small scale, and dial indicator. Large Small Dial Total Caliper #5 Add the three dimensions: large scale, small scale, and dial indicator. Large Small Dial Total Activity Sheet 6

