replacing selenium rectifiers
advertisement

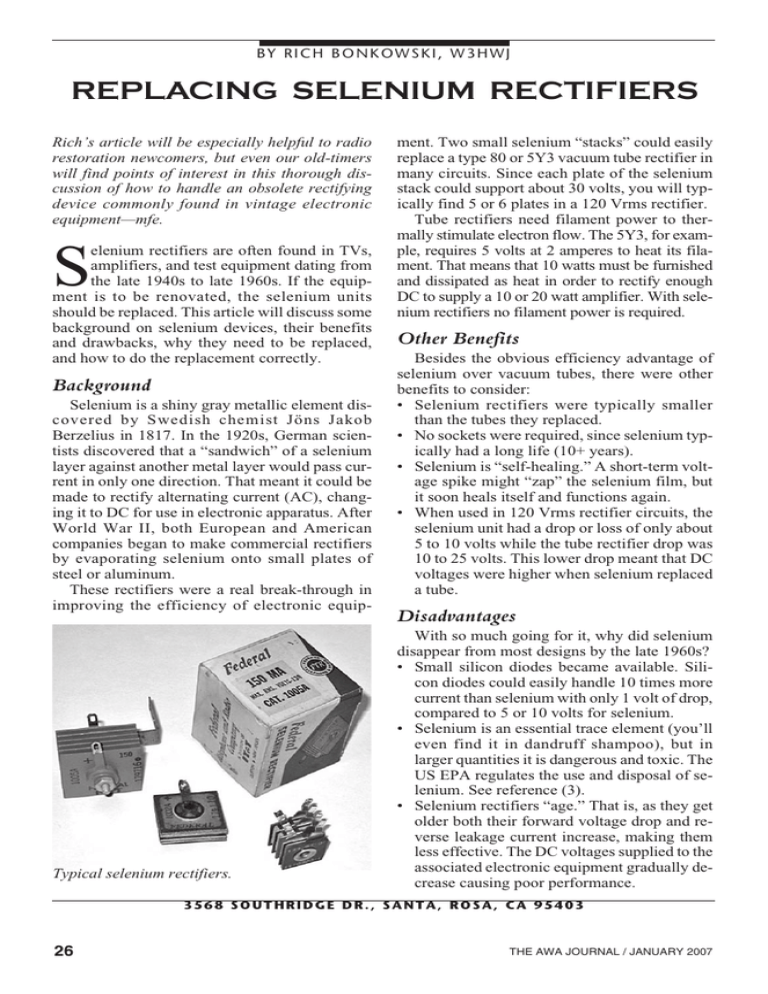
BY RICH BONKOWSKI, W3HWJ REPLACING SELENIUM RECTIFIERS Rich’s article will be especially helpful to radio restoration newcomers, but even our old-timers will find points of interest in this thorough discussion of how to handle an obsolete rectifying device commonly found in vintage electronic equipment—mfe. elenium rectifiers are often found in TVs, amplifiers, and test equipment dating from the late 1940s to late 1960s. If the equipment is to be renovated, the selenium units should be replaced. This article will discuss some background on selenium devices, their benefits and drawbacks, why they need to be replaced, and how to do the replacement correctly. S Background Selenium is a shiny gray metallic element discovered by Swedish chemist Jöns Jakob Berzelius in 1817. In the 1920s, German scientists discovered that a “sandwich” of a selenium layer against another metal layer would pass current in only one direction. That meant it could be made to rectify alternating current (AC), changing it to DC for use in electronic apparatus. After World War II, both European and American companies began to make commercial rectifiers by evaporating selenium onto small plates of steel or aluminum. These rectifiers were a real break-through in improving the efficiency of electronic equip- Typical selenium rectifiers. ment. Two small selenium “stacks” could easily replace a type 80 or 5Y3 vacuum tube rectifier in many circuits. Since each plate of the selenium stack could support about 30 volts, you will typically find 5 or 6 plates in a 120 Vrms rectifier. Tube rectifiers need filament power to thermally stimulate electron flow. The 5Y3, for example, requires 5 volts at 2 amperes to heat its filament. That means that 10 watts must be furnished and dissipated as heat in order to rectify enough DC to supply a 10 or 20 watt amplifier. With selenium rectifiers no filament power is required. Other Benefits Besides the obvious efficiency advantage of selenium over vacuum tubes, there were other benefits to consider: • Selenium rectifiers were typically smaller than the tubes they replaced. • No sockets were required, since selenium typically had a long life (10+ years). • Selenium is “self-healing.” A short-term voltage spike might “zap” the selenium film, but it soon heals itself and functions again. • When used in 120 Vrms rectifier circuits, the selenium unit had a drop or loss of only about 5 to 10 volts while the tube rectifier drop was 10 to 25 volts. This lower drop meant that DC voltages were higher when selenium replaced a tube. Disadvantages With so much going for it, why did selenium disappear from most designs by the late 1960s? • Small silicon diodes became available. Silicon diodes could easily handle 10 times more current than selenium with only 1 volt of drop, compared to 5 or 10 volts for selenium. • Selenium is an essential trace element (you’ll even find it in dandruff shampoo), but in larger quantities it is dangerous and toxic. The US EPA regulates the use and disposal of selenium. See reference (3). • Selenium rectifiers “age.” That is, as they get older both their forward voltage drop and reverse leakage current increase, making them less effective. The DC voltages supplied to the associated electronic equipment gradually decrease causing poor performance. 3568 SOUTHRIDGE DR., SANTA, ROSA, CA 95403 26 THE AWA JOURNAL / JANUARY 2007 • As selenium units get older and run hotter, they are more prone to catching fire, causing a foul-smelling, pungent smoke. Some oldtimers compare this to burning garlic. • By 1970, silicon diodes cost only pennies and were 10 times smaller than the selenium units they replaced. Some manufacturers’ data indicate that selenium rectifiers could handle as much as 250 milliamperes per square inch of plate area. From the table above, you can see that 100 milliamps is more typical. This isn’t a problem, as a replacement silicon diode will easily handle almost half an ampere. 1N4004 diode. Band identifies cathode, or (+) end. to find,, though they are still made in India. Don’t bother buying a new old stock (NOS) selenium unit. It will be at least 50 years old and already well-aged toward failure. Silicon Diode Specs Most parts distributors, including Radio Shack, carry one- ampere silicon diodes. The most popular are the 1N400x series. If you are Replacement a Must replacing a typical 130 Volt selenium, choose at Even if your equipment seems to be working least a 1N4004. This is a 400-volt rated part. well, you should replace the selenium rectifier Seems like over-kill? Not really. Unlike seleunit. It is only a question of time before it will nium, silicon is not “self-healing.” Even a few fail. If you are lucky, it will fail gracefully, blowmicroseconds of a voltage spike can zap a silicon ing a fuse or showing an “open” circuit. Unfordiode. My personal preference is to use a tunately, if your rectifier overheats, you could 1N4007 (rated at 1000 volts). It costs only a few have lots of nasty, toxic smoke. pennies more and provides a lot of extra margin. Replacement is easy and silicon diodes are If you are really conservative, the 1N5408 diode cheap, so there is no reason not to do the rewill handle 1000 volts and almost 3 amps! placement. New selenium rectifiers are difficult Silicon diodes are packaged as small cylinders with a wire lead emerging from MANUFACTURER PART NUMBER PLATE SIZE CURRENT each end. One end of the cylinder will NUMBER (INCHES) (MA) have a band marked on it. This is the cathode. Some diodes will have a Federal ITT 1005A 1.25 x 1.25 150 taper or chamfer to mark the cathode IRF RS050 .67 x .67 50 end. Be sure to observe the proper poIRF RS065 1x1 65 larity when connecting a silicon diode IRF RS075 1x1 75 in place of a selenium rectifier! My ilIRF RS100 1.2 x 1.2 100 lustration of a 1N4004 diode shows a (+) indication for the cathode—which IRF RS150 1.2 x 1.2 150 was the convention used on selenium IRF 6RS150 1.2 x 1.2 150* rectifiers. IRF RS200 1.5 x 1.5 200 IRF IRF IRF IRF Radio Receptor Radio Receptor Radio Receptor Radio Receptor Radio Receptor Sarkes Sarkes Sarkes RS350SL Q4B E-150L E-650L 8Y1 8J1 5Q1 5S1 6S2 ST-65 ST-100 ST-200 2x2 350 1x1 100 (full wave) 1x1 150 2x2 650 0.5 x 0.5 20 0.56 x 0.56 65 1.5 x 1.5 250 2.0 x 2.0 500 2.0 x 2.0 500* 1x1 65 1.25 x 1.25 100 1.65 x 1.65 200 Adding Resistance xxThe typical US power line is rated at 120 Vrms. This means that the peak voltage is 1.414 x 120 or roughly 170 volts. When you rectify the 120 Vrms line and used it to charge a filter capacitor, you might get as much as 170 VDC on the capacitor. In practice, the voltage is a bit lower due to losses in the rectifier and the wiring. xxWhen you exchange a selenium rectifier for a silicon diode you will find that the DC output voltage to your equipment has increased by 5 to 15 *Rated for 156 Vrms; all others are 130Vrms. volts. In order to maintain the originally specified output voltage, you Table 1. Some typical selenium devices you might encounter. will want to add a series resistor beJANUARY 2007 / THE AWA JOURNAL 27 restorations. In AC-DC power supplies, make sure that your new filter capacitors are rated for at least 170 Volts. Old equipment might have 150 V caps, but use the higher voltage rated capacitors when renovating. Replacement Considerations Selenium rectifier substitute is made up of silicon diode, power resistor and terminal strip (see text). tween the diode’s cathode and the first filter capacitor. Sometimes the increase in output voltage is not a particular problem, but a resistor should be added in all cases to reduce the available surge current. When a filter capacitor first charges up, it appears to be a momentary short circuit, drawing a huge current through the diode. Selenium rectifiers have a naturally higher internal resistance, so they “self-limit” the surge current. Silicon diodes have a lower forward resistance, so you need a resistor in series just to reduce the surge. My rule-of-thumb is to size the resistor to drop about 10 volts, simulating the drop of the old selenium rectifier. If the equipment requires 50 milliamperes, we can use Ohm’s Law to calculate: R = Vdrop/IDC = 10 V/0.050 A = 200 ohms This is only a rule-of-thumb. If you want to duplicate the exact original output voltage, start with a resistor of about 100 ohms and measure the output voltage with the equipment operating. Adjust the resistor value up or down until you achieve the voltage specified by the manufacturer of the equipment. Typical values will be from 20 to 200 ohms. The resistor has to dissipate some power, which means it will generate heat, so be sure to use a resistor rated for the power. In the example above, the approximate power required will be: P = V2/R = 102/200 = 0.5 watts Don’t use a half-watt resistor! A half-watt resistor gets very hot when dissipating a half-watt. I would recommend at least 100% to 200% safety factor. In fact, 5 watt resistors are probably easier to find than 2 watt types. If your current calculation is different, use a resistor rated for at least twice the power calculated. Resistors are cheap, so don’t cut corners. You’ll undoubtedly also be replacing the filter capacitors—standard practice in most 28 You may decide to remove the old selenium unit or merely disconnect it. It’s usually best to remove the unit and mount a multi-terminal connection strip in its place. Connect each wire of the new silicon diode to one lug of the terminal strip. Connect the resistor (calculated above) between the cathode lug and one of the free lugs of the terminal strip. It goes without saying that you should not use any lugs that are grounded to the chassis. The AC wire is the one that had been connected to the unmarked or minus (-) terminal of the selenium device. Now connect it to the unmarked side of the silicon diode. Connect the (+) terminal of the first filter capacitor to the free end of the resistor. Make sure that the banded end of the diode is the one that is connected to the resistor and through the resistor to the (+) terminal of the first filter capacitor. If you get the polarity wrong, you can short or destroy the filter capacitors, blow a fuse, and blow the new diode. Be careful. Be certain you know which end of the diode connects to the DC. Possible Configurations You will typically find selenium rectifiers used in audio amplifiers, test equipment, and “3Way” portable radios. Selenium was not used in the popular “All American Five” radios, because the rectifier tube was necessary to complete the heater series string for 120 VAC operation. In most equipment, there will be one selenium rectifier connected as a half-wave circuit. This was the lowest cost rectifier configuration. Ripple voltage is higher at the output, but that wasn’t a problem in most equipment. More sophisticated equipment might use two selenium rectifiers in a full-wave configuration. That means you need two silicon diodes and associated resistors. Likewise, TVs from the 1950s often used a voltage doubler circuit. Two selenium rectifiers were used in a circuit that boosted the DC output to twice the AC input voltage. Use particular caution in this case as the “boosted” DC can reach up to 400 V! Be careful in replacing selenium units in socalled “battery eliminators” or “3-way” portable radios. This equipment usually uses low voltage tubes in configurations involving the tube fila(continued on next page) THE AWA JOURNAL / JANUARY 2007 BY ROBERT F. HAWORTH, W2PUA 112 TILFORD RD., SOMERDALE, NJ 08083 AN RCA RADIO FOR THE BLIND f you’re like me, you have probably given little thought to how a blind person might enjoy tuning and listening to a radio. True, only a small percentage of the world’s population is affected this way, and we who are sighted don’t usually give much thought to the problems of the blind. As I now reflect on this issue, I can understand the frustration that must accompany View of a section of the radio’s top. Note braille performing such tasks as tuning a radio to a spemarkings on slide switch at upper right and on cific frequency. Close your eyes and try it! tuning drums beneath access windows. An RCA radio designed for the blind was given to me recently by an old friend and colsticker that might have carried this information. league from my days of working at the company. The identification “Japan 303” molded into the I don’t know if the set was strictly a philanthropic bottom suggests that the set was manufactured in project of RCA’s or produced with financial asthat country. sistance from one of the organizations that assist This is the only radio for the blind I’ve come the blind. Certainly the costs of tooling for this across in better than 20 years of attending hamspecial manufacture must have been significant. fests and antique shows. It occupies a prominent The controls of this radio are identified in both spot in my collection. braille and English. Note the window at the top of each knob. It gives access to a drum, carrying braille frequency identifications, that rotates as the knob is turned. The raised braille characters are molded into the plastic.The set’s design and appearance suggests that it is a product of the 1960s. Note that the set tunes the UHF and VHF TV audio in addition to AM and FM. No external antennas are required. All bands either use ferrite antennas or are capacitor-linked to the AC line in the manRCA radio for the blind ner of the FM sets of the 1940s and 1950s. has braille markings, There are no model numbers on the unit, though there is a shadow of a former tunes AM and FM as well as VHF and UHF TV audio. I Replacing Selenium Rectifiers, continued www.epa.gov/ttn/atw/hlthef/selenium.html “Insel Rectifiers.” http://www.rectifierindia. com/product/seleniumrectifiers/index.html 5. “Metallic Rectifier Design & Application.” http://www.pmillett.com/file%20downloadss/selenium.pdf 6. “Zenith Trans-Oceanic.” http://oak.cats. ohiou.edu/~postr/bapix/H500_2.htm 7. “Power Supply Rebuilding.” http:// trans-oceanic.fortunecity.net/te01015.htm 8. “Motorola VT-73.” “Replacing Selenium.” http://antiqueradio.org/motvt73.htm 9. “Powering your Antique Portable Radio.” http://antiqueradio.org/bsupply.htm 10. Radio Shack 1959 Guide to Electronic Buying 4. ments in the DC power circuit. These kinds of circuits have too many variations to cover here. A typical example is the Zenith Trans-Oceanic, one of the most popular of the 3-way portables. See the references (6) through (9) for more help. REFERENCES 1. 2. 3. ARRL Handbook 1959. American Radio Relay League. Allied Radio Catalog 1970 “Selenium Compounds; Hazards.” http:// JANUARY 2007 / THE AWA JOURNAL 29 Replacing Selenium Rectifiers Further Thoughts Six Years Later Since the Antique Wireless Association published my article in January of 2007, I've received numerous comments, mostly good, about the article. I think it's a good place to start for someone who is dealing with a selenium rectifier for the first time. Certainly, not all situations are covered, but the basics are still useful today. Here are some corrections and additions: 1. The comment about using selenium to replace a type 80 or 5Y3 vacuum tube rectifier is not really appropriate. These tubes have a reverse voltage rating exceeding 500 V. To replace them with selenium would require a very long stack of plates, certainly a dozen or more in series. But this fact highlights the really dramatic advantage of silicon rectifiers. In many circuits, one 1N4007 can be used to replace each plate of a dual rectifier tube. This saves more than 10 Watts of heat and allows nearby components to run cooler. 2. AT&T Bell Labs reported on selenium rectifier performance in an extensive report in the 1950s. J. Gramels explains in detail how selenium rectifiers are made and how they age with time. From the beginning of their use, it was understood that the rectifier characteristics would change with age. www3.alcatel-lucent.com/bstj/vol32-1953/articles/bstj32-6-1469.pdf 3. The 1N4007 diode is the best all-around choice for replacement of selenium rectifiers found in radios, test equipment, and TV sets. The price is so low, under 10 cents, that it doesn't pay to use anything less. The 1N5408 is another choice, though really overkill in most cases. 4. I continue to recommend a "cut and try" approach on the series resistor. The current waveform is not a nice sinusoid, as the rectifier supplies current only during the middle of an AC cycle when the filter capacitor needs additional charge. Peak currents can be 5 or 10 times higher than the measured DC average value. 5. Don't save money by using 150 V electrolytic capacitors. Yes, the old radios used them, but line voltages are higher today and capacitors are cheaper. I wouldn't use anything less than 200V for typical 120V (rms) line voltages. If the equipment you are repairing has a transformer, then use capacitors that are rated for at least the peak output voltage plus a 10 or 20% safety factor. 6. European radios favored a 4-diode full-wave bridge. These can be replaced with four 1N4007s or a commercial bridge rated for at least 600V. With 220V input, the peak diode voltage is in excess of √2 x 240 or 340V. 7. Automotive battery chargers and "eliminators" (like those sold by HeathKit and EICO) used large single- or double- plate selenium rectifiers. The circuit is usually a full-wave center-tap. For higher current levels you will need to choose a larger rectifier that bolts down to a heatsink. You must electrically isolate the rectifier if you choose to use the metal chassis or cabinet as a heatsink. Some helpful reading materials: • "Metallic Rectifiers," Theodore Conti. http://www.vacuumtubeera.net/MetRect-CrysDiodes.pdf • "Design Guide for Rectifier Use," Hammond Transformer. http://www.hammondmfg.com/pdf/5c007.pdf • AN 1040 "Mounting Considerations for Power Semiconductors, " ON Semiconductor. http://www.onsemi.com/pub/Collateral/AN1040-D.PDF • Data Sheet 1N4001-07 rectifier. ON Semiconductor. http://www.onsemi.com/pub/Collateral/1N4001-D.PDF


