WARNING: DO NOT over-tighten filter housings (hand
advertisement

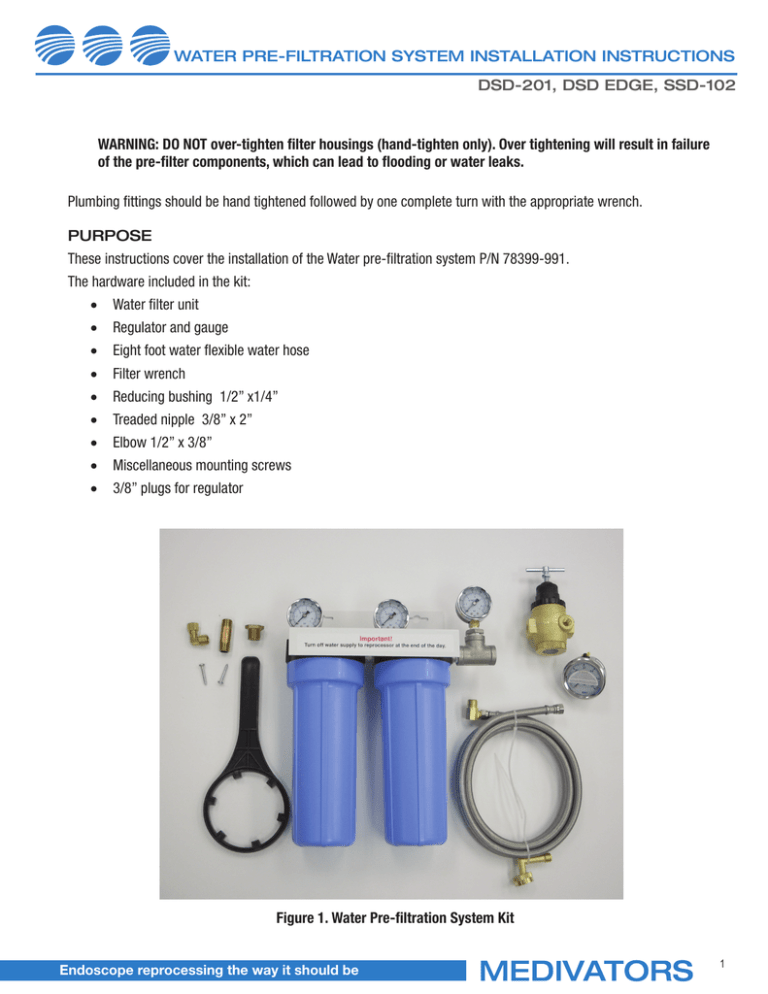
WATER PRE-FILTRATION SYSTEM INSTALLATION INSTRUCTIONS DSD-201, DSD EDGE, SSD-102 WARNING: DO NOT over-tighten filter housings (hand-tighten only). Over tightening will result in failure of the pre-filter components, which can lead to flooding or water leaks. Plumbing fittings should be hand tightened followed by one complete turn with the appropriate wrench. Purpose These instructions cover the installation of the Water pre-filtration system P/N 78399-991. The hardware included in the kit: • Water filter unit • Regulator and gauge • Eight foot water flexible water hose • Filter wrench • Reducing bushing 1/2” x1/4” • Treaded nipple 3/8” x 2” • Elbow 1/2” x 3/8” • Miscellaneous mounting screws • 3/8” plugs for regulator Figure 1. Water Pre-filtration System Kit Endoscope reprocessing the way it should be 1 Water Supply (Potable) FOR DSD EDGE ONLY: • The incoming water line must be a minimum of 1/2” diameter providing a minimum flow rate of 3.2 gal/min (12 liters/min) at a temperature of 95ºF ± 4ºF (35ºC ± 2ºC) . This will require the installation of a temperature regulator and temperature gauge prior to the water pre-filtration system. The facility is responsible for obtaining and installing the temperature regulator system. FOR DSD -201 and SSD-102 ONLY: • The incoming water line must be a minimum of ½” diameter providing a minimum flow rate of 3.2 gal/min (12 liters/min) at a maximum temperature of 110ºF (43ºC). FOR DSD EDGE, DSD-201 and SSD-102: Water connection to the unit is on the right side of the cabinet. The adapter attached to the unit is a 3/8” female NPT fitting. Water connections on the Pre-filtration system are 1/2” female NPT. • The incoming water pressure must be a minimum of 40 PSI (2.75 BAR) and should not to exceed 90 PSI (6.2BAR). • A shut off valve must be installed before the pre-filtration system. It is important that the valve be mounted within the operators’ reach. • The facility is responsible for the installation of the pre-filtration system and the connection of the incoming water line to the reprocessor and pre-filtration systems. Regulator installation and set up: • The pressure regulator requires the water to flow through in one direction for proper operation. On the bottom of the regulator is an arrow indicting water flow. Verify the proper flow direction when installing the water regulator. • Install the regulator between the filter assembly and the DSD EDGE/DSD-201/SSD-102. NOTE: Use a minimum of 1/2” piping for all waterline plumbing. Water flow direction arrow 2 Figure 2. Regulator adjustment: The regulator pressure can only be accurately set when water is flowing into the reprocessor. Once the machine is connected to the water supply, adjust the regulator during the initial flush cycle. Set the regulator to provide a water pressure to the reprocessor of 40 PSI (2.75 BAR). Filtration System The water filter housing is shipped with a 1.0 micron filter in housing #1 and a 0.45 micron filter in housing # 2. Gauge #1 Gauge #2 Water IN Gauge #3 Water OUT Housing #1 1.0 micron filter Housing #2 0.45 micron filter Figure 3 Endoscope reprocessing the way it should be 3 The accumulation of particulates in a filter can cause the water pressure to drop below the minimum required level. A pressure differential of 5 PSI or greater between gauges on each side of a filter indicates a need for replacement. For example, if the pressure on gauge #2 is 35 PSI when the pressure on gauge #1 is 40 PSI, a filter change is required. 12.00 inches 16.00 inches Depth of unit is approximately 6 inches Installation Figure 4 Dimensions of the water filter are shown in figure 4. • If not already installed, an incoming water shut-off valve must be installed upstream of the pre-filter system. • When mounting the pre-filtration system to sheet rock wall, suitable mounting hardware must be use to hold to the unit solidly to the wall. • The shut off valve must be easily accessible to the user to shut off when not in use. • Mount the filter assembly on the wall where the filters can be easily changed and the gauges checked. • Connect the output of the filter assy to the input of the regulator. • Connected the output of the regulator to the DSD EDGE/DSD-201/SSD-102 using the stainless steel hose. The other end of the hose will attached to the water inlet of the repressor on the right side of the machine. The installation kit ships with hardware that should fit most installations. If not, hardware may be sourced locally. Note: TURN OFF THE WATER SUPPLY AT THE END OF EACH DAY OR IF THE UNIT WILL NOT BE IN USE AND UNATTENDED FOR ANY LENGTH OF TIME. 4 Water filters changes • The filters in the Pre-filter housing should be changed every three months. • The filter wrench is only for removing the filter housings. NEVER tighten the filter housings with a filter wrench. • A thin film of silicon grease applied to the O-ring will aid in both sealing of the housing and ease of removal at the time of the next filter change. Silicon grease can be obtained from Medivators; the part number is 17599-463. The O-ring in the housing should be replaced at least once a year to prevent leaks. The part number for the O-ring is 43100-083. SAMPLE INSTALLATION OF A TEMERATURE REGULATOR FOR USE WITH DSD EDGE Temperature Regulator Temperature Gauge pressure regulators prior to regulator On/Off hot & cold water valves 5 SAMPLE INSTALLTION OF A DSD-201/ SSD-102 Minntech Corporation, 14605 28th Avenue North, Minneapolis, MN 55447 USA To l l F r e e : 1 - 8 0 0 - 4 4 4 - 4 7 2 9 · w w w . m i n n t e c h . c o m / m e d i v a t o r s 6 © 2010, MINNTECH CORPORATION, 50097-363/A

