Impulse Assembly PDF - Workrite Ergonomics
advertisement

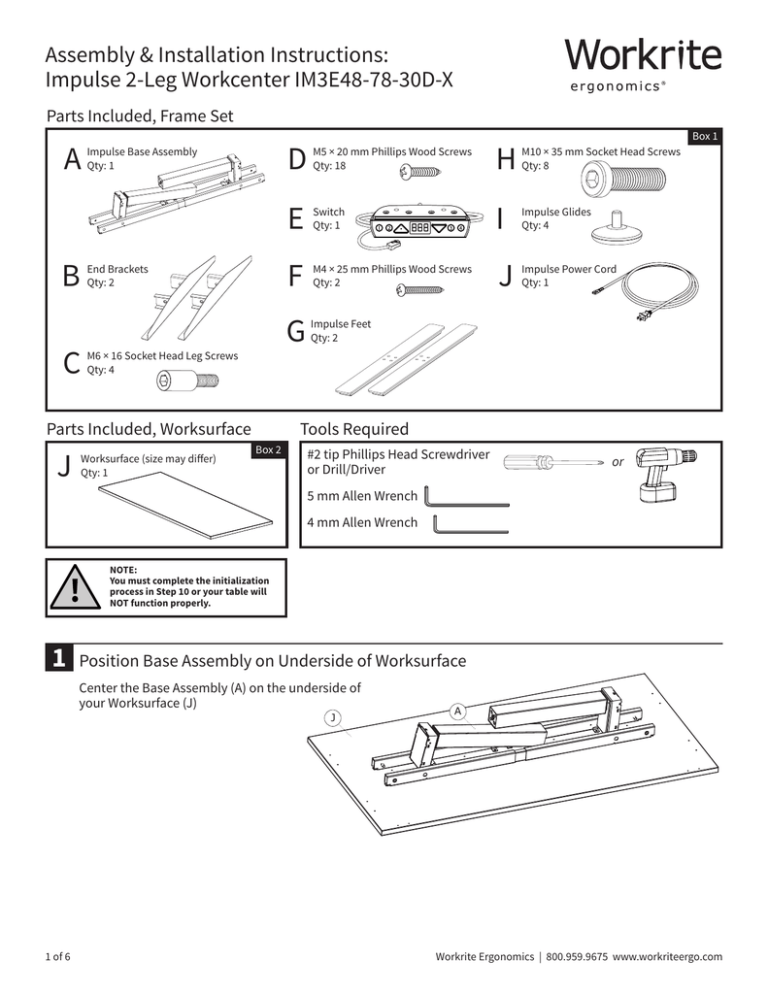
Assembly & Installation Instructions: Impulse 2-Leg Workcenter IM3E48-78-30D-X Parts Included, Frame Set A Impulse Base Assembly Qty: 1 B End Brackets Qty: 2 M5 × 20 mm Phillips Wood Screws Qty: 18 H E Switch Qty: 1 I F M4 × 25 mm Phillips Wood Screws Qty: 2 J M10 × 35 mm Socket Head Screws Qty: 8 Impulse Glides Qty: 4 Impulse Power Cord Qty: 1 G Impulse Feet Qty: 2 C M6 × 16 Socket Head Leg Screws Qty: 4 Parts Included, Worksurface J D Box 1 Worksurface (size may differ) Qty: 1 Tools Required Box 2 #2 tip Phillips Head Screwdriver or Drill/Driver or 5 mm Allen Wrench 4 mm Allen Wrench NOTE: You must complete the initialization process in Step 10 or your table will NOT function properly. 1 Position Base Assembly on Underside of Worksurface Center the Base Assembly (A) on the underside of your Worksurface (J) J 1 of 6 A Workrite Ergonomics | 800.959.9675 www.workriteergo.com 2 Install End Brackets on Base Assembly Slide the End Brackets(B) onto the Base Assembly (A). B A 3 Unfold and Lock Legs Into Place Fold legs up to a vertical position. a b Attach End Bracket (B) to Base Assembly (A)using M6 × 16 mm Socket Head Leg Screws (C) in four locations shown, with a 5 mm Allen Wrench. Lock into place by tightening the preinstalled Crossbar screws in four locations shown with a 5 mm Allen Wrench. c Hardware at actual size C M6 × 16 mm Socket Head Leg Screws 4 b C a b C a c c c c Pre-installed Crossbar screws C b C b Adjust the Width of Base Assembly for Worksurface Width Pull the End Brackets until the holes in the brackets align with the pre-drilled holes in your worksurface. 2 of 6 Workrite Ergonomics | 800.959.9675 www.workriteergo.com 5 Attach Base Assembly & Control to Worksurface a b Locate Switch (E) and route Switch Cable prior to attaching Base Assembly. c d Finish attaching Base Assembly (A) to Worksurface (J) with remaining M5 × 20 mm Phillips Wood Screws (D). e Plug in Switch to Control Box Anchor Base Assembly (A) to Worksurface (J) by first attaching at the four corners of End Brackets (B) with M5 × 20 mm Phillips Wood Screws (D). Allign switch with pre-drilled holes at edge of worksurface and attach using the two M4 × 25 mm Phillips Wood Screws (F). b Control Box Hardware at actual size D M5 × 20 mm Phillips Wood Screws b D c b b Hardware at actual size F F M4 × 25 mm Phillips Wood Screws d e E a Route Switch Cable through notch in frame set 6 Lock Base Assembly Width Tighten pre-installed Crossbar screws in four locations as shown at the inner side of the frame with a 4 mm Allen Wrench to lock Base Assembly width. 3 of 6 Switch Cable plugs into Control Box Pre-installed Crossbar screw Workrite Ergonomics | 800.959.9675 www.workriteergo.com 7 Attach Feet & Glides a b H I Attach Feet (G) to bottom of legs with M10 × 35 mm Socket Head Screws (H), using Allen Wrench (F) and tighten securely. a b I G H Install Glides (I) by screwing in. You will adjust the Glides once the workcenter is upright in Step 9. a G Hardware at actual size H M10 × 35 mm Socket Head Feet Screws 8 a b c Connect Power Cord to the Power Supply and Put Workcenter Upright Plug in Power Cord (J) into control Box Turn the workcenter over into an upright position. Plug the Power Cord (J) into the power outlet. J a 9 J c b Adjust Glides If necessary, adjust the Glides (I) to level the worksurface. Unscrew to increase height, screw in to decrease height. 10 Initialize Base Assembly a Press both the Up and Down arrows at the same time for three seconds. Continue pressing until the table reaches the lowest position. b Wait until the switch makes a "beep" sound and release buttons. When initializing, the display shows “000”. When the initialization is finished, the display shows the height. Your Impulse Workcenter is now ready for use. 4 of 6 You must complete this initialization step or your table will NOT function properly. Preset Buttons 1&2 Preset Buttons 3&4 Up Button Display Down Button Workrite Ergonomics | 800.959.9675 www.workriteergo.com User Instructions: Impulse Digital Programmable Switch Preset Buttons 1&2 Preset Buttons 3&4 Up Button Display Down Button Read all instructions before using this Impulse Workcenter. Normal operation 1 2 Press any button. Three digit display shows current workcenter height in inches. Press either the Up or Down button to adjust the workcenter height. When no button has been pressed for 30 seconds, the system goes into a <0.1 W standby mode and the display turns off. Press any button to wake the system up. The display will show the current height again. Starting height 1 Use the Up or Down height is 25.5 inches. buttons to move the workcenter to preferred starting height The default starting 2 Press Down button to go to the lowest position. At the lowest position, press Down seconds, display will flash for 10 seconds. 3 During the 10 seconds, press Up or Down buttons to adjust the starting height in inches, and then press Up and Down buttons together for 3 seconds to store the preferred starting height. The display will stop flashing and the preferred starting height is shown and also stored. button again for 5 Memorize position The Impulse Digital Programmable Switch supports 4 memory positions. 1 2 Use the Up 3 Once a position stored, press and hold the or Down buttons to move the workcenter to preferred height. Press any of Preset Buttons first, then simultaneously press either the Up or Down button for 2 seconds to store the current height. Display will show P1, P2, P3, P4 when the position has been stored. Preset Button continuously to move to the stored height. Please note that the stored position can only be overwritten, not removed. Reset 1 Press both the Up lower. and Down buttons at the same time for 3 seconds; the workcenter will begin to 2 Continue pressing the buttons until the workcenter reaches the lowest position. The control box makes a beep when the workcenter is reset; then the buttons can be released. When conducting a reset, the display shows “000”. When the reset is finished, the display shows the default or the programmed starting height. 5 of 6 Workrite Ergonomics | 800.959.9675 www.workriteergo.com ✓ Cleaning instructions To clean the Impulse legs, apply cleaner to a soft cloth. Suggested cleaners: Windex or Formula 409. Do not use solvents and do not saturate or spray cleaners directly onto workcenter base. 6 of 6 Workrite Ergonomics | 800.959.9675 www.workriteergo.com #1500265- Rev A


