PDF Google Sites Tutorial
advertisement

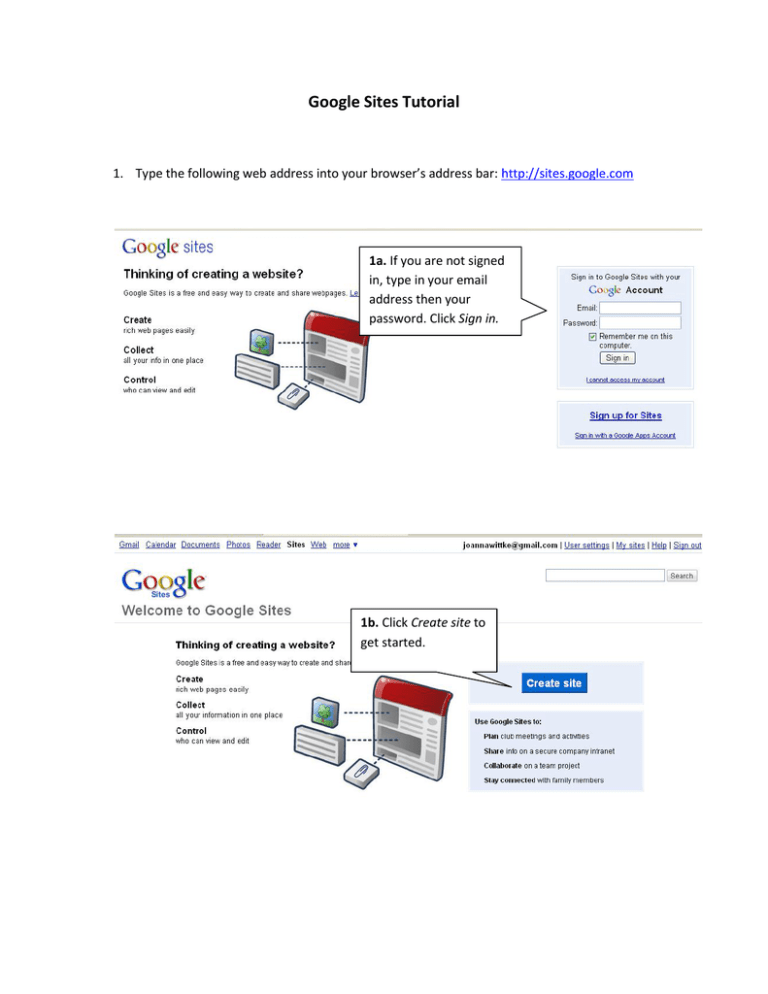
Google Sites Tutorial 1. Type the following web address into your browser’s address bar: http://sites.google.com 1a. If you are not signed in, type in your email address then your password. Click Sign in. 1b. Click Create site to get started. 1c. Give your new website a name. 1d. Give your site a unique URL that no one else will have and is related closely to your Site name. 1e. What’s your website about? 1f. Who do you want to be able to see your site? 1g. Click the circle next to the name of the theme you want for your website. The theme contains your background design and colors. 1h. Type in the code exactly how you see it and click Create site. 1i. If everything worked correctly, your site should automatically appear. Often the site URL will have already been taken by someone else. You may have to try different names. Also remember to type in the new code that appears every time you are finished. It changes every time you have to pick a different name. 2. Now it’s time to create a page for your website. My first one is going to be called About Me, and it’s going to be a generalized page about myself. 2a. Click Create page on the top left side of your website. 2b. Click the circle next to Web Page. 2c. Give your page a name. I chose About Me. 2d. You will want to select Put page at the top level. The second option would make your new page a subordinate page to your Home page. 2e. Click Create Page to get started on your new page. 2g. These are the tools you will use to edit the look and style of your text. 2f. In this area you can type the main content for your website. 2g. After you have entered your desired content click the Save button to save your page. 2h. To make your page appear in your main navigation bar click More actions then move your mouse down to Page settings and click again. 2i. If there isn’t a checkmark next to Show this page in the sidebar, go ahead and click in the box. Then click Save when you are finished. 2j. Now your new page appears in your sidebar. Repeat this process to add more pages to your new google website! 3. Next we are going to delete the Recent Site Activity sidebar that’s liable to confuse you and anyone else visiting your site. 3a. Click on Edit sidebar. 3b. Make sure that you are on the Site layout page. Then click delete to get rid of your Recent site activity sidebar. 3c. There should be a blank space now where the Recent site activity used to be. 3d. When you are done, click Save changes. 3e. Click Return to site to keep editing your website. 4. Lastly, we are going to add a Gadget to your website. 4a. Pick a page you want your gadget on. Then go to the top of your page to Edit page. I chose my Home page. 4b. Click Insert near the top left of your website. 4c. Move your mouse all the way down to the bottom to More gadgets… and click it. 4d. Scroll down until you find the Gadget you want. I am picking the Countdown widget. Click once. 4e. Click Add to add the widget to your page. This process applies to most widgets you would want to add to your site. 4d. I chose My Birthday as the event I want to countdown until. If I wanted to make it bigger, I would increase the number of pixels. If I wanted it smaller, I would decrease them. 4e. Click Preview Gadget to see what your Gadget is going to look like on your website. 4f. If that’s good enough for you, click OK. 4g. Your gadget may look something like this. Align L means align left, Align C means align center and Align R means align right. Wrap on will leave a boundary between the Gadget and any information on the page. Clicking Remove will remove the widget from your page. 4h. Now go ahead and click Save and you’ll see the functioning preview of your website with the Gadget you just added. You can access your site from any computer with internet. For example, my site is http://sites.google.com/site/joannacwittke. To edit it, all I have to do is sign in again. 4i. The Sign in option is at the very bottom of your website below your content.


