Guidelines for Calibrated Scale Bar Placement
and Processing
AuthoredbyCulturalHeritageImaging
Tosupporthighlyaccuratemeasurementof3Ddataofanobjectorasite,itisessentialfor
practitionersofphotogrammetrytolearnthecorrectplacementanduseofcalibratedscale
bars.
Asyoupreparetoimageasubject,youstartbyplacingthescalebarson,around,ornextto
theobjectorsite.Whenyouhavetakenaseriesofoverlappingimagesthatincludethe
scalebars,youarereadytoprocesstheimagesettocreatea3Dmodel.AgisoftPhotoScan
Profindstheexactcenterofthetargetsonthescalebarsinyourphotos,enablinghighly
accuratemeasurementofanyfeatureoftheimagingsubject.
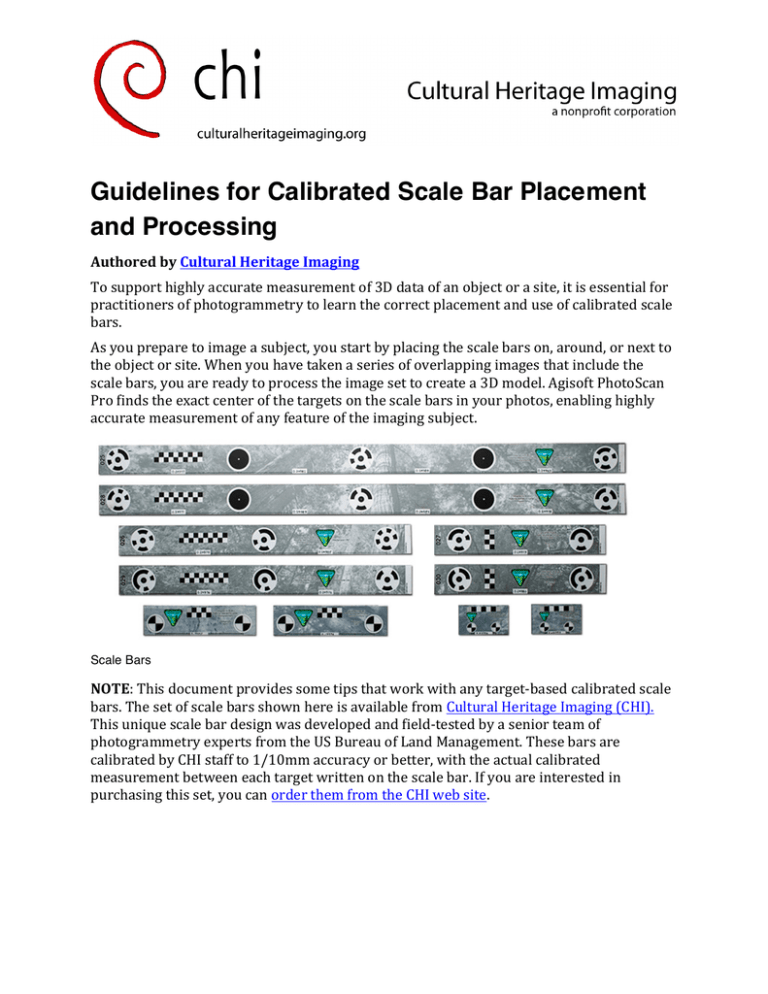
Scale Bars
NOTE:Thisdocumentprovidessometipsthatworkwithanytarget-basedcalibratedscale
bars.ThesetofscalebarsshownhereisavailablefromCulturalHeritageImaging(CHI).
Thisuniquescalebardesignwasdevelopedandfield-testedbyaseniorteamof
photogrammetryexpertsfromtheUSBureauofLandManagement.Thesebarsare
calibratedbyCHIstaffto1/10mmaccuracyorbetter,withtheactualcalibrated
measurementbetweeneachtargetwrittenonthescalebar.Ifyouareinterestedin
purchasingthisset,youcanorderthemfromtheCHIwebsite.
How to Place Scale Bars
Placethescalebarsinasceneoraroundanobjectofinterestsothetargetscanbeclearly
seeninmultipleoverlappingimages.Youshouldconsiderthescalebarstobepartofthe
“areaofinterest”foryourphotogrammetryproject,andmakesurethatyoursetof
overlappingimagesextendsbeyondtheplacementofthescalebars.
Thescalebarshavetargetsthatareusedasmarkerswhenthebarsareplacedinasceneor
aroundasubject.Whenyoursetofoverlappingphotosincludesthebars,thesemarkers
serveasreferencepointsforscaledefinition,andalsohelptheprocessingtoolalignimages
accurately.
Thescalebarsdonotneedtoappearineveryphoto.Theyshouldbewellcoveredby
overlappingphotoswithgoodgeometrysothattheircalibratedvaluescanbeusedto
provideaccuratescaleforthewholephotogrammetryproject.
ImportantNote:Donotmovethescalebarsduringphotogrammetricimagecaptureof
yourproject.Ifascalebarisaccidentallybumpedormoved,removeitfromthescene.Do
notattempttoplaceitbackinthescene,asitwillnotbeinexactlythesameplace.Scale
barsmustbeinaconstantlocationrelativetoyourprojectinordertobeusedaccurately.
Examples of Placement
Thefollowingfiguresshowsomewaysofplacingscalebars.
Figure 1: On the left, three scale bars in place around a smaller subject. On the right, two scale bars
placed on the outside of a large painting. Two additional scale bars (not shown) are placed on the far side
of the painting.
Guidelines for Calibrated Scale Bar Placement and Processing, Version 2.0
© Cultural Heritage Imaging 2015, All Rights Reserved
2
Figure 2: Scale bars in place around a small kiosk-style building. Some are placed on the ground around
the subject, and some are on the subject.
Whenusingscalebarsplacedontheground,outsidetheprimarysubjectarea,youmust
takeadditionaloverlappingphotosthatincludethescalebarsinordertousethemfor
accuratemeasurementinyourproject.
Inlargerprojects,placethescalebarsasfarawayfromeachotheraspossiblesothatyou
canvalidatethescaleacrosstheentireproject.
Guidelines for Calibrated Scale Bar Placement and Processing, Version 2.0
© Cultural Heritage Imaging 2015, All Rights Reserved
3
Figure 3: Four scale bars in place near an area of rock art and inscriptions to be imaged. These scale
bars are placed near, but not covering, the inscriptions that appear above them on the rock.
How Many Scale Bars to Use in Your Project
Whilephotogrammetrysoftwarecanaddscaletoyourprojectwithasinglescalebar,itis
advisabletoplaceaminimumofthreescalebarsinyourproject.Werecommendfour.Two
barsprovideabasiccheck,andthreeormoreaddconfidenceandstatisticalreassurance.
Usingfourbarsisideal,especiallyforlargerprojectsandoutdoorenvironments,becauseit
isalltooeasyforascalebartobemovedbythewind,kicked,orotherwisedisplaced
duringcapture.Ifthishappens,theprojectwillstillhavetheintegrityofthreevalidscale
bars.
Guidelines for Calibrated Scale Bar Placement and Processing, Version 2.0
© Cultural Heritage Imaging 2015, All Rights Reserved
4
Processing Data with Scale Bars
TheprocessingworkflowinAgisoftPhotoScanProVersion1.2includesthesebasicsteps:
•
Setthescalebaraccuracy
•
Detectthetargetsonthescalebarsintheimagesettogeneratemarkersineachphoto
thatincludesscalebars.
•
Createscalebarsobjectsbetweenspecificmarkers.
•
Addthecalibratedscalebardistancedataforthescalebarobjects.
Eachofthesestepsisdescribedfurtherbelow.Moreinformationonplacingmarkersand
creatingscalebarscanbefoundintheAgisoftPhotoScanProUser’sGuide,Chapter4,
ReferencingandMeasurement.
Set the Scale Bar Accuracy
Beginningwithversion1.2ofPhotoScanPro,itispossibletosetthescalebaraccuracy.The
ScalebarsfromCulturalHeritageImagingarecalibratedto1/10mmaccuracyorbetter.
YoushouldsettheScaleBarAccuracyto0.0001ifyouareusingthesescalebars.Otherwise,
setthisvaluetowhateveraccuracyiscorrectforthescalebarsyouareusing.(thedefault
valueis0.001)
Detecting Markers
Afteraligningphotos,andoptimizingyourproject,usetheDetectMarkersdialogtodetect
thetargetsonthescalebars,andusethemtoautomaticallygeneratemarkers.Makesure
theReferencePaneisvisibleandchooseTools>Markers>DetectMarkers.
Guidelines for Calibrated Scale Bar Placement and Processing, Version 2.0
© Cultural Heritage Imaging 2015, All Rights Reserved
5
Figure 4: Detect markers for scale bars.
TIP:Wesuggestthatyoustartwithatoleranceof20,andmakeithigherifnotalltargetsare
detected.
Thisgraphicalsoshowsthedifferentkindsofmarkersthatmayappearonscalebars.
ThescalebarsfromCHIincludeallthreekindsofmarkertargetssupportedbyPhotoScan,
asshowninthefigure.Markertargetscanbecircularcoded,circularnon-codedornoncodedcross.
Anadvantageofcodedtargetsisthattheyarealwaysnamedconsistently.Codedtargets
arenamed“targetxx,”wherexxisthenumberofthecodedtarget,printedonthescalebar.
Non-codedtargetsarenamedsequentiallyintheorderthesoftwareidentifiesthem,and
labeled“pointxx,”butthenumberingisnotreproducibleindifferentprojects.
TIP:Ifyouareusingbothcircularcodedandcircularnon-codedtargets,youshoulddetect
thecodedmarkers(thecircular12-bitmarkerinthisexample)beforeyoudetectanynoncodedcircularmarkers.Thisisbecausethecenterofthecircularcodedmarkerisacircle,
anditwillbedetectedasanon-codedcircleifthereisnotalreadyamarkerpresentfrom
detectingthecodedmarkers.Thenwhencodedmarkersaredetected,youmayhave
duplicationofmarkers.
Thecentersofcodedandnon-codedcirculartargetsareplacedwithhighprecisionbecause
thecenterofthecirclecanbedetectedalgorithmically.
Thecentersofnon-codedcross-typetargetswithcalibrateddistances,aswellasthe
cornersofsmallscalesmadeupofblackandwhitesquaresareplacedwithhighprecision
becausethecenterpointofthecrosscanbedetectedalgorithmicallybythesoftware.
Althoughyouwillrarelyusethesescalemarkersforsettingscaleinyourproject,you
shouldretainanydetectedscalemarkers.Theymarkadditionalknownpointsthatcanaid
thesoftwareinthephotoalignmentandcameracalibration.
Toseethemarkersthataregeneratedineachimage,clicktheEditMarkersiconinthetop
toolbar(theblueflag).Eachmarkerislabeledasatargetorpoint,withanindexnumber.
Guidelines for Calibrated Scale Bar Placement and Processing, Version 2.0
© Cultural Heritage Imaging 2015, All Rights Reserved
6
Figure 5: Detected coded and non-coded cross targets. Corners in the centimeter scale are also detected.
Formoreinformationonmarkers,seetheAgisoftPhotoScanProUser’sGuide,Chapter4,
ReferencingandMeasurement.
Examining and Editing Markers
Afteryoudetectthemarkers,youcanseeinformationabouteachmarkerintheMarkers
areaoftheReferencePane,asshowninFigure6.
Figure 6: The Markers area of the Reference Pane after markers have been detected.
•
TheError(pix)valueistheestimatederrorinunitsofpixelsforthatmarker’s
placement.Youshouldcheckthesevaluestoevaluatethequalityoftheautomatic
markerdetection.
Guidelines for Calibrated Scale Bar Placement and Processing, Version 2.0
© Cultural Heritage Imaging 2015, All Rights Reserved
7
•
TheProjectionsvalueisthenumberofphotosinwhichthemarkerwasdetected.We
recommendaminimumofthreeprojectionsforanymarkerthatisusedtosetscalefor
theproject.
Check the Error for Each Marker
Youcansortbyerrortofindthemostextremeonesinyourproject.Youcanreviewthe
markersonaphoto,removethemorchangetheirposition.
Ifyouintendtouseamarkertosetscale,werecommendthatyouremoveprojectionson
photoswiththemosterror,ormoveprojectionsuntilthemarkererrorisbelow0.4pixels.
(See“CreatingScaleBarObjects”belowforinstructionsoncreatingthescalebarsand
settingtheirdistancevalues)
BeginningwithPhotoScanversion1.2,itispossibletoseeinformationaboutalltheimages
thathaveaprojectionforanygivenmarker,andtoseetheerrorinpixelsforeach
projectiononeachphoto.Toviewthisinformation,rightclickonamarkerinthe
workspaceorinthereferencepaneandchoose“ShowInfo…”fromthemenu.
Figure 7: “Show Info…” box for a marker.
Youcansortthe“Values”forpixelerrorsintheinfodialogbox.Youcanremovethemarker
fromphotosthathavehighpixelerror.StartinginPhotoScanversion1.2.5,youcandouble
Guidelines for Calibrated Scale Bar Placement and Processing, Version 2.0
© Cultural Heritage Imaging 2015, All Rights Reserved
8
clickonanimagenameintheinfodialogboxandthatimagewillappearinthemain
window.Werecommendthatyouhaveaminimumof3projectionsforanymarkeryou
plantousetocreatescale.(Seebelowonhowtoaddandremovemarkers)
TIP:Aftersortingthepixelerrorsforeachphotowithaprojectionforamarker,youcan
removethemarkerfromanyphotothathasahighpixelerror.Removingthemarkeraffects
thenumberofprojectionsforthatmarker,sobesuretocheckthatyouhaveenough.
Youcanalsofindalltheimagesthathaveprojectionsforaspecificmarkerbyright-clicking
onthatmarkerandchoosingFilterPhotosbyMarkers.Thencheckthemarkerplacement
fortheimagesthathaveagreenorblueflag(indicatingthemarkerisbeingused).Todo
this,double-clickontheimageinthePhotosPane,andthenzoominonthetargetinthe
mainwindowarea.
Whenyouhavemadeanychangetoamarkerinaphoto,clickUpdateintheReference
Panetoolbartoupdatethepixelerrorestimate.
Check the number of projections for each marker
Markersshouldappearinthreeormoreimagesifyouhaveagoodimagesetwithproper
overlappingimages.Ifyouseefewerthanthreeprojectionsforamarker,youcanplacethe
markerbyhandonadditionalphotos.Alternatively,youcanchoosenottousethatmarker
forcreatingscalebars.
Asdescribedabove,therearetwowaystofindthephotosthathaveprojectionsforagiven
marker.YoucanuseFilterPhotosbyMarkersorthe“ShowInfo”dialogbox.Youcan
thenremovemarkersthathavehigherror,orrepositionthem.Ifyoudonothaveenough
markers,youcanplacethembyhand.
PhotoScansometimesdetectsadditionalphotosthathaveamarkerandshowsthemwitha
grayflag,becausethereisnotenoughcertaintyabouttheposition.Thesepotentialmarkers
arenotusedintheprojectunlessyouplacethemarkerexplicitlyintheadditionalphotoor
photos,asshowninFigure8.Ifyoudon'thaveenoughprojections,onewaytoaddmoreis
byexplicitlyplacinganypotentialmarkersinaphoto.
Thegreenflagbyphoto13inFigure8indicatesthatthemarkerfortarget72isbeingused
inthisphoto.Thegrayflagindicatesthatapotentialmarkerwasdetected,butitisnot
beingused.
Toconvertapotentialmarkertoausedmarker,double-clicktoselectthephotowiththe
grayflag.Inthemainwindowarea,hoveroverthebaseoftheflagforthesuggestedmarker
untilitturnsred.Youcanthenrightclicktobringupthecontextmenu.Toplacethe
marker,choosePlacemarkerfromtheright-clickcontextmenu.
Guidelines for Calibrated Scale Bar Placement and Processing, Version 2.0
© Cultural Heritage Imaging 2015, All Rights Reserved
9
Figure 8: Placing markers by hand.
Creating Scale Bar Objects
Theprocessingsoftwareusesascalebarobjecttorepresentthephysicalscalebarwith
targetsthatwasusedtocreatethemarkers.Youmustcreatethesescalebarobjectsfrom
markerpairs,afterallmarkershavebeengenerated.
Tocreatescalebarobjects,selecttwomarkersintheReferencePane,thenright-clickand
chooseCreateScaleBar.
Eachscalebarobjectthatyoucreateshouldcorrespondtoaphysicalcalibratedscalebar
thatyouusedwhencapturingyourimageset.
Figure 9: Creating a scale bar from target 71 to target 72.
Adding Scale Bar Distances
SelectViewSourceintheReferencePanetoolbartoviewthescalebarobjectsyouhave
created.EachscalebarobjectisassociatedwithaDistancevaluethatyoucansettothe
Guidelines for Calibrated Scale Bar Placement and Processing, Version 2.0
© Cultural Heritage Imaging 2015, All Rights Reserved
10
exactdistanceinmetersbetweenthetwomarkersonyourphysicalscalebar.Thisisthe
informationthatprovidesthescaleforthewhole3Dproject.
Figure 10: Updating information about markers and scale bars.
TheDistancevalueisinitiallyblank.Inordertosetthescaleforthemodel,youmustenter
adistancevalueforoneormorescale-barobjects.Thedistancebetweenmarkersinthe
objectshouldmatchtheknowndistancebetweentargetsonthephysicalscalebar.
Toenteraknowndistancevalue:
•
Selectascale-barobject.
•
Double-clickintheDistance(m)column.
•
Entertheknowndistancebetweentargetsforthecorrespondingcalibratedscalebar.
TIP:Whileaprojectcanbescaledusingtheknowndistancefromasinglescalebar,more
scalebarsarestronglyrecommenced.Twobarsprovideabasiccheck,andthreeormore
addconfidenceandstatisticalreassurance.
TIP:Whenyoumakeanychangestomarkersorscale-barobjects,suchasmanuallyplacing
ormovingmarkersorenteringscalebardistances,clickUpdatetoseetheeffectofthose
changesontheerrorandestimateddistances.
Check estimated scale bar distance values
Inawell-shotprojectwithcrispphotosandproperimageoverlap,thedifferencebetween
theestimateddistancevalueforeachscale-barobjectandtheknowntargetdistanceinthe
correspondingcalibratedscalebarshouldbelessthantheprecisionofthescalebar.Inthe
caseofthescalebarsfromCHIthisis1/10mm(0.0001meter).
Guidelines for Calibrated Scale Bar Placement and Processing, Version 2.0
© Cultural Heritage Imaging 2015, All Rights Reserved
11
Eachtimeyouupdatethesourcedata,thetoolrefinesthescaleoftheentiremodel.Itthen
usesthecurrentscaleandprojectgeometrytoestimatedistancesforalldefinedscale-bar
objects.
Toshowtheestimateddistancevaluesthatarebasedonthecurrentscale,clicktheView
Estimatediconinthetoolbar.
Figure 11: Show estimated distance between markers in scale-bar objects.
InFigure11,thedistancevaluesyouenteredarereplacedbytheestimatedvaluesbasedon
thecurrentprojectscale.Thetoolestimatesvaluesforallscale-barobjects,basedonthe
currentscaleithasdevelopedforthemodel.
•
Thecheckmarksshowthoseobjectsforwhichyouhaveentereddistancedata.For
theseobjects,theestimateddistancevalueisadjustedtoconformwiththecurrent
scaleinthemodel.
•
Theuncheckedobjectshaveonlyestimateddata,becausenodatahasbeenexplicitly
enteredforthem.
Youcanevaluatetheaccuracyofthecurrentscalebyseeinghowcloselytheestimated
distancevaluesforscalebarobjectsmatchtheknowndistancesbetweentargetsinthe
physicalscalebarsthatyouusedtogeneratetheimageset.
TIP:Enterknownmarkerdistancesforallexceptoneofthescale-barobjectsthat
correspondtoyourphysicalscalebars.Thisenablesyoutocomparethewhollyestimated
valuewiththeadjustedvalues.
Guidelines for Calibrated Scale Bar Placement and Processing, Version 2.0
© Cultural Heritage Imaging 2015, All Rights Reserved
12


