Night Flying
advertisement

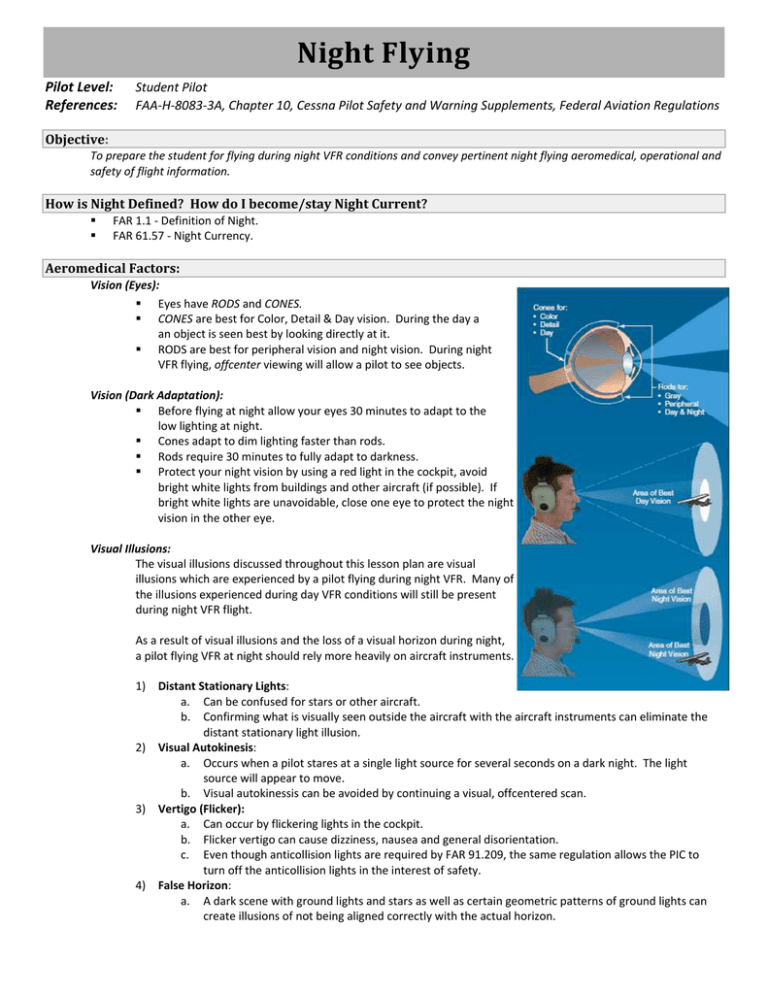
Night Flying Pilot Level: References: Student Pilot FAA-H-8083-3A, Chapter 10, Cessna Pilot Safety and Warning Supplements, Federal Aviation Regulations Objective: To prepare the student for flying during night VFR conditions and convey pertinent night flying aeromedical, operational and safety of flight information. How is Night Defined? How do I become/stay Night Current? FAR 1.1 - Definition of Night. FAR 61.57 - Night Currency. Aeromedical Factors: Vision (Eyes): Eyes have RODS and CONES. CONES are best for Color, Detail & Day vision. During the day a an object is seen best by looking directly at it. RODS are best for peripheral vision and night vision. During night VFR flying, offcenter viewing will allow a pilot to see objects. Vision (Dark Adaptation): Before flying at night allow your eyes 30 minutes to adapt to the low lighting at night. Cones adapt to dim lighting faster than rods. Rods require 30 minutes to fully adapt to darkness. Protect your night vision by using a red light in the cockpit, avoid bright white lights from buildings and other aircraft (if possible). If bright white lights are unavoidable, close one eye to protect the night vision in the other eye. Visual Illusions: The visual illusions discussed throughout this lesson plan are visual illusions which are experienced by a pilot flying during night VFR. Many of the illusions experienced during day VFR conditions will still be present during night VFR flight. As a result of visual illusions and the loss of a visual horizon during night, a pilot flying VFR at night should rely more heavily on aircraft instruments. 1) Distant Stationary Lights: a. Can be confused for stars or other aircraft. b. Confirming what is visually seen outside the aircraft with the aircraft instruments can eliminate the distant stationary light illusion. 2) Visual Autokinesis: a. Occurs when a pilot stares at a single light source for several seconds on a dark night. The light source will appear to move. b. Visual autokinessis can be avoided by continuing a visual, offcentered scan. 3) Vertigo (Flicker): a. Can occur by flickering lights in the cockpit. b. Flicker vertigo can cause dizziness, nausea and general disorientation. c. Even though anticollision lights are required by FAR 91.209, the same regulation allows the PIC to turn off the anticollision lights in the interest of safety. 4) False Horizon: a. A dark scene with ground lights and stars as well as certain geometric patterns of ground lights can create illusions of not being aligned correctly with the actual horizon. Visual Illusions (During Approach & Landing): Visual illusions during approach and landing at night can be countered by being aware of and anticipating the illusions as well as using visual glide slope aids such as VASIs or PAPIs. 1) Black-hole Approach: a. Occurs when the landing is made from over water or non-lighted terrain where the runway lights are the only source of light. b. The general problem with the black-hole approach is the pilot can have trouble orienting themselves relative to the earth. The runway may seem to be upsloping or downsloping. c. Counter this illusion by using available approach aids such as VASIs or PAPIs. 2) Bright Runway Lights: a. Bright runway lights advance the runway, making it appear closer than it actually is. b. In this situation, the pilot who does not recognize this illusion may fly a higher than normal approach. c. Counter this illusion by using available approach aids such as VASIs or PAPIs. 3) Ground Lighting Illusion: a. Lights along a road or even trains can be mistaken for runway and approach lights. b. Counter this illusion by using available approach aids such as VASIs or PAPIs as well as maintaining proximity/situational awareness to the airport and surroundings. Scanning for Traffic: During night VFR flying, distant moving objects are best seen using offcentered viewing or peripheral vision. The pilot should scan for traffic as usual and maintain awareness for movement detected peripherally. Supplemental Oxygen: Dark adaptation is impaired by flying at cabin pressure altitudes above 5,000 ft; therefore, it is recommended to use supplemental oxygen while flying at night above 5,000 ft. Drugs & Alcohol: Night flying presents additional challenges to VFR flying. Flying with drugs or alcohol in a pilots system creates a greater potential for an accident. Pre-Flight: Flashlights: Use white light to pre-flight the aircraft and check the fuel. Use red light or a red lens to the extent possible in the cockpit. o Red light is non-glaring and will not impair a pilots night vision. o When using red light, some features on a sectional chart may not be seen (such as any features depicted in red or the yellow markings indicating urbanization/population). o Cockpit instruments may also be difficult to see while using a red lens. o When flying cross-country, the route should be drawn in black on the sectional so it can be seen using a red lens. Required Instruments & Equipment for Night VFR Flight: FAR 91.205: o TOMATO FFLLAMES + FLAPS FAR 91.209: o Aircraft Lights. Temperature/Dewpoint Spread: Prior to flying, review the temperature/dewpoint spread to ascertain the likelihood of fog occurring. o When the temperature and dewpoint are within 6o, and there is little to no wind, fog is likely to form. Starting, Taxiing and Runup: Prior to Starting: Ensure all items which will be needed for the flight are organized and in a easily accessed location. Use extra vigilance prior to starting the engine. Ensure the rotating beacon is on and consider flashing the position lights in addition to yelling "prop clear." Electrical Load: Be conscious of electrical usage prior to starting and during taxi at low RPMs. Taxi: Taxi slower than normal. o Taxiing slower than normal will allow adequate time to orient/maneuver on the airport and will allow for shorter stopping distance if necessary. In addition to the taxi lights, usage of the landing light may be advantageous. o Maintain awareness of electrical load. o Maintain awareness of other pilots and be considerate of their night vision/dark adaptation. Use taxiway lines (if painted) to ensure guidance and clearance. If taxiing and departing at an uncontrolled airport, listen to the CTAF frequency for other traffic. Runup: During the runup, be aware that recognition of aircraft movement, especially during higher power settings, may not be as quickly noticed as compared to a daytime runup. Be alert to the motion of your aircraft. Takeoff & Climb: Prior to Takeoff: Adjust cabin lights to ensure adequate lighting without hindering night vision. Check flight instruments, especially the attitude indicator and heading indicator. Prior to takeoff, ensure the runway and final approach is clear. Ensure all lights are turned ON. Taxi onto the runway and align the aircraft with the centerline. Ensure the heading indicator corresponds with the departure runway. Takeoff, Climb & Departure: There will be an absence of daytime visual cues. Instruments will need to be checked more frequently for airspeed, heading and attitude. Once beyond 10 miles from the or any airport/air traffic congestion, turn the landing light & taxi light off, as they are ineffective at altitude and may contribute to disorientation if the light is reflected off of fog or the propeller. Orientation & Navigation: Maintaining VFR Flight: Clouds can be difficult to see during the night as well as determining distance from the clouds. o Usually, the first indication of flying into restricted visibility conditions is the gradual disappearance of lights on the ground. Navigation: VFR cross country checkpoints which are clearly visible during the day, can be unusable at night. Night VFR cross country checkpoints should be easily identifiable and easily seen at night. o Using GPS, VOR radials or NDB bearings in addition to pilotage and dead reckoning is a must during night VFR cross country flight. Periodically check the status of aircraft systems and instruments. o Ensure you are checking engine oil pressure & temperature, circuit breakers, annunciator panel, vacuum gauge, fuel quantity indicators, ammeter, etc. Finding the Airport: The airport beacon is one of the quickest methods to identify an airport. Scan for the appropriate beacon color combination in the direction of the airport. o Alternating White / Green - Lighted Civilian Land Airport o Alternating White / White/ Green - Lighted Military Land Airport o Alternating White/ Yellow - Lighted Civilian Water Airport o Alternating Green/ Yellow / White - Lighted Heliport Turning on the Runway & Approach Lights: At uncontrolled airports pilot controlled lighting is typically used. o Refer to the AF/D for available airport lighting and appropriate frequency for activation. o In addition to the AF/D the pilot can refer to a sectional or terminal area chart to ascertain if pilot controlled lighting is available. To activate pilot controlled lighting, the pilot typically turn the COMM Radio to the CTAF frequency and in quick succession (5 seconds) the pilot depresses and releases the Push to Talk, a set amount of times for differing intensities of airport lighting: o Low Intensity is usually 3 clicks. o Medium Intensity is usually 5 clicks. o High Intensity is usually 7 clicks. Obstruction Lights: Prior to conducting the flight, a review of obstructions on the route or in the area of flight should be made. AIM 2-2-3 lists colors and combinations of obstruction lighting. Check NOTAMS for obstruction light outages prior to flight. Aircraft and Airport Lighting: Aircraft Lights: Position Lights: o Right Wing = Green o Left Wing = Red o Tail = White Rotating Beacon = Red Strobes - Flashing White Taxi & Landing = White Airport Lights: There are additional types of airport lighting than those listed. The lights detailed are commonly used. VASI (Visual Glide Slope Indicator) PAPI (Visual Glide Slope Indicator) Runway Edge Lights (LIRL, MIRL, HIRL) o Color: White and amber on last 2,000 ft of runway (if instrument runway). Threshold Lights o Mark the end of each runway o Color: Green at approach end, Red at departure end Runway End Identifier Lights o Identify runway with two synchronized flashing lights. Taxiway Lights o May be electrically powered or reflective. o Color: Blue Approaches & Landings: The approach and landing should be made in the same manner as a day approach and landing. During the roundout and touchdown, speed, height and sink rate are difficult to ascertain. To determine the proper roundout point do the following: o Establish a constant approach descent. o When the landing light reflects off the runway and tire marks can be seen begin the roundout and reduction of power. Night Emergencies: Emergency Approach and Landing (Off Airport): Maintain control of the airplane. Don't get distracted, always maintain positive control. Aviate, Navigate, Communicate Airspeed, Best Field, Checklist/Cockpit Checks o Best field will be an unlighted area. o If the landing light is unusable and there are inadequate visual references during the final approach and landing, maintain a descent and a level-landing attitude until the ground is contacted. Blackout Landings: During a landing without the use of landing lights start the roundout when the runway lights at the far end of the runway first appear to be rising higher than the nose of the airplane. Blackout Unusual Attitude Recovery & Constant Rate Descents (Electrical Power Loss in IMC or during Flight): Organize the cockpit in such a way that you have easy access to a head lamp or a flashlight in the event of a complete electrical failure.


