No part of this publication may be reproduced, stored in a retrieval system, or transmitted,
in any form by any means, without prior permission of American Honda Motor Co., Inc.
Water Pump Replacement for
BF200A • BF225A Outboard Motors
Prior to removing the gear case, make sure the outboard motor is secure on an engine stand or transom of a
boat that is out of the water. Tilt the outboard motor up to the highest position and place the shift lever in the
“N” (neutral) position.
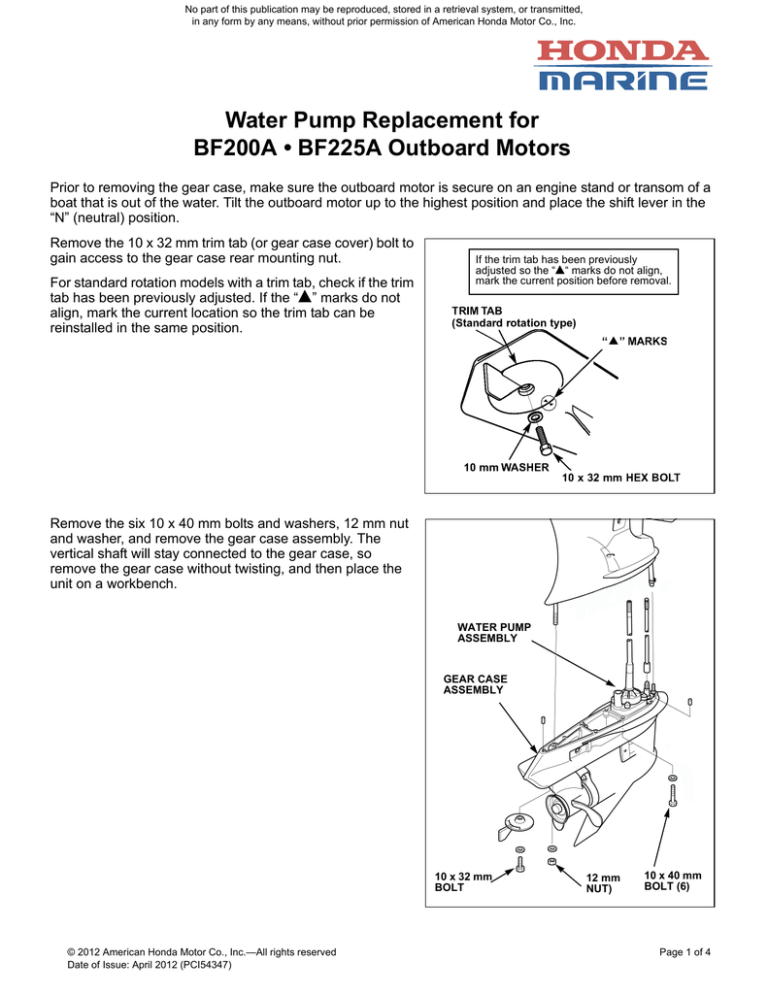
Remove the 10 x 32 mm trim tab (or gear case cover) bolt to
gain access to the gear case rear mounting nut.
For standard rotation models with a trim tab, check if the trim
tab has been previously adjusted. If the “” marks do not
align, mark the current location so the trim tab can be
reinstalled in the same position.
If the trim tab has been previously
adjusted so the ““ marks do not align,
mark the current position before removal.
Remove the six 10 x 40 mm bolts and washers, 12 mm nut
and washer, and remove the gear case assembly. The
vertical shaft will stay connected to the gear case, so
remove the gear case without twisting, and then place the
unit on a workbench.
WATER PUMP
ASSEMBLY
GEAR CASE
ASSEMBLY
10 x 32 mm
BOLT
© 2012 American Honda Motor Co., Inc.—All rights reserved
Date of Issue: April 2012 (PCI54347)
12 mm
NUT)
10 x 40 mm
BOLT (6)
Page 1 of 4
No part of this publication may be reproduced, stored in a retrieval system, or transmitted,
in any form by any means, without prior permission of American Honda Motor Co., Inc.
Remove the four water pump 8 x 60 mm bolts and washers
and remove the pump assembly over the vertical shaft.
Clean all parts and check the impeller, liner, and
cover for wear or cracks.
1
8
2
TYPE KIT
CONTENTS
PART NUMBER
Service kit
Impeller, Gasket,
Woodruff key,
O-Ring
06192-ZY3-000
Rebuild kit
1- Seal ring
2- Bolt (4)
3- Washer (4)
4- Collar (4)
5- Housing
6- O-Ring
7- Liner
8- Impeller
9- Woodruff key
10- Cover
11- Gasket
3
9
10
4
11
5
06193-ZY3-000
K0 models
06193-ZY3-010
K1 models
6
7
Start reassembling the pump by applying marine
grease to the inner surface of the impeller liner,
housing O-ring, and the water tube seal rubber.
Install the impeller by turning it counterclockwise into
the impeller liner. Make sure the open end of the
keyway is visible and will face out when installed in
the pump.
KEYWAY
(Viewed from the bottom)
Page 2 of 4
© 2012 American Honda Motor Co., Inc.—All rights reserved
Date of Issue: April 2012 (PCI54347)
No part of this publication may be reproduced, stored in a retrieval system, or transmitted,
in any form by any means, without prior permission of American Honda Motor Co., Inc.
Insert a new greased O-ring and water tube seal rubber
and four distance collars into the impeller housing. Install
the pump liner/impeller into the housing.
Slide the pump gasket and cover over the shaft, aligning
the holes with the pump base.
Place a small amount of marine grease on the Woodruff
key and insert it onto the flat surface of the vertical shaft.
Slide the impeller housing assembly over the shaft,
making sure to align the Woodruff key with the impeller
keyway.
Install the 8 x 40 mm bolts, water tube seal holder, and two
washers and torque to 15 ft•lb (20 N•m) in a crisscross
pattern to make sure the housing seats correctly.
WATER TUBE
SEAL RUBBER
8 x 40 mm BOLT,
WASHER, and
DISTANCE COLLAR (4)
IMPELLER
HOUSING
ASSEMBLY
O-RING
PUMP LINER
Apply marine
grease inside liner.
PUMP
IMPELLER
WOODRUFF
WOODRUFF
KEY
KEY
COVER
GASKET
Check that the shift shaft in the gear case is in the "N"
(Neutral) position.
The cutout in the shift shaft spline will be in the forward
direction as shown.
Note that A2 thru A5 counter-rotating models will have the
cutout in the rearward direction.
© 2012 American Honda Motor Co., Inc.—All rights reserved
Date of Issue: April 2012 (PCI54347)
Forward
direction
Page 3 of 4
No part of this publication may be reproduced, stored in a retrieval system, or transmitted,
in any form by any means, without prior permission of American Honda Motor Co., Inc.
Apply marine grease to the water tube seal ring, two dowel
pins, and the splines of the vertical shaft.
SHIFT
SHAFT A
VERTICAL
SHAFT splines
If shift shaft A was removed with the gear case, insert the
upper end into into the motor before installing the gear case.
Install the gear case assembly into the motor, making sure
the speed sensor tube is connected and aligning shift shaft
A splines.
Start threading the six 10 x 40 mm bolts and washers and
the 12 mm nut to hold the gear case in place.
Torque the 10 mm gear case bolts to 25 ft•lb (34 N•m).
DOWEL
PIN (2)
GEAR
CASE
Install the trim tab (or gear case cover) by aligning the
““ marks as shown (or marks previously made).
Install and tighten the 10 x 32 mm bolt and washer.
MARKS
12 mm NUT
GEAR CASE
COVER
10 x 32 mm BOLT
and WASHER
Page 4 of 4
© 2012 American Honda Motor Co., Inc.—All rights reserved
Date of Issue: April 2012 (PCI54347)

