Project: Morse Code Communicator
TEL 240 - Electronics Technology
Name:_______________________
Samuel F. B. Morse was born on
April 27, 1791 in Charlestown,
Massachusetts. After graduating
from Yale, Morse undertook a
career as an artist. When traveling
home from Europe in 1832, Morse
heard about electromagnetism, and
conceived the idea of using
electromagnets as a means of
transmitting messages. In 1837,
Morse applied for a patent for his
telegraph. The original
communications plan was to
transmit a series of numbers using
dots and dashes. The receiver would use a special dictionary to translate the numbers
into words and phrases. In 1838, Morse demonstrated transmission of messages at an
exhibition in New York. He had given up on the dictionary, and established a code for
letters and numbers. Using this, he was able to transmit messages at a rate of 10 words
per minute. In 1844, using government support, Morse successfully transmitted a
message from the Capitol Building in Washington, DC to Baltimore, Maryland. In 1846,
telegraph lines were established from Washington, DC to Buffalo and Boston.
The telegraph revolutionized communications. Prior to this invention, news would only
travel the speed of a sailing ship at sea or a horse on land. By sending messages through
the telegraph, information could reach across the country in minutes. In 1858, the first
transatlantic cable was laid, and was an unsuccessful venture. In 1866, a second attempt
was made, and it was now possible to communicate between Ireland and Newfoundland.
In 1894, Sir Oliver Lodge demonstrated the first radio transmission of Morse Code.
These developments allowed for communication worldwide.
The concept of sending data through pairs of wires is now nearly 170 years old. Our
communications systems today utilize the Binary system of ON and Off signals to send
text data using the American Standard Code for Information Interexchange (ASCII) code.
While much of our high-speed communications is now being transmitted as binary on
laser and fiber optic based systems, much of our communication depends on the same
basic principled developed by Morse.
Web Resources
For more information on Morse Code and Communications, check out the following
websites.
Title and URL
Locust Grove Website
www.morsehistoricsite.org
Description
This links to the website for
Locust Gove, historical home of
Samuel Morse. The museum has
information on Morse and
educational opportunities for
visitors.
Library of Congress Morse Archives
Samuel Morse’s papers will be
http://lcweb2.loc.gov/ammem/atthtml/mrshome.html available online soon from the
Library of Congress.
Wikipedia Article
http://en.wikipedia.org/wiki/Samuel_F._B._Morse
Wikipedia is a free online
encyclopedia. This article is rich
with history and links to related
technologies and people.
American Radio Relay League
http://www.arrl.org/
The ARRL is an organization for
amateur radio operators. They
have several educational programs
to assist with getting started in
amateur radio. There are local
affiliate clubs throughout the
world.
CGI Morse Code Translator
http://morsecode.scphillips.com/cgi-bin/morse.cgi
Web based Morse Code translator
written by Stephan C. Phillips.
This will take text and translate it
into an audio file for you.
Morse Code Communicator Circuit Board
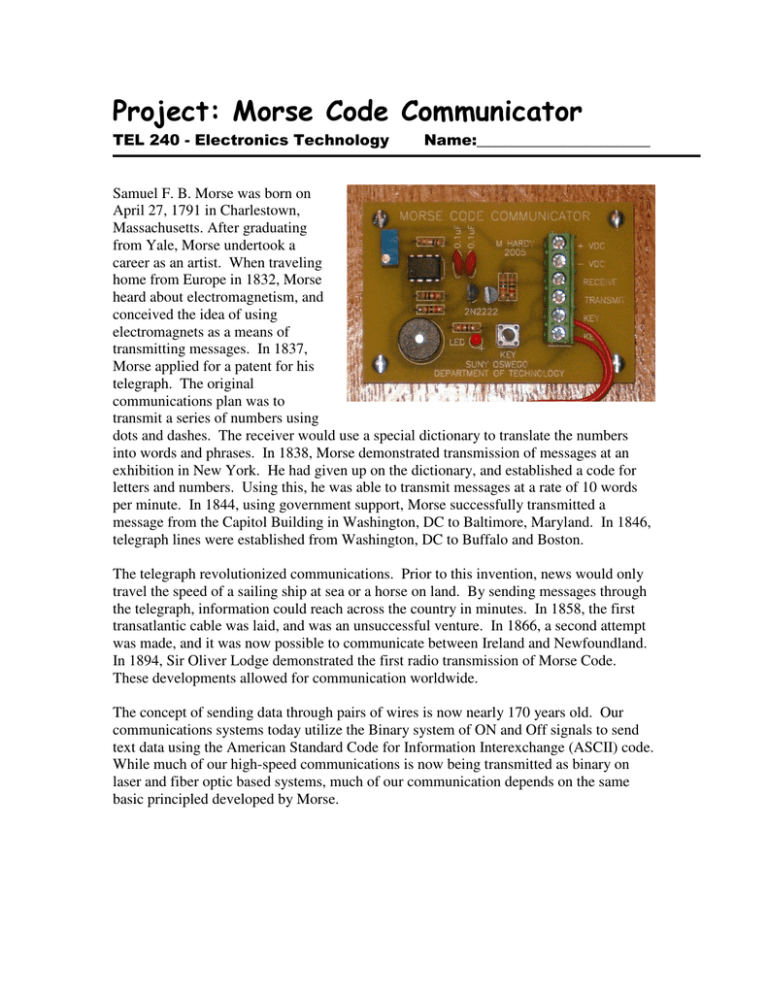
This circuit board has been developed for use as an electronics project and
communications teaching aid for Technology Education laboratories. The circuit board
produces an audible tone on a speaker. When combined with a telegraph key or other
switch, this oscillator can be used to produce Morse Code communications. Two boards
can be connected together through wires to allow students in different areas to
communicate back and forth. Instructional applications include the following,
Teach basic electronics theory including oscillators, resistors, transistors,
capacitors, and integrated circuits.
Teach basic communications through Morse Code.
Teach history of communications and illustrate communications systems from a
century ago.
Introduce radio communications, networking, and telephony.
Link two boards together using LASERs and photodiodes.
Link several boards together using a central switchboard.
Have communications competitions to develop code proficiency.
Have the students play “telephone” with the code system and see how a message
gets changed when relayed.
Connect an external light to have students communicate using light signals.
Circuit Board Operation Theory
This circuit board uses a simple 555 astable timer circuit to produce an audible frequency
square wave. The timer frequency is controlled by a 0.1uF capacitor, a 10K resistor, and
a 10K potentiometer. The speed that the capacitor charges controls the frequency. The
resistors control the current flow into and out of the capacitor. By adjusting the
potentiometer, the frequency or note that the board produces can be raised and lowered.
The 555 timer IC drives one of a pair of 2N2222 transistors. The second transistor is
connected to the RECEIVE connection on the circuit board. These two transistors are set
up in an OR configuration. This allows either the 555 or the RECEIVE connection to
turn the speaker on and off at a high frequency producing a sound. An indicator LED is
also on the circuit board for visual feedback.
The circuit uses the RESET pin on the 555 timer to control the wave output. When the
pushbutton is closed, the RESET pin is connected to positive, allowing the 555 to output
a wave. When the switch is open, a 1K resistor pulls the RESET to ground, disabling the
output.
The connections on the circuit board are as follows,
+ VDC
DC + Power Connection. The board will operate off of a voltage between
5 and 9 VDC.
- VDC
DC – Power Connection
RECEIVE
The receive connection connects to the transmit connection on a remote
board. The input voltage should match the power voltage connected to the
circuit board.
TRANSMIT The transmit connection connects to the receive connection on a remote
board. This is a direct, square-wave, digital output from the 555 timer.
This could be used to drive external devices.
KEY
The two KEY connections can be directly connected to a normally open
(NO) switch or external telegraph key.
Connecting Multiple Boards
The diagram below shows how two boards can be connected together to communicate
between them.
Steps:
1. Connect + and – power on the first board to a battery or DC power supply. 5 to 9
VDC is recommended.
2. Connect + power to + power on each board.
3. Connect – power to – power on each board.
4. Connect the TRANSMIT on one board 1 to the RECEIVE on board 2.
5. Connect the RECEIVE on board 2 to the TRANSMIT on board 2.
Components List
Below is a list of components in the kit that will be assembled. Please identify and
inventory your components kit to verify that you have the correct quantity and values for
your components.
Component
555 Timer Integrated Circuit
0.1µF Capacitor
Red LED
1 KΩ Resistor
10 KΩ Resistor
10 KΩ Potentiometer
2N2222 NPN Transistor
Pushbutton Switch
Terminal Block
Piezoelectric Speaker
Printed Circuit Board
TOTAL
Quantity
1
2
1
4
2
1
2
1
3
1
1
Cost Each
$0.24
$0.10
$0.08
$0.01
$0.01
$1.10
$0.05
$0.14
$0.21
$0.91
$1.72
19
Total Cost
$0.24
$0.20
$0.08
$0.04
$0.02
$1.10
$0.10
$0.14
$0.63
$0.91
$1.72
$5.18
Sources:
Electronics Components
Mouser Electronics
Mansfield, TX
www.mouser.com
Prices are based on purchasing in quantities of 100 parts
Printed Circuit Board
Northern Circuits
Syracuse, NY
www.northerncircuits.com
Price is based on purchasing 200.
Copyright Notice:
This circuit board design may be freely reproduced by Technology Education teachers for
use in their own laboratories provided that the artwork is used as presented. This circuit
design may not be reproduced for commercial use or sale. All rights are reserved by
Mark W. Hardy.
Assembly Instructions
1. Identify and inventory the components in your kit and verify that you have the
correct quantity of components. Please ask for assistance if you need help
identifying components.
The finished circuit board.
2. Identify the 1KΩ, and 10KΩ resistors. Use the following chart to identify the
resistors:
Value
1K Ω
10K Ω
Quantity
4
3
Color Code
Brown, Black, Red, Gold
Brown, Black, Orange, Gold
Insert their leads into the board, solder in place, and then trim the leads. As a
good practice, align the resistors such that the gold stripe is toward the top, such
that the color code can be correctly read from the right edge of the board. Be
careful and double check the resistor values to the different locations on the
circuit board.
3. Identify the 0.1 microfarad capacitors. Insert the leads into the board, solder
them, and trim off the excess. This capacitors do not have any polarity and do not
require any specific orientation.
4. Insert and solder in place the LED. You need to make sure that the anode (longer
lead) is toward the hole marked with a +. Trim off the excess leads after
soldering them in place.
5. Identify the 555 Timer IC. Insert the pins into the holes in the circuit board being
careful to not bend any pins over. The notch or dot identifying pin 1 should be
toward the left of the circuit board and aligned with the notch on the block screen
printed on the circuit board. Solder each of the pins in place. Be careful to avoid
bridging solder between the pins.
6. Identify the pushbutton switch and place it on the circuit board. Make sure that it
sits flat on the printed circuit board. Solder the switch in place and trim the
excess leads off.
7. Identify the Piezo Speaker. Place the speaker on the circuit board. The long lead
should be oriented toward the Positive (+) mark on the board. Solder the speaker
in place and trim the leads off.
8. Identify the 2N2222 Transistors. Note that there is a flat side on the resistor that
must face toward the left as marked on the circuit board. Solder the leads in place
and trim off the excess.
9. The remaining components to install are the terminal blocks. These blocks have
dovetails on the side that allow them to be connected or “ganged” together.
Connect the three blocks together and insert the pins into the circuit board with
the screw terminal openings facing out of the board. Solder the pins in place.
Due to the larger size of the pins, these will require additional heat to make a
good solder joint.
This completes the assembly stage of the circuit board. Inspect the circuit for any
bridged solder joints, cold joints, missed joints, or other imperfections and repair them.
Communicator circuit shown mounted to a wood base
with a telegraph key.
International Morse Code
A
B
C
D
E
F
G
H
I
J
K
L
M
.-…
-.-.
-..
.
..-.
--.
….
..
.---..-..
--
N
O
P
Q
R
S
T
U
V
W
X
Y
Z
-.
--.--.
--..-.
…
..….--..-.---..
The International Morse Code is comprised
of a series of dots and dashes that represent
the different letters, numbers, and symbols
that we use.
When learning to send Morse Code, the
following basic rules should be used:
1. A dot has one count.
2. A dash has three counts.
3. A space between the dot and dash
has one count.
4. A space between letters has three
counts
5. A space between words has seven
counts.
Morse Trivia
0
1
2
3
4
5
6
7
8
9
----.---..--…-….…..
-….
--…
---..
----.
Period
Comma
?
!
@
.-.-.--..-..--..
-.-.-.--.-.
The SOS distress call …---… was
introduced in Germany in 1905 as a
component of their national radio
regulations. It wasn’t until after it was
created that the words, “Save Our Ship,”
or, “Save Our Souls,” became popularized.
The following sentence:
The quick brown fox jumps over the lazy
dog, uses every letter of the alphabet.
Morse Code Communicator Challenge:
TEL 240 - Electronics Technology
Name:_______________________
Directions: Connect the Morse Code Communicator boards together as a pair. You and
your lab partner will send a message back and forth to one another. Have the instructor
provide you with a message, convert it to Morse Code, and then send it. Have the
instructor check off the message for accuracy after it has been received.
Message to Send:
____
____
____
____
____
____
____
____
____
____
____
____
____
____
____
____
____
____
____
____
____
____
____
____
____
____
____
____
____
____
____
____
____
____
____
____
Morse Code Message:
____ ____ ____ ____
____
____
____
____
____
____
____
____
____
____
____
____
____
____
____
____
____
____
____
____
____
____
____
____
____
____
____
____
____
____
____
____
Received Morse Code Message:
____
____
____
____
____
____
____
____
____
____
____
____
____
____
____
____
____
____
____
____
____
____
____
____
____
____
____
____
____
____
____
____
____
____
____
____
Received Message:
____
____
____
____
____
____
____
____
____
____
____
____
____
____
____
____
____
____
____
____
____
____
____
____
____
____
____
____
____
____
____
____
____
____
____
____
Instructor Approval:
___________________________


