How to Use the “Drawing Toolbar” in Microsoft

How to Use the “Drawing Toolbar” in Microsoft Word
The “drawing toolbar” allows you to quickly and easily label pictures (e.g., maps) in a MS Word file. You can add arrows, circle spots, or label with words. You can quickly change the color and line width of these objects as well.
Overview
• How to Open the Drawing Toolbar
• Setting the Grid
• Arrow Tool
• Rectangle and Oval Tools
• Text Box Tool
• Copying and Deleting Objects (Arrows, Rectangles, Ovals, and Text Boxes)
• Grouping Objects (Making them easier to move around)
• Ordering Objects (which one goes on “top” of the other)
Note:
“left-click” means press the left-mouse button, and “right-click” means press the right-mouse button.
If the instructions simply tell you to “click,” it means that you should “left-click.”
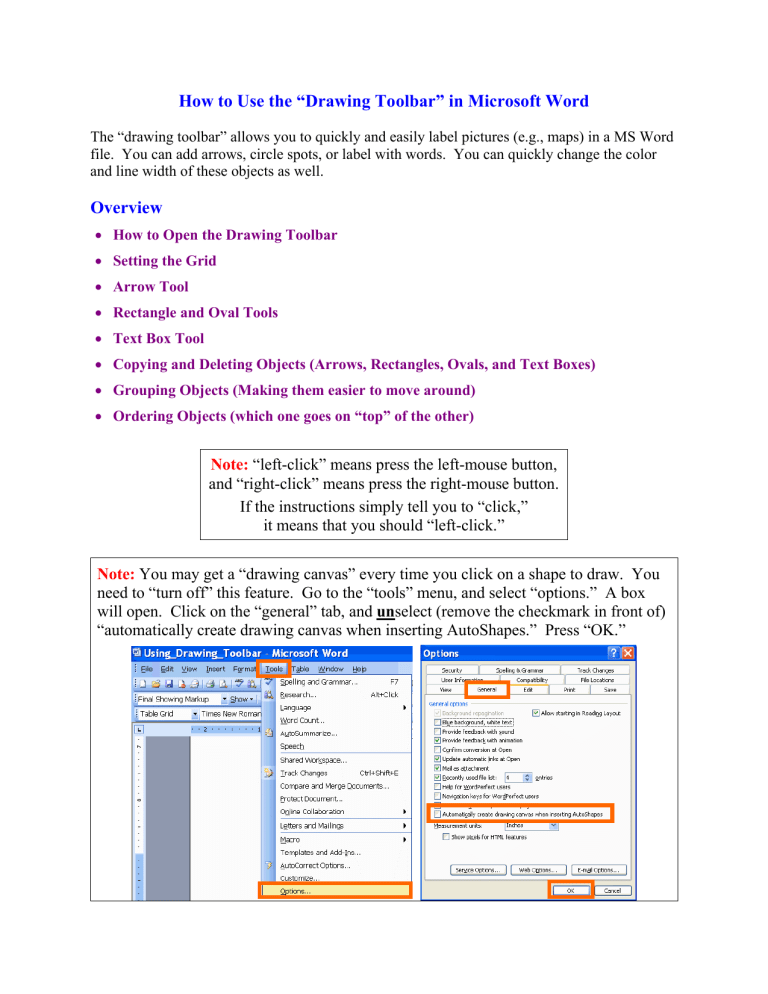
Note:
You may get a “drawing canvas” every time you click on a shape to draw. You need to “turn off” this feature. Go to the “tools” menu, and select “options.” A box will open. Click on the “general” tab, and un select (remove the checkmark in front of)
“automatically create drawing canvas when inserting AutoShapes.” Press “OK.”
How to Open the Drawing Toolbar
Click the “view” drop-down
menu at the top, and then select “toolbars.”
Go down to “drawing” and click on it.
The drawing toolbar will appear:
Blue Bar
I personally find it inconvenient to have the drawing floating in the middle of my paper. If you click on the blue bar across the top that says “drawing” and hold down the button, you can drag the drawing toolbar to the top or bottom of the page where it will automatically become part of border.
Drawing Toolbar
In the picture above, the drawing toolbar was placed on the border at the bottom of the page.
Setting the Grid
The “grid” determines how precisely you can place your objects. I like the grid to be as precise as possible.
Click on the “draw” menu on the drawing toolbar and select “grid.”
A box will open. Type 0.01 into the blank spaces next to “horizontal spacing” and “vertical spacing.” Then click “OK.”
Arrow Tool
The arrow tool allows you to create arrows (of course). Click on the “arrow” tool , and then click in the white area, hold down the button, and drag the cursor in any direction. The result should be an arrow.
Notice the little circles at the end. By left-clicking on the dots and dragging them, you can change the direction and length of the arrow. (If the circles disappear, just click on the arrow and they should appear.)
To move the arrow around the page, click on the arrow, hold down the button, and drag it to wherever you want the arrow to be. Let go of the button to drop it in place. Alternatively, click on the border of the shape, and use the arrow keys on your keyboard.
To change the width of the arrow, click on the arrow, then click on the “line style” tool . Click on whichever line width and style you want from the menu.
To change the color of the arrow, click on the arrow, then click on “line color” tool . Click on the “paintbrush” part of the tool if you want the color that is already shown. Otherwise, click on the smaller triangle to its right, and you will get a menu of colors to select from.
Menu of Colors
“Paintbrush”: set to “orange”
Rectangle and Oval Tools
The rectangle and oval tools will allow you to surround
(“circle”) objects or specify a location in a picture. Click on the either tool, and then click in the white area, hold down the button, and drag the cursor in any direction. The result should be a rectangle or oval, depending up which one you selected beforehand.
What if you decide that you want a bigger or smaller shape?
Just click on the object and small circles will appear on it.
Click on a circle and drag it outwards (makes it bigger) or inwards (makes it smaller) to change its size.
You can also “rotate” a shape by clicking on the green circle, holding down the button, and dragging it to the right or left.
To move a shape, click on it (the circles should appear), hold down the button, move the cursor to where you want the shape to be
(“drag” it), and let go of the button. Alternatively, click on the shape and use the arrow keys.
Just like arrows, you can change the width and color of lines using the
“line style” and “line color” tools.
In addition, you can “fill in” the center of the shapes with colors using the
“fill color” tool. Click on the “paint can” part of the tool if you want the color that is already shown. Otherwise, click on the smaller triangle to its right, and you will get a menu of colors to select from.
Notice the choice “
no fill
” at the top of the menu. This is an extremely useful fill color. It makes the center of the shape transparent, so that you can see what it beneath it. This makes it great for circling features in a map or drawing. (You can see how I have used it to surround “no fill” itself!)
Filled
with
“white”
“Paint Can:” set to “blue”
“no fill” = transparent
Menu of
Colors
Important:
If you use the “no fill” color, then you must click
on the border
of a shape to activate it so that you can move it, change colors, etc.
Text Box Tool
The “text box” tool allows you to place text (words) anywhere on the screen that you would like. Click the text box tool , and then click in the white area, hold down the button, and drag the cursor in any direction. The result should be a rectangle with a flashing “|” inside it and shading around the outside. Click inside the box, and now you can type words inside it.
If you click outside the box, the shading around the edge disappears and you can no longer type inside of it. Just click inside, though, and you can go back and change what you wrote.
If there is not enough space inside the text box, click on the border of the box, and then you can click on the small circles, hold down the button, and move the cursor to change the size of the text box.
Oceanograp h i f
Oceanography is fun.
You can modify the text in the text box as normal: changing the font and font size color using “font color”
, making it bold, italic, or underlined , or changing its
tool. You can also change its alignment (i.e., whether the text is on the left, right, or centered in the middle .
Oceanography is fun.
As with shapes, you can use the “line style” and “line color” tools to change the width and color of the border of the box. (Remember to click on the border of the box first to
“activate” it.) In addition, you can “fill in” the center of the textbox with a background colors using the “fill color” tool.
Oceanography is fun.
As with the shapes (rectangles and ovals), you can move text boxes by clicking on their border
(but not the dots!), holding down the button, and dragging them to their new position.
Alternatively, you can click on the border, and use the arrow keys on your keyboard.
Copying and Deleting Objects (Arrows, Rectangles, Ovals, and Text Boxes)
If you have already made an object that you and you need another one, do not just make again. That’s too much work! Instead, it, and then paste it. Select the object by clicking on it (remember to click the border of text boxes and shapes with “no then use the edit menu to copy it. Use the menu again to paste it. Better yet, learn to the control keys to copy and paste more quickly (see the box below).
Copy is CTRL-C,
Cut is CTRL-X, &
Paste is CTRL-V. like, it copy fill”), edit use
Note: before you “paste” a text box, make that you click outside the text box you
“copied,” otherwise the text box you
“paste” will be inside the original textbox! sure
If you have already made an object that you like, it is often easier to copy the object, paste it elsewhere, and then modify it a little bit than re-do the entire object. For example, if I like my oceanography text box:
Oceanography is fun.
then it is easy to make a similar-but-slightly-different text box:
Surf’s Up!
To remove (“delete”) an object, select it by clicking on it and then hit the delete key.
(Remember to select the border of a text box or a shape with “no fill.”) You can also “cut” the object to remove it. (However, if you cut it, then the next thing you will “paste” is the object. If you “cut” or “copy” again before pasting, then the first object you cut will be lost permanently.)
Handy Tip!
Hold down the CTRL key and hit “Z.” and it will “undo” the last thing you did!
Every time you hit CTRL-Z, it will undo one more thing that you did, starting with the most recent. (The computer does not remember an infinite number of things that you did, but in many programs it remembers quite a few. This works in most Microsoft programs, like MS Word.)
Grouping Objects (Making them easier to move around)
Sometimes you want several objects to be “joined” to one another. For example, you might want an arrow, a text box, and a circle to all be linked. It would be very annoying to move each one individually again and again. Instead, you can make them into a group, and move them all together.
Click on one object (e.g., the circle below).
You should now see small circles surrounding it.
Next, hold down the control key (CTRL) and click on each of the other objects that you want to join the group.
(Remember, you must click on the border of text boxes and shapes with “no fill.”) When finished, all of the objects should have little circles around them.
Finally, click on the “draw” button and select “group” from the menu. Now, you can move (or delete) and the objects as a group. Notice how the small circles are not distributed around the group instead of around individual objects now.
Instead of going to the “draw” menu, you can right-click on one of the objects in the group, menu will open up, allowing you to “group” the objects. and a
You can “ungroup” the objects: just click on the “draw” button, and select “ungroup” from the menu. (Or right-click as noted above.)
Ordering Objects (which one goes on “top” of the other)
In MS Word, the most recently created object will be “on top” of older objects. For example, if I create a blue-filled oval after the group from the previous example, the oval would appear “on top” of the group. We say that the blue oval is “in front” of the group and that the group is
“behind” the blue oval.
Best Spot
To make the group appear “in front”
(on top) of the blue oval, click on the group, then click on the “draw” button and select “order” from the menu. Finally, click on “bring to front.” (Alternatively, you could click on the blue oval, then click on the “draw” button, select “order” from the menu, and click on “send to back.”)
As a result, you should see:
Alternatively, you can right-click on one of the objects in the group, and a menu will open up, allowing you to “order” the objects.
