Small Van de Graaff Generator
SE1002-00
WWW.NEXGENSCI.COM
4
3
2
1
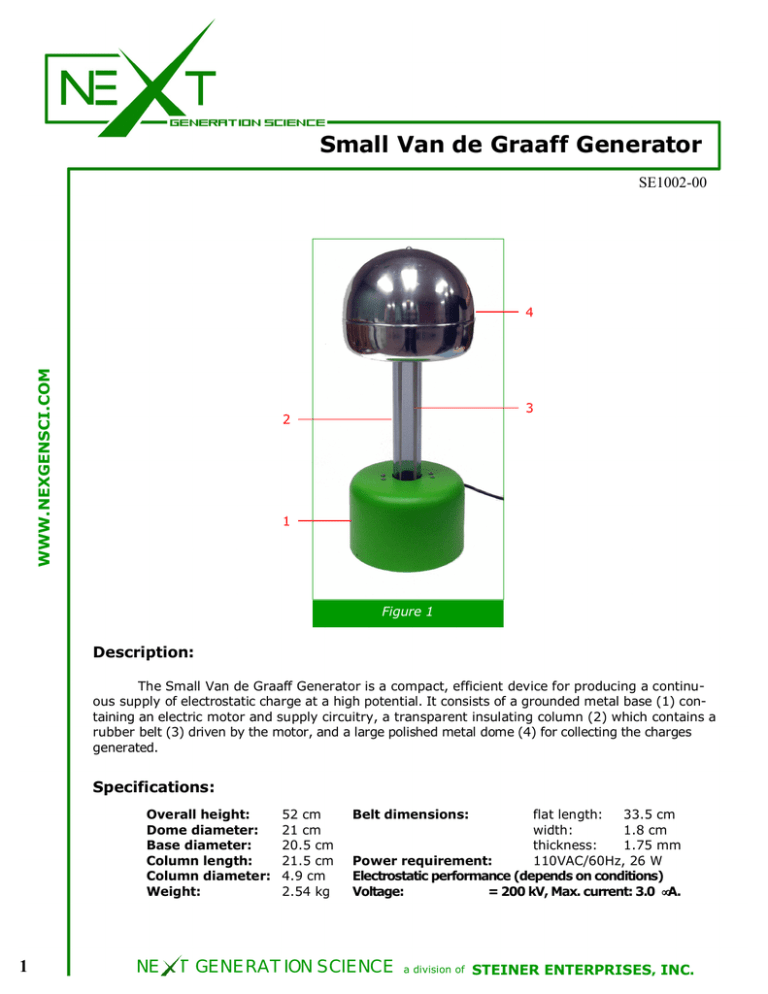
Figure 1
Description:
The Small Van de Graaff Generator is a compact, efficient device for producing a continuous supply of electrostatic charge at a high potential. It consists of a grounded metal base (1) containing an electric motor and supply circuitry, a transparent insulating column (2) which contains a
rubber belt (3) driven by the motor, and a large polished metal dome (4) for collecting the charges
generated.
Specifications:
Overall height:
Dome diameter:
Base diameter:
Column length:
Column diameter:
Weight:
1
52 cm
21 cm
20.5 cm
21.5 cm
4.9 cm
2.54 kg
Belt dimensions:
flat length:
33.5 cm
width:
1.8 cm
thickness:
1.75 mm
Power requirement:
110VAC/60Hz, 26 W
Electrostatic performance (depends on conditions)
Voltage:
= 200 kV, Max. current: 3.0 µA.
NE T GENERATION SCIENCE
a division of
STEINER ENTERPRISES, INC.
Small Van de Graaff Generator
WWW.NEXGENSCI.COM
SE1002-00
Figure 2
Principle:
A schematic diagram of the Van de Graaff generator is shown in Figure 2. The continuous
rubber belt passes around two pulleys, one each at the top and bottom of the insulated column.
Close to each pulley is a sharp metal comb whose teeth point towards the belt. The lower comb is
connected to ground and the upper comb is connected to the inside of the metal dome. The lower
pulley, which is fixed to the axle of the driving motor, is made of plastic, while the upper, freerunning pulley is made of metal. The process of charge generation is as follows:
1.
2.
3.
4.
5.
6.
2
Friction and charge separation generate negative charges on the plastic pulley.
Electrons on the belt repelled by the negative charges jump to the comb teeth and
are conducted to ground, leaving the belt positively charged.
The belt is made of a relatively good insulating material, so charges do not migrate
along it and the positively charged belt areas are carried in their fixed locations to
the upper pulley by the belt material.
At the upper pulley, they encounter the second sharp comb. This is fixed to the inside of a hollow conductor, and so should carry no net charge. Electrons from the
comb jump onto the belt, neutralizing the positively charged areas and leaving the
comb with a net positive charge.
Attraction drives electrons from the metal dome onto the comb in an attempt to
neutralize its net positive charge, leaving the outer surface of the dome charged
positively.
The outer surface of the belt is now neutralized, and is carried back down the lower
pulley, where the process begins again. Note that the inside of the belt remains
positively charged throughout the process, which assists in maintaining the negative
charge on the plastic pulley, once it is established.
NE T GENERATION SCIENCE
a division of
STEINER ENTERPRISES, INC.
Small Van de Graaff Generator
SE1002-00
WWW.NEXGENSCI.COM
Operation:
For safety during transportation,
the metal dome is packed separately
from the rest of the generator (Figure
3a). To assemble, place the dome over
the comb support so the hole in the
Figure 3b
dome (Figure 3b) fits over the acorn nut
on the comb support (Figure 3c). Plug
the end of the power cord into the power
receptacle (Figure 3d), then insert the
power cord plug into a 110V receptacle.
Figure 3d also shows the on/off power
switch, the grounding tag for attaching
accessories such as the insulated sphere,
and the fuse holder (below the power
cord receptacle.)
Place the generator in a stable,
level surface, at least 1 m from electronic devices. Connect the power cord
Figure 3d
Figure 3a
Figure 3c
to a 110V outlet and turn the power
switch on. The belt will begin to rotate, and within a few seconds charge will begin to build
up on the dome. Sparks can then be drawn from the dome with a grounded wire, other electrostatic accessories, or the finger or elbow.
If no charge builds up on the dome after several minutes, see the troubleshooting
section below for corrective actions.
After switching off the generator, ground the dome to discharge any remaining
charges by briefly touching it with a wire connected to the grounding tag on the base.
Safety
To
•
•
•
•
•
•
•
3
operate this device safely, the following precautions should be taken:
The device should always be plugged into a GROUNDED 110Volt 60Hertz outlet.
This device should never be operated in wet or damp locations or outdoors.
Caution should be taken when operating this device near individuals with internal electromechanical
devices such as pacemakers.
Any damaged components should be replaced immediately before operation. Always check
components for damage before operation.
Device should always be used under adult supervision.
Electric discharge from this device can be harmful to computers, televisions, stereos, etc. Operate
the device away from these types of devices.
The electric shock produced by this device is not harmful, but may be uncomfortable. Shock is
similar to shock received from a car door in the winter.
NE T GENERATION SCIENCE
a division of
STEINER ENTERPRISES, INC.
Small Van de Graaff Generator
SE1002-00
Application Suggestions:
1. Visualization of an Electric Field
WWW.NEXGENSCI.COM
PURPOSE: To show the shape effect of the electric field in the immediate vicinity of the Van de
Graaff generator.
ADDITIONAL MATERIALS:
Pompom
Insulated (plastic) stool
(Student) volunteer with long hair (gels or hairspray will decrease effect)
PROCEDURES:
Pompoms
1. Turn on Van de Graaff generator.
2. Holding the pompom by the insulated plastic handle, slowly approach the charged upper sphere.
The strips of the pompom should separate and align to the electric field emanating from the
generator.
3. Once the pompom strips align to the electric field, illustrate the three dimensional field by moving the pompom around the generator.
As the pompom is moved near the generator, the strips should align themselves perpendicular to
the generator dome. This reflects the three dimensional shape of the electric field.
Volunteer
1. Place the insulated stool next to the generator.
2. Turn off and discharge the generator.
3. Have the volunteer stand on the insulated stool and place their hand on the generator.
4. Activate the Van de Graaff generator. The volunteer’
s hair should stand up as he/she is charged
through contact with the dome. The volunteer will generally only feel the charging process as a
gentle prickling sensation as their hair raises itself on end.
5. Turn off the generator and discharge the generator by touching a grounded wire to the dome.
6. Have the volunteer remove his/her hand from the generator after discharging. Removing the
volunteer’
s hand from the generator before discharging usually results in a more noticeable
shock.
When a person performs this experiment, an electric field is generated around their body because they are providing an additional electrical path. This can be visualized when the person’
s hair
stands up. The hair shows the field in the vicinity of the person’
s head.
These experiments are a good introduction to electric fields. It allows students to visualize
the invisible field surrounding the generator. The concept of the electric field is important to all experiments with this device, as it is this field that drives the experiments.
4
NE T GENERATION SCIENCE
a division of
STEINER ENTERPRISES, INC.
Small Van de Graaff Generator
SE1002-00
2. Charge Transfer
PURPOSE: To demonstrate the effect of the transfer of charge from the dome to various objects.
WWW.NEXGENSCI.COM
ADDITIONAL MATERIALS:
Common children’
s bubbles
2-5 small pie tins
Fluorescent light bulb
PROCEDURES:
Bubbles
1. With the Van de Graaff generator on, blow bubbles toward the generator.
2. Observe the bubbles, describe what you see.
3. Following this experiment, remove and clean the dome with soap and water.
The bubbles are first attracted to the generator, but then after touching the surface, are
repelled away from it. Originally, the bubbles are neutrally charged, but as they approach the
dome, the positively charged particles in the bubble are pushed away from the generator exposing
negatively charged particles. These negatively charged particles are then attracted to the dome
and the bubble touches the surface. Once the bubble touches, its negatively charged particles
are removed by the generator and it gains a net positive charge. This charge pushes the bubble
away from the dome as the charged particles repel each other. The bubble then pulls off of the
surface of the dome and floats away.
Pie Tins
1. Place a stack of 2-5 small pie tins upside down on top of the generator dome.
2. Turn on the generator and observe.
The plates fly off one at a time. At the start of the experiment, the pie tins are neutrally
charged. When they are placed on the dome and the generator is turned on, they collect charge on the
outermost surface as the generator runs. The top pie tin acquires charge the fastest, and it also
requires the least amount of force to repel it from the stack, so it is the first to “
jump off”
. Once
separated from the rest of the stack, the pie tin flies away and the process continues with the next
pie tin. This repeats until there are no more pie tins left.
Light Bulb
1. In a darkened room, turn on the generator.
2. Slowly approach the generator with a light bulb, being careful not to get close enough to immediately discharge the dome. Note: Some discharge will be felt from the bulb.
3. Repeat for other types of bulbs if necessary.
When the bulb is close to the dome, the outside surface of the bulb acquires a negative
charge. When this charge is great enough, the bulb discharges through the air (or you). When
the discharge occurs, electrons flow through the bulb, producing enough charge to light the bulb.
Different effects can be seen at varying distances. In general, as the bulb gets farther away, it will
be brighter, but will take longer between discharges. Likewise, when close to the dome, the bulb
will discharge frequently, but will be less bright.
5
NE T GENERATION SCIENCE
a division of
STEINER ENTERPRISES, INC.
Small Van de Graaff Generator
SE1002-00
3. Ionic Discharge
WWW.NEXGENSCI.COM
PURPOSE: To see the effects of ionic discharge.
ADDITIONAL MATERIALS:
Candle
Needle
Clay or tape (clay generally works best)
Straw
6-8ft length of wire (stranded preferred)
Air spectrum tube
PROCEDURES:
Electric Wind –“
Candle in the Wind”
1. While the generator is off and discharged, attach the needle perpendicular to the dome surface
with clay. Make sure that the base of the needle makes contact with the dome.
2. Turn on the generator.
3. Light the candle and slowly bring the flame toward the tip of the needle.
4. The flame should deflect to show the effect of the ionic discharge.
When the needle is connected to the generator, the charge density on the end of the needle
is much higher than the rest of the dome. This creates an extremely high electric field at the needle tip which ionizes the air in the immediate vicinity of the needle. The ionized air molecules are
repelled, producing currents in the air which are directed away from the needle’
s tip. These air currents are strong enough to deflect the candle’
s flame.
Because the charge on the end of the needle is being used to drive the “
wind”phenomenon,
the overall charge on the dome decreases. If the generator were shut off during the experiment,
the wind would decrease in intensity until it was no longer measurable.
This effect can be compared to the operation of lightning rods. During a thunderstorm, a building
will acquire charge. The lightning rod is like the needle in our experiment. It dissipates the charge
by ionizing the air around its tip. This makes the overall charge on the building decrease, thus also
decreasing the chances of a lightning strike.
Corona Discharge –“
Glow in the Dark Needle”
1. Strip one end of the wire and attach it to the base of the generator. This provides an electrical
path to ground.
2. Strip the other end of the wire and wind the strands through the eye of the needle so that the
needle is directly connected to ground.
3. Poke the needle through one end of the straw so that the needle is perpendicular to the straw.
4. Turn on the generator and turn off or dim lights.
5. Holding the straw (insulator,) slowly bring the needle close to the generator dome. You should
see a glow at the tip of the needle.
6. Check the distance for which the glow is visible.
Because the needle is in the strong electric field and provides a path to ground, a large induced charge accumulates on the sharp tip. The strong electric field is sufficient to ionize the air
around the needle. The ionized air molecules in the vicinity of the needle’
s tip store substantial
amounts of energy and emit some of that energy in the form of visible light as the ions recombine
with electrons. This effect is called a corona discharge.
6
NE T GENERATION SCIENCE
a division of
STEINER ENTERPRISES, INC.
Small Van de Graaff Generator
SE1002-00
WWW.NEXGENSCI.COM
This phenomenon was well known on sailing ships. When at sea, sailors would report seeing
the tip of the mast glow in stormy weather. The glow is the same type of corona discharge
demonstrated here.
Aurora Borealis
1. Turn the generator on and turn off or dim lights.
2. Slowly bring the spectrum tube close to the generator dome. You should see the contents of the
spectrum tube glow.
This experiment shows a phenomenon similar to the aurora borealis. The low pressure air
inside the tube, when exposed to the electric field, is ionized and the molecules emit visible light as
they pass through various excited states in recombining with electrons. When air in the atmosphere is ionized by exposure to a stream of charged particles near the poles, the same effect is
seen but in a much larger scale.
4. Van de Graaff Charge – “Just how much voltage is actually there?”
PURPOSE: To estimate the voltage created by the generator.
ADDITIONAL MATERIALS:
Metal mixing bowl
Dry towel
PROCEDURE:
1. Turn on the generator.
2. Holding the mixing bowl with the dry towel, slowly approach the generator, noting the maximum
distance for which a discharge can be achieved.
3. Record the maximum distance.
The electric field strength at which air at sea level breaks down is 3,000,000 volts/meter, or
76,200volts/in. Multiply this by your measured distance to determine the approximate voltage of
the generator dome.
This is a VERY approximate method for voltage determination. The air breakdown voltage is sensitive to the shape of the electrodes (our mixing bowl and the generator sphere) and humidity. In addition, the breakdown voltage is not linear, as this experiment assumes. However, the calculation will
yield a reasonably good order of magnitude for the voltage and will help students to realize the very
high voltages being produced. Typical results are around 200,000 volts.
Troubleshooting and Maintenance:
TROUBLESHOOTING
The performance of a Van de Graaff generator depends heavily on the local conditions—humidity and temperature—and on the cleanliness of the generator and its surroundings. The electric field of the generator attracts dust particles—much like a television set—and
these quickly create leakage paths to ground by corona discharge and conduction, greatly reducing the performance of the generator. Keeping the generator scrupulously clean will
greatly enhance its performance.
7
NE T GENERATION SCIENCE
a division of
STEINER ENTERPRISES, INC.
Small Van de Graaff Generator
SE1002-00
The most common problem conditions are:
• Weak sparks
•
No charge developed (especially if the generator was working perfectly yesterday/last
week/last year)
WWW.NEXGENSCI.COM
Weak sparks - The machine runs OK, but only produces corona discharges or small, weak
sparks.
This is usually due to accumulation of dust on the belt, insulating column and dome,
or, in humid conditions, to adsorption of moisture in the same areas. These create leakage
paths to ground for the charges, most of which leak away before reaching the dome or are dissipated
as corona discharges from dust particles on the dome acting as tiny “
needles.”
Remedy:
- Sometimes, running the generator for a longer period (about 10 minutes) will “
burn off”the
dust and cure the problem. If not:
- Clean the outside of the dome and the outside of the column with a clean, dry cloth.
- In humid conditions, or if humid conditions have existed since the last use, remove the
dome and blow warm air down the column with a hairdryer. This will often blow off the dust
and evaporate the adsorbed moisture. Warm up the dome in the same way.
- Inspect the belt and the inside of the column for accumulated dirt. If necessary, clean the
belt as described below. Clean the inside of the column with a dry piece of soft cloth attached to
a stiff wire. Be careful to avoid scratching the column.
No charge developed - The machine runs okay, but there are no signs of electrostatic
activity.
This can be just an extreme form of the “
weak sparks”problem, which can be cured by
the same measures. If these do not succeed, further problem issues may be a dirty or damp
lower pulley which prevents any charge separation taking place, misadjusted combs, or a
worn belt.
- Lower pulley problems can often be solved by removing the belt as described below and
blowing warm air down the column with a hairdryer. If this does not work, the bottom cover
should be removed and the pulley cleaned from below. DISCONNECT THE GENERATOR FROM
THE POWER OUTLET BEFORE REMOVING THE LOWER COVER! Also clean the belt to prevent
recontamination of the clean pulley.
- The combs are adjusted at the factory, and usually will not need attention. Visually inspect
the machine to see that the combs are about 1/16”away from the belt. If they are misadjusted,
follow the adjustment procedure below.
- After some years of use, the belt may become stretched and/or brittle with age. A loose
belt or a degraded surface leads to inefficient charge transport, and eventually to no transport at
all. In this case, the belt must be replaced. A new belt can be obtained from your distributor.
NOTE: If you acquire a spare belt at the time you purchase the machine, be sure to store it in
a dry place away from sunlight or chemical vapors, or it may be as degraded as the old belt
when you need to use it.
8
NE T GENERATION SCIENCE
a division of
STEINER ENTERPRISES, INC.
Small Van de Graaff Generator
SE1002-00
MAINTENANCE
STORAGE
WWW.NEXGENSCI.COM
If the Van de Graaff generator will not be used for some time, storing the machine as follows will help
prevent problems on the next use.
•
Store the machine in a dry area where it will not be exposed to moisture or chemical vapors which
could attack the rubber belt material and/or degrade the surface of the insulating column.
•
Cover the machine with a cloth or plastic bag to reduce the accumulation of dust and the adsorption of
moisture on the column.
•
Store the machine away from direct sunlight, which will cause the rubber of the belt to become
brittle.
MAINTENANCE PROCEDURES
For safety, maintenance work on the Van de Graaff generator should only be performed when
the machine is unplugged from the power outlet and fully discharged.
Basic maintenance procedures include belt cleaning/replacement and comb adjustment.
BELT REMOVAL
1. Remove the dome from the Van de Graaff generator.
2. Next, remove two screws from the upper comb and pivot the comb to expose the upper portion of
the belt.
3. Pull up on the belt and remove the upper pulley sideways.
4. The belt can now be slid off the lower pulley and removed from the top of the unit through the
column.
BELT INSTALLATION
1. Draw a 24”piece of thick string through the belt. DO NOT PIERCE THE BELT, just loop the string
through the belt.
2. Carefully lower the belt into the tube, using the string, so as not to drop the belt.
3. Re-attach the belt to the lower pulley.
4. Pull the string to expose the other end of the belt.
5. Slide the upper pulley into the loop of the belt and reposition the pulley axle in the notches on the
top of the column. Make sure that the belt is not twisted inside the tube.
6. Rotate the upper comb back into position and reattach the two screws.
7. Check that the upper comb is about 1/16”away from the belt and tighten the screws.
8. Rotate the upper part of the belt by hand to center the belt on the pulleys and ensure that the
belt does not catch on the combs.
BELT CLEANING
1. Follow the above instructions for belt removal.
2. To clean the belt, wash it with a solution of a few drops of dishwashing detergent in water.
Rinse with clean water and allow the belt to air dry completely before reassembling the unit.
3. Replace belt following the above instructions.
9
NE T GENERATION SCIENCE
a division of
STEINER ENTERPRISES, INC.
Small Van de Graaff Generator
SE1002-00
WWW.NEXGENSCI.COM
COMB ADJUSTMENT
If the belt is clean, humidity is low, and Van de Graaff operation is substandard, the comb/
belt spacing may need adjustment. Factory settings for the distance between the belt and the
comb are 1/16”
. To adjust the comb settings:
1. Remove the dome.
2. Loosen the four comb retaining screws and adjust the upper comb to desired spacing.
3. Tighten the screws. DO NOT OVER-TIGHTEN THE SCREWS—there is a risk of stripping the
threads in the plastic insulating column. Replace the dome.
4. Remove the base cover.
5. Loosen the lower comb retaining screws and set the appropriate spacing.
6. Tighten the screws and replace the base cover.
FUSE REPLACEMENT
If fuse replacement is necessary, the fuse is a 5 x 20 mm cartridge fuse - 250 V, 1 A, time delay
(slow blow).
Copyright Notice
The Small Van de Graaff Generator opera ting instru ctions are copyrighted and all rights are reserved. Permission is
granted to all non-profit educational institutions to make as many copies as they wish as long as it is for the sole purpose of
teaching students. Reproduction of these operating instructions by anyone for any other purpose is prohibited.
© 2007 Steiner Enterprises, Inc
10
NE T GENERATION SCIENCE
a division of
STEINER ENTERPRISES, INC.


