Vandal Shield - LSI Industries
advertisement

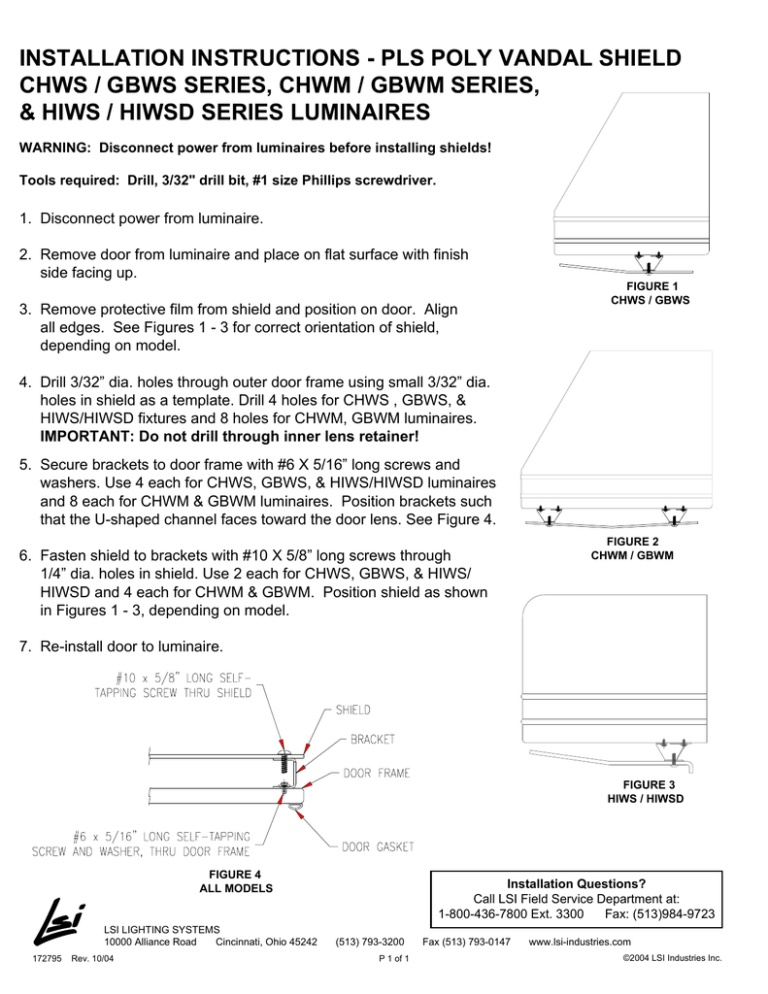
INSTALLATION INSTRUCTIONS - PLS POLY VANDAL SHIELD CHWS / GBWS SERIES, CHWM / GBWM SERIES, & HIWS / HIWSD SERIES LUMINAIRES WARNING: Disconnect power from luminaires before installing shields! Tools required: Drill, 3/32" drill bit, #1 size Phillips screwdriver. 1. Disconnect power from luminaire. 2. Remove door from luminaire and place on flat surface with finish side facing up. 3. Remove protective film from shield and position on door. Align all edges. See Figures 1 - 3 for correct orientation of shield, depending on model. FIGURE 1 CHWS / GBWS 4. Drill 3/32” dia. holes through outer door frame using small 3/32” dia. holes in shield as a template. Drill 4 holes for CHWS , GBWS, & HIWS/HIWSD fixtures and 8 holes for CHWM, GBWM luminaires. IMPORTANT: Do not drill through inner lens retainer! 5. Secure brackets to door frame with #6 X 5/16” long screws and washers. Use 4 each for CHWS, GBWS, & HIWS/HIWSD luminaires and 8 each for CHWM & GBWM luminaires. Position brackets such that the U-shaped channel faces toward the door lens. See Figure 4. 6. Fasten shield to brackets with #10 X 5/8” long screws through 1/4” dia. holes in shield. Use 2 each for CHWS, GBWS, & HIWS/ HIWSD and 4 each for CHWM & GBWM. Position shield as shown in Figures 1 - 3, depending on model. FIGURE 2 CHWM / GBWM 7. Re-install door to luminaire. FIGURE 3 HIWS / HIWSD FIGURE 4 ALL MODELS LSI LIGHTING SYSTEMS 10000 Alliance Road Cincinnati, Ohio 45242 172795 Rev. 10/04 Installation Questions? Call LSI Field Service Department at: 1-800-436-7800 Ext. 3300 Fax: (513)984-9723 (513) 793-3200 P 1 of 1 Fax (513) 793-0147 www.lsi-industries.com ©2004 LSI Industries Inc.

