installation instructions
advertisement

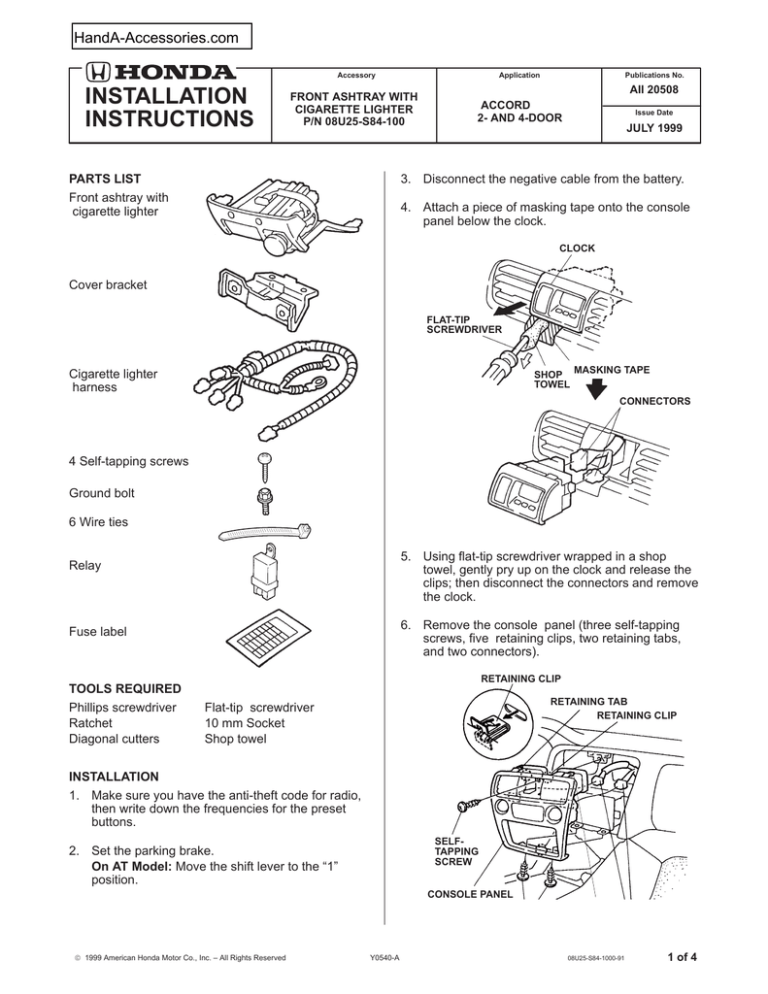
HandA-Accessories.com Accessory INSTALLATION INSTRUCTIONS Application FRONT ASHTRAY WITH CIGARETTE LIGHTER P/N 08U25-S84-100 PARTS LIST Front ashtray with cigarette lighter Publications No. AII 20508 ACCORD 2- AND 4-DOOR Issue Date JULY 1999 3. Disconnect the negative cable from the battery. 4. Attach a piece of masking tape onto the console panel below the clock. CLOCK Cover bracket FLAT-TIP SCREWDRIVER SHOP MASKING TAPE TOWEL Cigarette lighter harness CONNECTORS 4 Self-tapping screws Ground bolt 6 Wire ties 5. Using flat-tip screwdriver wrapped in a shop towel, gently pry up on the clock and release the clips; then disconnect the connectors and remove the clock. Relay 6. Remove the console panel (three self-tapping screws, five retaining clips, two retaining tabs, and two connectors). Fuse label TOOLS REQUIRED Phillips screwdriver Ratchet Diagonal cutters RETAINING CLIP RETAINING TAB RETAINING CLIP Flat-tip screwdriver 10 mm Socket Shop towel INSTALLATION 1. Make sure you have the anti-theft code for radio, then write down the frequencies for the preset buttons. SELFTAPPING SCREW 2. Set the parking brake. On AT Model: Move the shift lever to the “1” position. CONSOLE PANEL 1999 American Honda Motor Co., Inc. – All Rights Reserved Y0540-A 08U25-S84-1000-91 1 of 4 7. Remove the radio assembly (four radio mounting bolts, and unplug the connector and antenna lead). CONNECTOR 9. Remove the left fuse box cover (three retaining clips and two retaining tabs). ANTENNA LEAD RETAINING CLIP RETAINING CLIP LEFT FUSE BOX COVER RADIO MOUNTING BOLTS (Reuse.) RETAINING TAB RADIO ASSEMBLY RETAINING CLIP 8. Remove and discard the front console lower cover (four retaining clips). 10. Remove the driver’s dashboard lower cover (three screws and five retaining clips). RETAINING CLIP SCREW FRONT CONSOLE LOWER COVER (Discard.) SCREW RETAINING CLIP DRIVER’S DASHBOARD LOWER COVER RETAINING CLIP SCREW RETAINING CLIP 2 of 4 AII 20508 (9907) 1999 American Honda Motor Co., Inc. – All Rights Reserved 11. Remove the left front side trim (one retaining clip and four retaining tabs). RETAINING CLIP 14. Plug the yellow/red 1-pin connector of the cigarette lighter harness into the No. 1 terminal of the fuse box, the red/black 1-pin connector into the No. 3 terminal, and the white 1-pin connector into the No. 5 terminal, respectively. YELLOW/RED RED/BLACK LEFT FRONT SIDE TRIM 1-PIN CONNECTOR WHITE FUSE BOX FUSE CASE 1-PIN CONNECTOR RETAINING TAB FUSE LABEL 12. Remove the left kick panel (two retaining clips). 15. Attach the fuse label to the fuse case taped to the cigarette lighter harness. 16. Remove the bolt securing the bottom of the engine hood opener bracket, and install the relay there with the same bolt. GROUND BOLT BOLT (Discard.) GROUND CONNECTOR (Move ground connector from the 2:00 o’clock to the 10:00 o’clock position.) 4-PIN CONNECTOR GROUND OF CIGARETTE BOLT LIGHTER HARNESS GROUND TERMINAL 13. Loosen the ground bolt and move the ground connector from the 2:00 o’clock to the 10:00 o’clock position. Retighten the ground bolt. RELAY ENGINE HOOD OPENER BRACKET BOLT 17. Remove and discard the bolt securing the top of the engine hood opener bracket, and attach the ground terminal of the cigarette lighter harness there with the ground bolt from the kit. 1999 American Honda Motor Co., Inc. – All Rights Reserved AII 20508 (9907) 3 of 4 18. Plug the 4-pin connector of the cigarette lighter harness into the relay you installed in step 16. 22. Attach the cover bracket with the two self-tapping screws. SELF-TAPPING SCREWS 19. Route the 4-pin connector of the cigarette lighter harness above the steering shaft to the front console. Secure the harness to the dashboard support with one wire tie. CIGARETTE LIGHTER HARNESS WIRE TIE COVER BRACKET 23. Reinstall the driver’s dashboard lower cover. DASHBOARD SUPPORT 20. Secure the cigarette lighter harness with the three wire ties in the areas shown. CIGARETTE LIGHTER HARNESS 24. Plug the 4-pin connector of the cigarette lighter harness into the front ashtray with cigarette lighter; then push the four retaining clips of the front ashtray with cigarette lighter into the holes in the dashboard. CIGARETTE LIGHTER HARNESS VEHICLE HARNESS RETAINING CLIP 4-PIN CONNECTOR VEHICLE HARNESS SELFTAPPING SCREWS WIRE TIES FRONT ASHTRAY WITH CIGARETTE LIGHTER RETAINING CLIP 21. Continue routing the cigarette lighter harness into the front console, and secure it with two wire ties. WIRE TIES 25. Secure the front ashtray with cigarette lighter with two self-tapping screws. 26. Check that all wire harnesses are routed properly and all connectors are plugged in. 27. Reinstall all removed parts. 28. Connect the negative cable to the battery. 29. Enter the customer’s radio anti-theft code, and reset the radio station preset buttons. 30. Reset the clock. CIGARETTE LIGHTER HARNESS 4 of 4 31. Check the operation of the cigarette lighter. AII 20508 (9907) 1999 American Honda Motor Co., Inc. – All Rights Reserved


