Cylinder Head Gaskets - FME
advertisement

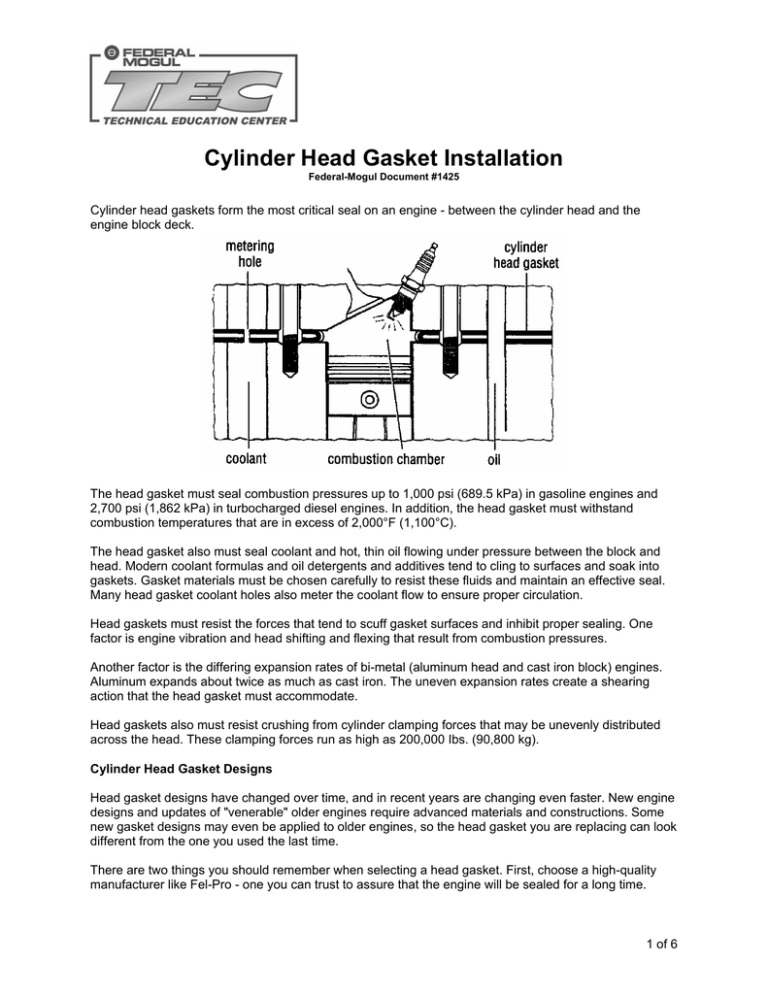
Cylinder Head Gasket Installation Federal-Mogul Document #1425 Cylinder head gaskets form the most critical seal on an engine - between the cylinder head and the engine block deck. The head gasket must seal combustion pressures up to 1,000 psi (689.5 kPa) in gasoline engines and 2,700 psi (1,862 kPa) in turbocharged diesel engines. In addition, the head gasket must withstand combustion temperatures that are in excess of 2,000°F (1,100°C). The head gasket also must seal coolant and hot, thin oil flowing under pressure between the block and head. Modern coolant formulas and oil detergents and additives tend to cling to surfaces and soak into gaskets. Gasket materials must be chosen carefully to resist these fluids and maintain an effective seal. Many head gasket coolant holes also meter the coolant flow to ensure proper circulation. Head gaskets must resist the forces that tend to scuff gasket surfaces and inhibit proper sealing. One factor is engine vibration and head shifting and flexing that result from combustion pressures. Another factor is the differing expansion rates of bi-metal (aluminum head and cast iron block) engines. Aluminum expands about twice as much as cast iron. The uneven expansion rates create a shearing action that the head gasket must accommodate. Head gaskets also must resist crushing from cylinder clamping forces that may be unevenly distributed across the head. These clamping forces run as high as 200,000 Ibs. (90,800 kg). Cylinder Head Gasket Designs Head gasket designs have changed over time, and in recent years are changing even faster. New engine designs and updates of "venerable" older engines require advanced materials and constructions. Some new gasket designs may even be applied to older engines, so the head gasket you are replacing can look different from the one you used the last time. There are two things you should remember when selecting a head gasket. First, choose a high-quality manufacturer like Fel-Pro - one you can trust to assure that the engine will be sealed for a long time. 1 of 6 Second, there is no one best gasket design since no single type is best for all applications. Gasket manufacturers engineer the correct head gasket design for each individual engine. Exhaustive testing is performed to ensure that the correct construction and design is used. Gasket designs that consumers receive are not necessarily at their option; they receive what is required by each application. No-retorque head gaskets are now common and desirable. However, depending on the brand or design, many gaskets for import vehicles, as well as older designs, require the cylinder head to be retorqued. Retorque-type gaskets take a set after initial engine operation and relax to the point where retorquing is needed to restore proper clamping force. In the long run, the extra labor and expense of using a retorque cylinder head gasket makes the repair more expensive than using a no-retorque design. Early Head Gasket Designs One early head gasket design was the Embossed Steel Shim. It was inexpensive to produce and used extensively by engine manufacturers. The design required supplementary sealers for an effective seal, but retained torque well. The problem with this gasket was that coolant could eventually corrode the steel, leading to gasket failure and possible engine damage. Embossed steel shim gaskets are not recommended for replacement use, as they may not effectively seal surface imperfections caused by engine wear. The soft Faced/Perforated Core head gasket was another early design. The gasket did not require supplementary sealers and the soft thick facing material would conform to surface irregularities. However, the soft facing material tended to compress and relax so that retorquing was necessary to maintain a good seal. Modern Head Gaskets Modern no-retorque head gasket constructions use a variety of materials and basically consist of facings, coatings and a core. Cores can be either solid or clinched steel. Even if the core is a clinched steel type, the facing attached to it will be dense enough to maintain torque and strong enough to resist blowout. Two facing materials commonly used are expanded graphite and reinforced rubber fiber. These materials are dense enough not to relax much, so retorquing is not required; but, they will compress enough to conform to minor surface irregularities. This is important with smaller, higher-revving engines that are more subject to flexing and vibration. Coatings are used as needed to help seal minor surface imperfections and resist friction. Coatings may be Teflon or silicone-based depending on the temperature range at which the engine will operate. A coating's anti-friction properties help the gasket deal with the shearing of facing material. Bi-metal engines' aluminum heads and cast iron blocks expand and contract at different rates during heating/ cooling cycles. This causes a shearing action that can eventually cause the gasket to degenerate and fail. Anti-friction coatings also act as anti-sticking agents so the gaskets will come off clean, protecting the engine surfaces and reducing the labor required when serviced in the future. Special Sealing Constructions As required, head gaskets may utilize other special sealing constructions: Printoseal®Elastomeric Sealing Beads increase clamping forces around critical sealing openings such as coolant and oil ports. It can be applied to several no-retorque designs. Printoseal also helps seal smaller displacement engines, such as newer domestic and imports, that are more subject to flexing. Wire Ring Combustion Seals may be encased in stainless steel armors for increased strength on racing and heavy-duty applications. Combustion wire rings can be made of copper or pre-flattened steel to prevent brinelling (indenting) of aluminum components. 2 of 6 Multi-Layer Steel (MLS) Head Gaskets A new development in head gasket technology is the MuIti-Layer Steel Gasket (MLS). At first glance, these gaskets look like old-fashioned steel shim gaskets, but they are very "high-tech." A thin rubber coating is bonded to the steel shim and, when required, multiple layers of this rubber coated steel shim are used. The rubber coating provides fluid sealability across the outer faces and between layers and helps seal minor surface imperfections. MLS gaskets also provide excellent torque retention. They were first used on Japanese engines and are now being used for domestic applications as well. Installing typical cylinder head gaskets 1. Allow engine to cool completely-before disassembly Cylinder heads tend to warp if removed while they are still hot. This is particularly important when working-with aluminum components. Remember, heat expands metal, making assembly bolts more difficult to remove and prone to breakage. Working on a cool engine avoids burned arms, hands and fingers. 2. Loosen and remove the bolts in reverse torque sequence Follow the torque sequence, in the Fel-Pro Torque Tables or OEM manual, in reverse order to loosen each bolt. Then repeat the process again to remove the bolts. This minimizes the chance that the components will warp. 3. Clean mating surfaces of foreign material All foreign material should be removed from sealing surfaces. Debris not removed can prevent a good seal. Sometimes, debris can even damage the block, gasket and head. You also may wish to use a degreaser. On iron components, use a scraper and wire brush. Use a non-metallic scraper on aluminum surfaces since they are easily damaged. Careful when using conditioning discs. Some discs contain aluminum oxide, a very hard and aggressive abrasive. Cover oil and coolant ports when using and clean surfaces with a solvent type cleaning solution. 4. Inspect the old head gasket Inspect the old head gasket for wear and damage. It provides clues to previous as well as potential engine problems. For example, a cracked armor may indicate abnormal combustion -detonation or preignition. Replacing the gasket without correcting the problem can cause even high-quality gaskets to fail again. 5. Check for warpage and distortion Place a straightedge lengthwise on the head surface (also check the block) and slide a feeler gauge between the head and the straightedge. A good rule for flatness is that three-cylinder applications should not be more than .003" out-of-flat, four-cylinder applications .004" out-of-flat and six-cylinder applications 3 of 6 .006" out-of-flat. Widthwise, all applications should not be more than .002" out-of-flat. These are combined specs for both the head and block together, and should not exceed the maximums shown. 4 of 6 6. Resurfacing the head Resurface the head or block if it exceeds the specifications mentioned in Step 5. The machine shop should remove just enough metal to return the surface to flatness. Excessive resurfacing can result in possible valve/piston interference and in V-type engines, poor alignment of manifold bolt holes and ports. 7. Inspect all engine parts Look for any irregularities that may cause leaks, such as gouges, scratches or cracks. Replace cracked or badly warped parts. 8. Never reuse head gaskets A used gasket is one of the most expensive gaskets you can install. It is an open invitation to gasket failure. 9. Check head gasket for proper fit Before installing the new gasket, check it for fit on the head and block, and against the old gasket. Combustion openings should be slightly larger than the engine bore and may have irregular shapes to fit valve pockets in the cylinder head. The gasket coolant holes may be smaller or shaped differently from the coolant passages in the head or block. This is because head gaskets are designed to control or meter coolant flow. There also may be openings in the engine head or block that are not in the gasket. These are casting holes used in manufacturing which do not affect operation. The gasket you purchase should meet the most recent OEM recommendations and be designed for replacement use. A gasket from a reputable manufacturer ensures that the combustion and coolant holes are of proper size and configuration. The gasket bore size, depending on the vehicle, can often accommodate up to a .060" overbore. The gasket also should accommodate a reasonable chamfer of uniform size. However, the combination of cylinder overbore and chamfer cannot exceed the cylinder head gasket combustion opening size. Excessive overbore and/or chamfer will result in unloading of the combustion seal and cylinder head gasket failure. 5 of 6 10. Head and block surface finishes Check the surface finish with a surface comparator. If the casting surface is too smooth, the gasket cannot grip the surface for a durable combustion seal. If the casting surface is too rough, the gasket will not conform to the surface, causing combustion and fluid leaks. A micro inch finish of 60 to 100 RA is preferred for cast iron and 50 to 60 RA for aluminum. Note: Some new Multi-Layer Steel (MLS) gasket designs require a very smooth surface finish-30 RA max; consult an OEM manual for details. 11. Clean and prepare bolt holes Inspect bolt holes carefully, especially if the head or block has been resurfaced. If the threads run up to the surface, chamfer and tap the hole so the threads will not be drawn above the surface when the bolts a re tightened. This slight irregularity is enough to cause gasket failure. Use a thread chaser to clean the threads to the bottom of the hole. Remove all loose material from the bottom of blind holes or the bolt may bottom out and reduce clamping force. This can lead to gasket failure. 12. Clean and prepare threads on bolts Be sure to wire brush the threads on all assembly bolts. Check the bolt threads for damage. Dry, dirty threads in poor condition can decrease the bolt's clamping force by as much as 50%. This will lead to false torque readings and possible gasket failure. To avoid this, we recommend that you use spray white lithium grease on the underside of all bolt heads and washers and on the threads of all bolts that go into blind holes. Use liquid Teflon on the threads of bolts who’s holes extend into water jackets. 13. Check for correct bolt length If the bolts have stretched or excessive machining has been done, the bolts can hit the bottom of blind holes. To check for this problem, put a pencil in the block hole. Mark the hole depth on the pencil. Compare this to the length of the bolt threads that go into that hole. If the bolt is longer, it will bottom out when in the bolt hole. If it is determined that the bolt will hit the bottom of the hole, place a hardened steel washer under the head of the bolt before assembly. 14. Head bolts that penetrate into coolant passages Coat bolt threads with a non-hardening sealer if they enter the coolant passages. This will stop coolant seepage around the bolt threads. Seeping coolant could get into the oil or cause corrosion that might damage parts, resulting in engine failure. 15. Follow the proper torque sequence and torque to specification Fel-Pro Torque Tables, showing the proper torque sequence and torque specs, are available from FelPro dealers. Carefully following all instructions in the proper sequence, torque the head bolts to the specified torque in foot-pounds. If the engine has torque-to-yield bolts, turn the head bolts the additional amount shown in the torque tables, still following the torque sequence. Use a torque-to-angle indicator to 6 of 6 measure accurately the additional turn used to stretch the bolts into the torque-to-yield range. Note: Because torquing specs may change, it is important that the most current information is used. 16. Run the engine alter complete reassembly Check for fluid and combustion leaks. This ensures a properly completed repair and reduces the chance of a comeback repair. 17. Retorquing the cylinder head gasket If you used a Fel-Pro PermaTorque®gasket, your installation job is complete. However, some cylinder head gasket designs, especially those manufactured overseas for imports, need to be retorqued. If the gasket design requires retorquing, run the engine to a normal operating temperature (usually 10 to 15 minutes) and shut off the engine. Carefully retorque the cylinder head bolts for a second time. Retorquing can be done while the engine is still warm if the engine is cast iron. If the head or block is aluminum, allow the engine to cool to room temperature. Follow the torque sequence to the specified amount in the torque tables. Retorque-type cylinder head gaskets may need to be tightened a third time after a longer time or certain mileage; follow OEM recommendations. 7 of 6

