FROM BALL-PEEN TO TOP SET - blacksmithsofarkansas.org
advertisement
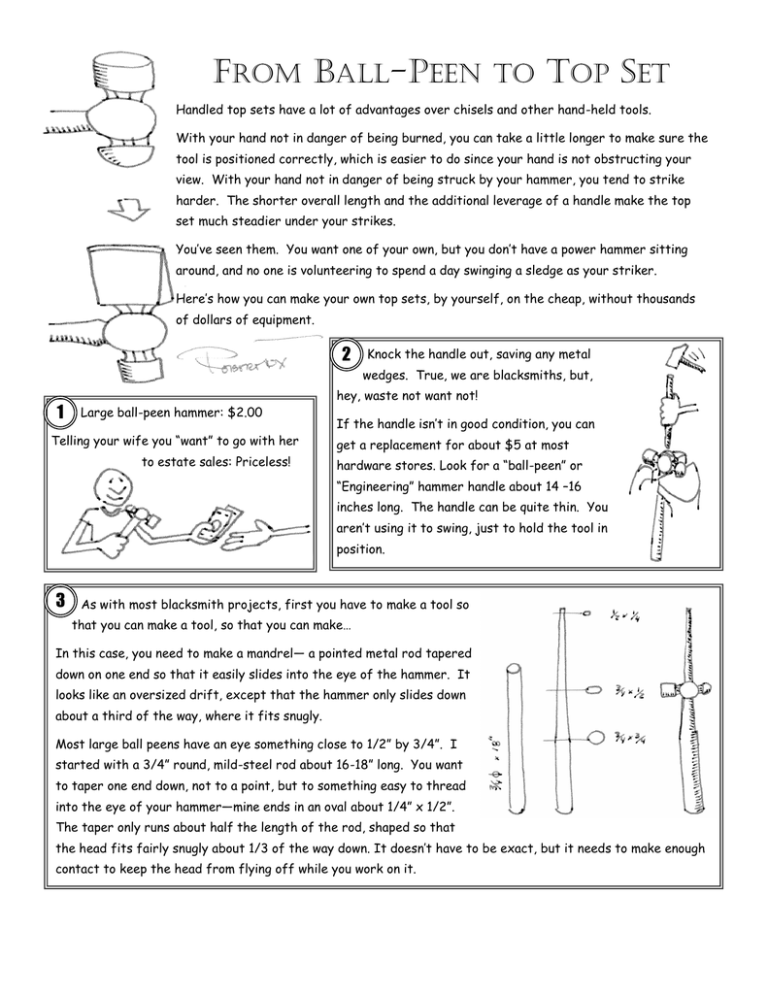
FROM BALL-PEEN TO TOP SET Handled top sets have a lot of advantages over chisels and other hand-held tools. With your hand not in danger of being burned, you can take a little longer to make sure the tool is positioned correctly, which is easier to do since your hand is not obstructing your view. With your hand not in danger of being struck by your hammer, you tend to strike harder. The shorter overall length and the additional leverage of a handle make the top set much steadier under your strikes. You’ve seen them. You want one of your own, but you don’t have a power hammer sitting around, and no one is volunteering to spend a day swinging a sledge as your striker. Here’s how you can make your own top sets, by yourself, on the cheap, without thousands of dollars of equipment. 2 Knock the handle out, saving any metal wedges. True, we are blacksmiths, but, 1 Large ball-peen hammer: $2.00 Telling your wife you “want” to go with her to estate sales: Priceless! hey, waste not want not! If the handle isn’t in good condition, you can get a replacement for about $5 at most hardware stores. Look for a “ball-peen” or “Engineering” hammer handle about 14 –16 inches long. The handle can be quite thin. You aren’t using it to swing, just to hold the tool in position. 3 As with most blacksmith projects, first you have to make a tool so that you can make a tool, so that you can make… In this case, you need to make a mandrel— a pointed metal rod tapered down on one end so that it easily slides into the eye of the hammer. It looks like an oversized drift, except that the hammer only slides down about a third of the way, where it fits snugly. Most large ball peens have an eye something close to 1/2” by 3/4”. I started with a 3/4” round, mild-steel rod about 16-18” long. You want to taper one end down, not to a point, but to something easy to thread into the eye of your hammer—mine ends in an oval about 1/4” x 1/2”. The taper only runs about half the length of the rod, shaped so that the head fits fairly snugly about 1/3 of the way down. It doesn’t have to be exact, but it needs to make enough contact to keep the head from flying off while you work on it. 4 NOW you can heat the hammer head. I have a gas forge, which is ideal for this 5 When the hammer head is up to a yellow heat, poke the mandrel into because you can let the tool steel soak the heat the eye and fish it out. Tap the mandrel in deep without any danger of burning the steel. down on your anvil lightly to snug the Only heat the hammer head, not the mandrel. hammer head up. Don’t try to drive it on tight—you will make the eye larger. 6 Most of the mass in a ball-peen is in the hammer end, not the ball end. You will need that mass to make your tooling, so the first thing you need to do is to convert the ball end into a shape you can strike with another hammer. This should only take 2-3 heats at most. If your octagon looks as poor as mine did, you can continue shaping it to round, and tell 7 Square up the sides Make it into an of the ball end octagon everyone you prefer it that way. Flattening the striking surface is the step that’s most likely to mess up the eye of your hammer. Take a deep heat, pick out the head with tongs this time, and oilquench all but the striking surface you are working on. It should take only one heat to flatten that surface 8 Now the hard part begins. The previous steps will make a striking surface suited for many different top tools. From this point on in the demo, we will be making a hot-set. So, heat the hammer head back up, fish it out on the mandrel, and started forming the wedge. This will take a BUNCH of heats—tools steel is TOUGH. Switch the mandrel to the other end of the eye after each heat so that you work the surface evenly. Each time the hammer head is heating, quench the mandrel in water. You should be able to hold onto it with a gloved hand. 9 When you are tapering the working end of the tool, the wedge will want to spread out into a fishtail. To prevent this, you should be able to put the mandrel point down in the hardy hole and let go of it. Then you can smack the wedge back into shape swinging your heaviest hammer with both hands. 10 When the edge approaches about 1/8”, don’t try to take it any further. As the saying goes, “He who would a good edge win must forge thick and grind thin.” Take a heat or two to make sure the tool is straight, pretty up the profile, and add your maker’s mark. If you don’t have a flatter (yet), a flat piece of heavy gauge steel will help take out the bulk of your hammer marks. 11 All this reshaping of the hammer head has put a lot of stress into the Iron crystal metal. You can take it out through a process called annealing. Heat the hammer up to orange all over, and let it cool slowly—don’t quench. I just turn off structure before shaping the gas in my forge and leave the hammer in there. Take a break, go rest, drink something, come back in an hour (or more) when the hammer is cool enough to Crystal hold in your hand. structure after I’ve heard people say to repeat this process a couple of times. That may be good shaping advice—but I didn’t follow it, and everything has worked out Ok so far. I’ve heard other people say to anneal metal by burying it in a bucket of vermiculite—a non-flammable product available by the bag at most lawn-care stores as a soil This is as soft as your tool is going to get. This is the time to take a grinder/file/flap-disk and make it look nice. Use a wire brush/wheel to clean of any remaining scale. Go ahead and grind/file the cutting edge. For a hot-set, aim for about a 60 degree angle. I like a little bow in the edge so I can “rock” it along a line. structure rebuilt through additive used to hold water like a sponge. Apparently it holds heat also. 12 Crystal annealing 13 Now is the time to harden your tool. Heat the whole head up to cherry-red and quench it quickly in oil. Note: I have found a military surplus 50 caliber ammo case to be perfect for an oil quench tank. It is metal, not plastic, and welded, not soldered. It has a gasket to keep water out (or oil in), is a perfect size, has a locking clasp and a handle. $15 at Bennet’s in Little Rock. They have a stack of them the size of a car. 14 The tool is now very hard, but very brittle. If you struck it, it would probably shatter. You need to temper it. First, use a flap-disk sander to polish both the struck end and the working end. This has the pleasant side effect of making your mark stand out, as it will still be covered with black oxide. The struck end needs to be tempered all the way to a blue color (about 600° F), while the cutting edge needs to go only to a pale straw (about 430° F). I put it in our kitchen oven on 440°. I started at 400° and increased by 10° until I started to get color. This way I knew the temper ran throughout the piece, not just a tempered shell on a brittle core. Then, before the piece cooled, I used a hand-held propane torch to bring the struck end and the eye up to blue. On one project, my torch ran out an I finished tempering on a stove top gas burner. If you go slowly, you can ease it right up to the color you want. If the color continues to spread, quenched it quickly in oil to stop the tempering process. 15 Last step—put the handle on your new top set. Hammer in the wooden Drive the wedge, saw off the handle on excess wood and by whacking sand flush the end on The wedges hold Hammer in the metal the handle on wedge the opposite tightly because the direction of cross-section of the the wooden hammer eye is shaped wedge like an hourglass— unless you’ve messed it up! your anvil. Here’s some ideas for other handled tools you might want to make using this same process: This hot set Top fuller Butcher Slitter Slot punch Round punch Flatter A top-set butcher for starting clean tenons.
