Installation Instructions
advertisement

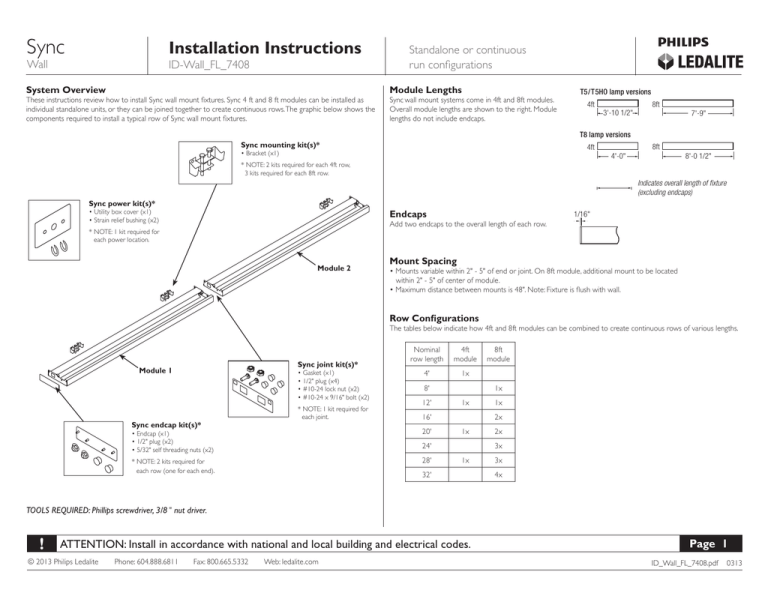
Sync Installation Instructions Wall ID-Wall_FL_7408 System Overview These instructions review how to install Sync wall mount fixtures. Sync 4 ft and 8 ft modules can be installed as individual standalone units, or they can be joined together to create continuous rows. The graphic below shows the components required to install a typical row of Sync wall mount fixtures. Standalone or continuous run configurations Module Lengths Sync wall mount systems come in 4ft and 8ft modules. Overall module lengths are shown to the right. Module lengths do not include endcaps. T5/T5HO lamp versions 4ft 8ft 3'-10 1/2" 7'-9" T8 lamp versions Sync mounting kit(s)* 8ft 4ft • Bracket (x1) 4'-0" 8'-0 1/2" * NOTE: 2 kits required for each 4ft row, 3 kits required for each 8ft row. Indicates overall length of fixture (excluding endcaps) Sync power kit(s)* • Utility box cover (x1) • Strain relief bushing (x2) Endcaps 1/16" Add two endcaps to the overall length of each row. * NOTE: 1 kit required for each power location. Module 2 Mount Spacing • Mounts variable within 2" - 5" of end or joint. On 8ft module, additional mount to be located within 2" - 5" of center of module. • Maximum distance between mounts is 48". Note: Fixture is flush with wall. Row Configurations The tables below indicate how 4ft and 8ft modules can be combined to create continuous rows of various lengths. Sync joint kit(s)* Module 1 • Gasket (x1) • 1/2" plug (x4) • #10-24 lock nut (x2) • #10-24 x 9/16" bolt (x2) Sync endcap kit(s)* * NOTE: 1 kit required for each joint. Nominal row length 4ft module 4' 1x 1x 8' 12' 1x 20' * NOTE: 2 kits required for each row (one for each end). 28' 1x 2x 16' • Endcap (x1) • 1/2" plug (x2) • 5/32" self threading nuts (x2) 8ft module 1x 2x 3x 24' 1x 32' 3x 4x TOOLS REQUIRED: Phillips screwdriver, 3/8 " nut driver. ! ATTENTION: Install in accordance with national and local building and electrical codes. © 2013 Philips Ledalite Phone: 604.888.6811 Fax: 800.665.5332 Web: ledalite.com Page 1 ID_Wall_FL_7408.pdf 0313 Sync Wall Installation Instructions ID-Wall_FL_7408 1 Install utility box and utility box cover IMPORTANT: Read all instructions at least once prior to beginning installation. All mount brackets must be secured to wall structure (eg. studs or cross-braces). 2 Install wall brackets wall bracket cover bracket Attach cover plate to utility box strain relief Determine power feed location and install 2"x4" utility box (supplied by others) parallel with fixture. Complete connections at utility box with supplied power cord. Attach cover bracket using supplied hardware. Punch power access hole in supplied cover, feed power cord through and attach strain relief on wall side. Attach cover using supplied painted hardware. NOTE: Bottom of utility box should be in line with bottom of wall brackets. 4 Standalone or continuous run configurations Raise fixture and engage on wall brackets 3 3 Unpack / Prepare fixtures Arrange boxed fixtures on floor in specified locations; remove fixtures from boxes; remove plastic from fixtures. Cap all unnecessary power feed holes at back of fixture(s) using supplied 1/2" plugs. Bottom of utility box should be in line with bottom of wall brackets. Determine fixture mounting location and secure wall brackets to structure using appropriate fasteners (two per bracket, supplied by others). 4ft fixtures: Require two bracket assemblies; 8ft fixtures: Require three bracket assemblies. Brackets must be installed a maximum of 5" from end of fixture (on 8ft fixture, the third bracket can be 5" of ether side of inrow crossplate). NOTE: Mounted fixture(s) will sit approximately 1/4" above top edge of bracket assembly. 5 Access wiring / remove reflector 6 Complete electrical connections Secure bracket strain relief wirenuts (supplied by others) With 2 people, raise fixture into position and engage it on hooks located on top of wall brackets, then rotate it down into position. Secure bracket using supplied hardware. POWER LOCATIONS: Prior to engaging fixture in mounting brackets, feed installed power cord through the access hole at back of the fixture. ! To access wiring, remove screw from top reflector and lift reflector off. NOTE: Care should be taken when lifting up top reflector to avoid disconnecting internal wiring. ATTENTION: Install in accordance with national and local building and electrical codes. © 2013 Philips Ledalite Phone: 604.888.6811 Fax: 800.665.5332 Web: ledalite.com Complete electrical connections using wire nuts (supplied by others). Re-install reflector and hardware removed in STEP 5. Page 2 ID_Wall_FL_7408.pdf 0313 Sync Installation Instructions Wall 7 Standalone or continuous run configurations ID-Wall_FL_7408 Level and secure first fixture 8 Install and join additional fixtures to create row Complete electrical connections at joints 10 Level and secure additional fixture gasket lock screw tilt screw 9 gasket TOP VIEW OF BRACKET LEVEL: Using 5/16" hex nut driver, level fixture by adjusting the tilt screw. quick-wire connectors (supplied) With two people, raise second fixture and engage on mounting brackets (see STEP 4). At joint, remember to insert black gasket. SECURE: Secure fixture to wall bracket assemblies by tightening the lock screw. 11 Install Endcaps 12 wire nuts (by others) Complete in-row electrical connections. NON-POWER LOCATIONS: Use supplied quick-wire connectors. Tuck wires into wire cavity. POWER LOCATIONS: Remove installed quick-wire connectors and complete electrical connections using wire nuts (supplied by others). Tuck wires into wiring cavity. Level second fixture by adjusting the tilt screw (see step 7). Slide second fixture flush against first fixture and secure joint using supplied nut and bolt hardware (requires 3/8" nut drivers). Secure fixture to wall brackets by tightening the lock screw at each bracket location (see step 7). NOTE: Use smallest appropriate wire nuts. Repeat steps 8-10 for each additional fixture(s) in row. Finishing Lamp fixtures. Secure all components: Ensure all components are secure and installed according to code. Attach endcap to first and last module in each row using supplied hardware. IMPORTANT: Do not over-tighten endcap fasteners. Ledalite recommends tightening fasteners by hand. When nut is flush with crossplate, turn an additional 1/4 turn. ! ATTENTION: Install in accordance with national and local building and electrical codes. © 2013 Philips Ledalite Phone: 604.888.6811 Fax: 800.665.5332 Web: ledalite.com Page 3 ID_Wall_FL_7408.pdf 0313

