T8 Troffer Reflector Kit
advertisement
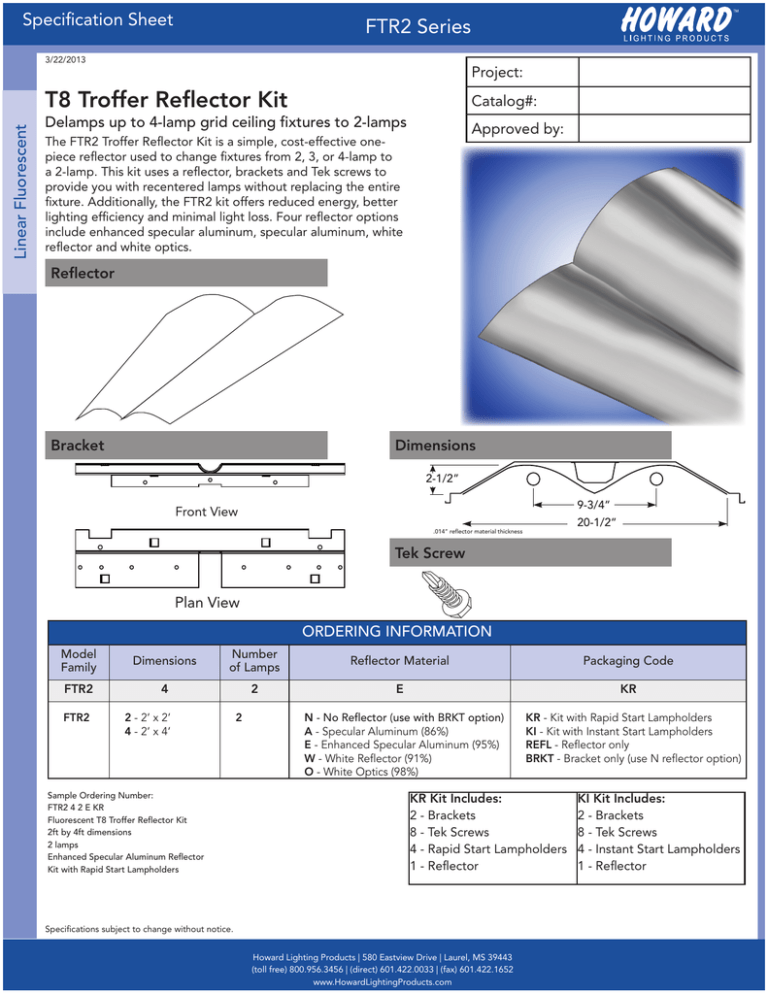
Specification Sheet FTR2 Series Linear Fluorescent 3/22/2013 Project: T8 Troffer Reflector Kit Catalog#: Delamps up to 4-lamp grid ceiling fixtures to 2-lamps Approved by: The FTR2 Troffer Reflector Kit is a simple, cost-effective onepiece reflector used to change fixtures from 2, 3, or 4-lamp to a 2-lamp. This kit uses a reflector, brackets and Tek screws to provide you with recentered lamps without replacing the entire fixture. Additionally, the FTR2 kit offers reduced energy, better lighting efficiency and minimal light loss. Four reflector options include enhanced specular aluminum, specular aluminum, white reflector and white optics. Reflector Bracket Dimensions 2-1/2” 9-3/4” Front View 20-1/2” .014” reflector material thickness Tek Screw Plan View ORDERING INFORMATION Model Family Dimensions Number of Lamps Reflector Material Packaging Code FTR2 4 2 E KR FTR2 2 - 2’ x 2’ 4 - 2’ x 4’ Sample Ordering Number: FTR2 4 2 E KR Fluorescent T8 Troffer Reflector Kit 2ft by 4ft dimensions 2 lamps Enhanced Specular Aluminum Reflector Kit with Rapid Start Lampholders 2 N - No Reflector (use with BRKT option) A - Specular Aluminum (86%) E - Enhanced Specular Aluminum (95%) W - White Reflector (91%) O - White Optics (98%) KR - Kit with Rapid Start Lampholders KI - Kit with Instant Start Lampholders REFL - Reflector only BRKT - Bracket only (use N reflector option) KR Kit Includes: 2 - Brackets 8 - Tek Screws 4 - Rapid Start Lampholders 1 - Reflector Specifications subject to change without notice. Howard Lighting Products | 580 Eastview Drive | Laurel, MS 39443 (toll free) 800.956.3456 | (direct) 601.422.0033 | (fax) 601.422.1652 www.HowardLightingProducts.com KI Kit Includes: 2 - Brackets 8 - Tek Screws 4 - Instant Start Lampholders 1 - Reflector Specification Sheet FTR2 Series Linear Fluorescent 3/22/2013 Project: T8 Troffer Reflector Kit Catalog#: Delamps up to 4-lamp grid ceiling fixtures to 2-lamps Approved by: Installation Information Socket Plate with Lampholders Reflector NOTE: 2’x2’ Reflector Assembly Not Shown NOTE: Do not remove clear protective film from reflector until Step #8. 1. Turn off and lock out electrical power to the lighting fixture during the installation process. 2. Open or remove fixture doorframe (with lens or louver) from lighting fixture to gain access to the interior of the fixture. 3. Remove lamps, ballast covers and lampholder brackets. 4. Disconnect ballast (may not be required) to be removed and remove completely with related wire and lampholders from fixture. Ensure remaining ballast is adequately connected to circuit and unused wires are capped off and secured with UL Listed insulating connectors (wirenuts, electrical tape, etc). 5. Reinstall remaining lampholders into new socket brackets, route wires preventing any pinching or damage to wires leading to the ballast. 6. Center socket brackets on each end of fixture and fasten using TEK screws provided. 7. Remove protective film from reflector and secure reflector in place. 8. Replace lamps. 9. Re-install fixture door with lens or louver. 10.Reapply power to fixture Specifications subject to change without notice. Howard Lighting Products | 580 Eastview Drive | Laurel, MS 39443 (toll free) 800.956.3456 | (direct) 601.422.0033 | (fax) 601.422.1652 www.HowardLightingProducts.com
