Assembly Instructions
advertisement

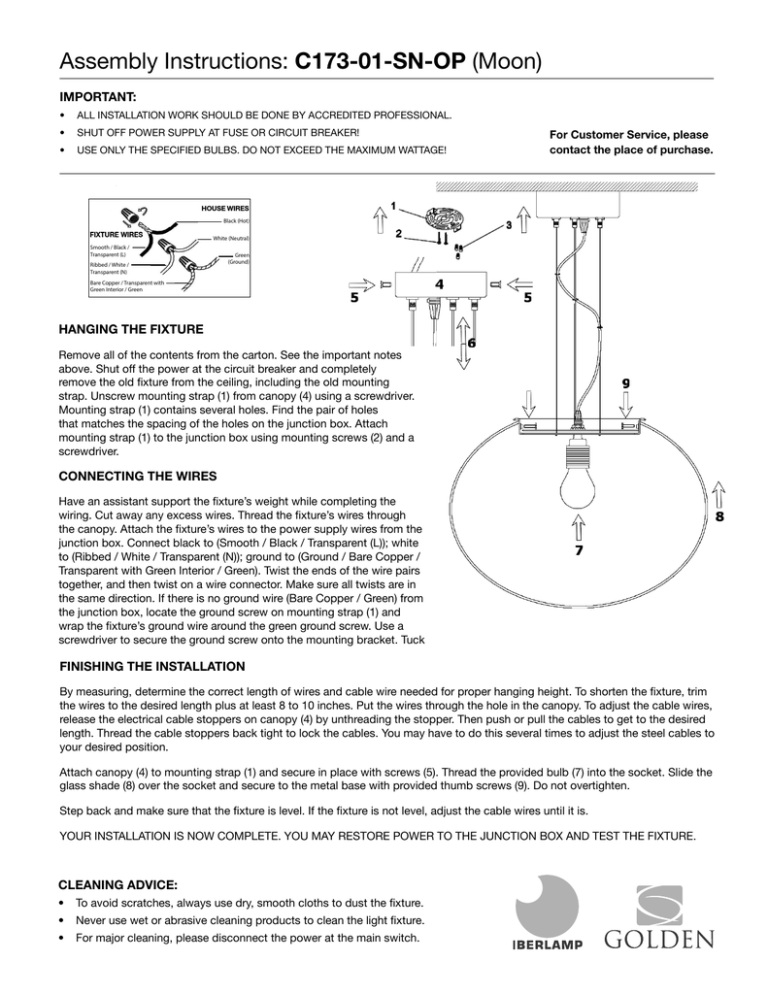
Assembly Instructions: C173-01-SN-OP (Moon) IMPORTANT: • ALL INSTALLATION WORK SHOULD BE DONE BY ACCREDITED PROFESSIONAL. • SHUT OFF POWER SUPPLY AT FUSE OR CIRCUIT BREAKER! • USE ONLY THE SPECIFIED BULBS. DO NOT EXCEED THE MAXIMUM WATTAGE! For Customer Service, please contact the place of purchase. Black (Hot) White (Neutral) Smooth / Black / Transparent (L) Ribbed / White / Transparent (N) Green (Ground) Bare Copper / Transparent with Green Interior / Green HANGING THE FIXTURE Remove all of the contents from the carton. See the important notes above. Shut off the power at the circuit breaker and completely remove the old fixture from the ceiling, including the old mounting strap. Unscrew mounting strap (1) from canopy (4) using a screwdriver. Mounting strap (1) contains several holes. Find the pair of holes that matches the spacing of the holes on the junction box. Attach mounting strap (1) to the junction box using mounting screws (2) and a screwdriver. CONNECTING THE WIRES Have an assistant support the fixture’s weight while completing the wiring. Cut away any excess wires. Thread the fixture’s wires through the canopy. Attach the fixture’s wires to the power supply wires from the junction box. Connect black to (Smooth / Black / Transparent (L)); white to (Ribbed / White / Transparent (N)); ground to (Ground / Bare Copper / Transparent with Green Interior / Green). Twist the ends of the wire pairs together, and then twist on a wire connector. Make sure all twists are in the same direction. If there is no ground wire (Bare Copper / Green) from the junction box, locate the ground screw on mounting strap (1) and wrap the fixture’s ground wire around the green ground screw. Use a screwdriver to secure the ground screw onto the mounting bracket. Tuck FINISHING THE INSTALLATION By measuring, determine the correct length of wires and cable wire needed for proper hanging height. To shorten the fixture, trim the wires to the desired length plus at least 8 to 10 inches. Put the wires through the hole in the canopy. To adjust the cable wires, release the electrical cable stoppers on canopy (4) by unthreading the stopper. Then push or pull the cables to get to the desired length. Thread the cable stoppers back tight to lock the cables. You may have to do this several times to adjust the steel cables to your desired position. Attach canopy (4) to mounting strap (1) and secure in place with screws (5). Thread the provided bulb (7) into the socket. Slide the glass shade (8) over the socket and secure to the metal base with provided thumb screws (9). Do not overtighten. Step back and make sure that the fixture is level. If the fixture is not level, adjust the cable wires until it is. YOUR INSTALLATION IS NOW COMPLETE. YOU MAY RESTORE POWER TO THE JUNCTION BOX AND TEST THE FIXTURE. CLEANING ADVICE: • To avoid scratches, always use dry, smooth cloths to dust the fixture. • Never use wet or abrasive cleaning products to clean the light fixture. • For major cleaning, please disconnect the power at the main switch.
