Measurement of Crack Depth in a Transition Weld Using Acpd
advertisement

MEASUREMENT OF CRACK DEPTH IN A TRANSITION WELD USING ACPD
R. Collins, D.H. Michael and R. Clark*
University College London NDE Centre
Torrington Place, London WC1E 7JE, U.K
* Rolls-Royce & Associates, Derby, U.K
INTRODUCTION
This paper is concerned with the application of the ACPD method to the
measurement of surface-breaking cracks at the interface between an austenitic and a
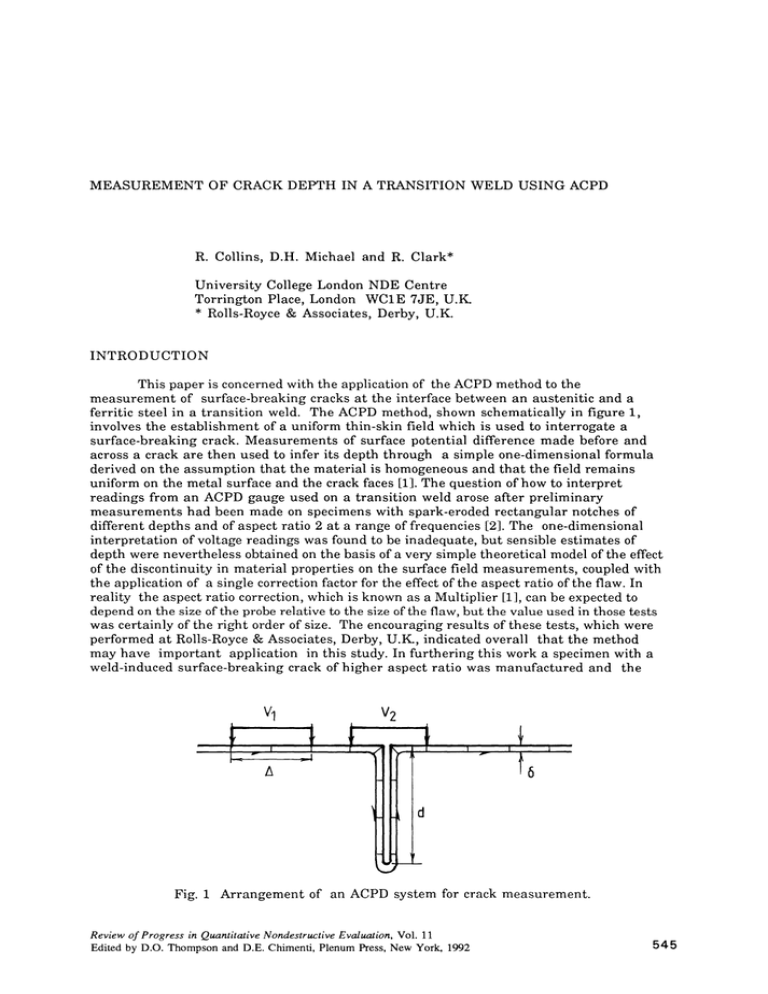
ferritic steel in a transition weId. The ACPD method, shown schematically in figure 1,
involves the establishment of a uniform thin-skin field which is used to interrogate a
surface-breaking crack. Measurements of surface potential difference made before and
across a crack are then used to infer its depth through a simple one-dimensional formula
derived on the assumption that the material is homogeneous and that the field remains
uniform on the metal surface and the crack faces [1]. The question ofhow to interpret
readings from an ACPD gauge used on a transition weId arose after preliminary
measurements had been made on specimens with spark-eroded rectangular notches of
different depths and of aspect ratio 2 at a range offrequencies [21 The one-dimensional
interpretation of voltage readings was found to be inadequate, but sensible estimates of
depth were nevertheless obtained on the basis of a very simple theoretical model of the effect
of the discontinuity in material properties on the surface field measurements, coupled with
the application of a single correction factor for the effect of the aspect ratio of the flaw. In
reality the aspect ratio correction, which is known as a Multiplier [1], can be expected to
depend on the size of the probe relative to the size ofthe flaw, but the value used in those tests
was certainly of the right order of size. The encouraging results of these tests, which were
performed at Rolls-Royce & Associates, Derby, U.K, indicated overall that the method
may have important application in this study. In furthering this work a specimen with a
weld-induced surface-breaking crack of higher aspect ratio was manufactured and the
6
d
Fig. 1 Arrangement of an ACPD system for crack measurement.
Review of Progress in Quantitative Nondestructive Evaluation. Vol. 11
Edited by D.O. Thompson and D.E. Chimenti. Plenum Press. New York, 1992
545
construction of a more detailed model of the surface field which is being explored in the
measurements was put in hand in order that a rational procedure for the correct
interpretation ofinstrument readings could be formulated. This paper compares test data
obtained on the manufactured crack with predictions of crack depth obtained from both the
simple theory and from the more elaborate models. Details of the theoretical
developments will be published separately [3]. This initial work considers only defects of
large aspect ratio.
DESCRIPTION OF THE STUDY
(a) Results from simple model
Figure 2a shows a section across a crack of uniform depth at a junction between
two materials whose properties will be distinguished by suffixes a for austenitic and f for
ferritic. The electri.cal skin depths are denoted by oa and of respectively. The material
properties relevant to this work which determine these values are given in Table 1. The
likely range of instrument frequencies is 250 Hz to 10 kHz so that the operating conditions
are such that 0.2 mm < of < 1.5 mm, while 4 mm < oa < 25 mm. In contrast the
approximate crack depths to be studied are 2 mm < d < 20 mm. The theoretical field
problem to be considered, therefore, is the combination of a thin or not-so-thin skin on the
ferritic side where of /d« 1 or of /d < 1, with a thick or not-so-thick skin on the austenitic
side where oa/d > 1 or oa/d == 1. This combination, which is potentially the most awkward
from a mathematical point ofview, is that considered in the companion paper [3]; here we
discuss the problem only at the thin-thin limit where Or /d« 1 and oa /d« 1.The aspect
ratio of interest is high so that a model with uniform crack depth is appropriate.
Table 1
Data on material properties for the transition weId
Mild steel:
Stainless:
Hence
I1r =100
<J f = 4.45x10 6 S/m
I1r =1
<J a= 1.56x10 6 S/m
S = <JP'<Ja = 2.85
R = (<Ja I1f / <Jf l1a)1l2 = 5.92
At frequency 10 k Hz: Or = 0.238 mm and
oa = 4.02 mm
Consider the conditions across the junction J shown in figure 2b in which a surface
current flows in the y direction and meets a discontinuity in material properties at the
plane Ox with no crack present. With an input current of angular frequency 0), the skin
parameters on either side of the discontinuity are
2
and k. = iJ.l.(j .0);
(1)
where <J is the electrical conductivity and 11 the magnetic permeability. We are not
concerned with the transition regions in which the current flows from one material to the
other. The changes in these regions occur on length scales of the order of the skin depths Or
and oa in the neighbourhood of 0 and, as in the homogenous model at the thin-skin limit,
these are assumed to be small compared with crack depth d and probe size ll. We thus
assurne that
o /d < < 1 ; o.ld < < 1 and
o/ ~
< < 1 ; 0./ ~ < < 1
On either side ofthe discontinuity the streams will be ofthe forms
546
(2)
( a)
I
I
I
ju nction
if
(b)
/1
,.Ef
hf
0
y
IJ
"'}...
I
I
f
I
~X
a
V
(c)
Et/1
""
/1
0
Fig. 2
~
(a) Section across a crack of uniform depth d at a junction between a ferritic and
austenitic material, (b) current flow across a junction between two materials with
no crack, (c) probe signal on crossing the junction in (b).
where Ef and E a denote the respective surface values of E y . Since the total current flow I
must be conserved, we have
o
o
(4)
from which
(5)
On using equations (1) and (5), the ratio ofthe surface values is given by
(6)
The surface values determine the magnitudes of the voltage readings which would be
obtained with a probe contacting the surface and they are seen here to be permanently
rescaled when the current traverses a discontinuity in material properties. For example if
the probe in figure 2b is moved aeross the junetion there will be a linear transition with
distanee while the probe is straddling the diseontinuity, with eonstant signals Ef ß and
E a ß on either side onee the traverse is eompleted, as shown in figure 2c.
547
t- l
Il
(al
A
Ef
d
d
J
I
I
P
f
'\
Q
•
Ea
J
B
a
I
I
I
PQ
A
B
Ea
f
a
d
(bl
I
I
I
J
V
(cl
(V2 -V1 lf
""~
Ef .6
.6
o
(V2- V1 l a
JEi
l
y
Fig. 3 (a) Procedure for folding the field in fig. 2b, (b) refolded field with crack at the
junction , (c) probe signal seen on crossing the crack.
Since we are considering thin-skin fields in this case, the unfolding theory may be
applied [1] and it folIo ws that figure 2b shows the fields on the unfolded metal and crack
faces when a crack ofuniform depth d is situated at the interface. If we fold the crack back
into place, as in figure 3a and b, then the probe signals may be deduced for this
circumstance from the relationship between the locations ofthe probe contacts on the
physical surface and the unfolded plane. On denoting the readings obtained when off the
crack and when straddling the crack with suffixes 1 and 2 respectively we have
(7)
and
(8)
lt follows that
(V 2 - V
548
l)r
= (V 2 -
VI)'
=V2 -
Vj
(9)
showing that the discontinuity in voltage registered by the probe on crossing the crack is
independent of the side from which readings are taken, and further that
(10)
where VI m = (VI f+ VI a)/2 is the mean ofthe two off-crack readings. Ifthere were no
discontinuity in material properties, then VI f = VI a =VI and equation (10) would then
reduce to
(11)
which is the one-dimensional interpretation of instrument readings used in the
homogeneous problem [1]. Interestingly, equation (10) retains the one-dimensional form
for the material junction, provided that the mean of the two values of VI on either side of
the crack is employed. If it is the case, however, that access to the crack can be obtained
from one side only, then in terms of measurements VI and V2 made from the ferritic
side, we have from equations (6), (7) and (11)
(12)
In this form the quantity 2RJ(1 + R) plays the part of a Multiplier for the ferritic side of the
material junction, d/d* = Mjf say, which operates on the simple one-dimensional result
d* so as to modify it to the correct depth d. Although accurate knowledge of Ilf is difficult,
the likely value of R for the ferritic-austenitic junction is large. The property values in
Table 1 suggest R =5.92 for example, and equation (12) would then give Mjf =1.71
implying that the one-dimensional interpretation would underestimate the true depth by
42%. If R» 1, as would be the case when Ilf »Ila, then
d = 2d*
(13)
so that Mjf = 2 in that extreme and a one-dimensional interpretation from measurements
on the ferritic side would then underestimate the true depth by 50%. This result may be
interpreted as showing that the contribution to the cross-crack voltage associated with the
austenitic crack face in this thin-thin limit is then negligible compared with the
contribution from the ferritic face, and this is in fact the simple assumption adopted by
Charlesworth and Clark [2] in interpreting their earlier measurements.
The profile of probe signal to be expected on crossing the crack in this case is shown
in figure 3c. The essential features which distinguish it from the conventional top-hat
profile seen with no material discontinuity are Ci) the linear variation in probe reading as
the probe traverses the crack and (ii) the rescaling of the off-crack signal. In fact, if both
sides are accessible to the probe these two off-crack readings allow an experimental
measurement of R since
(14)
Note that the values in Table 1 give R = 5.92 and the off-crack signal on the ferritic side is
thus the larger of the two signals in this thin-thin limit.
Cb) Results from further theory
The unfolding model on which the results in the previous section are based, is valid
549
for vanishingly sm all skin depths o/d« 1 and in formulating that model it was argued
that the disturbances to the field in the neighbourhood ofthe corners P, J and Q depicted in
figure 3b would occur on the length scale ofthe skin depth. They would thus contribute
negligibly to the surface values and as a result, the unfolded field is in sensitive to the
crack inclination to the surface, the details of fields at the corners being ignored. The
corner solutions have been studied however [4] and their influence has been inc1uded in a
development of this thin-thin theory [3] to show that the junction Multiplier for the ferritic
side, correct to the first order in skin thickness is given by
*_ ~{ __l..~.!.d*
4 - 1t 3p + S)}
d/d - 1 + R 1 1t d* Ll + 81t
d*
(15)
where S = crf.1'cra with value S = 2.85 from Table 1. In the limit ofnegligible skin depths,
that is of/d* « 1 and oa/d* « 1, equation (15) ofcourse reproduces the result in equation
(12). For the case when R is large (15) gives
*_ { _..L~ d*
4 - 1t 3 P + S) }
d/d - 2 1 1t d* Ll + 81t
d*
(16)
to be compared with the thin-skin result in (13) which was interpreted there as showing the
austenitic contribution to the cross crack signal to be negligibly small compared with the
ferritic. In contrast, when the first order effects of skin thickness are included, (16) still
contains a contribution from the austenitic side in the limit oflarge R through the ratio of
conductivities S = crf.1'cra. When plotted as functions of d*/ö, it is observed that the junction
Multipliers for the thin-thin model fall rapidly to values which are sensibly constant for
d*/ö above about 0.2 - 0.3, and that the result Mjf= 2R1(1+R) is a good first approximation
to those values [31
The second theoretical model developed in reference [3] considers a situation in
which the skin depth on the austenitic side is large. It involves a mixture of the thin-skin
theory with corner corrections in the ferritic material and a solution at the static limit in
the austenitic which describes a line source at the crack tip fed from the .current flow on the
ferritic face of the crack. No explicit expression for the ferritic side Multiplier arises from
this model but it gives
(17)
which can be used to evaluate Mjfby assigning values to d/ö and evaluating d*/ö. It may
be observed that for vanishingly small skin depth of, this equation reduces to equation (13)
showing a Multiplier of Mjf = 2. Multipliers have been evaluated from equation (17) using
the property values in Table 1 and the results are plotted in reference [3] for three values of
ö/of. For ö/of = 10, Mjf has a minimum value of1.6 at d*/ö == 0.3 but subsequently rises
slowly to achieve the same level as given by the thin-thin model at high d*/ö. There is
found to be a stronger dependence ofMjf on ö/Üfin the thin-thick model than in the thinthin and an increase in ö/ofis seen to push the minimum in Mjftowards lower values of
d*/ö. The overall level of Mjf is not greatly affected however.
EXPERIMENTATION
Ajig was designed to enable the technique to be applied to a tubular transition weId
specimen. It consisted of a perspex frame which held a pad of twelve equally-spaced
inducing wires so that they were positioned 1mm above the metal surface when the jig was
held in place on the tubular specimen by two electromagnets. The spacing between the
wires was 7.5 mm and the overall pad size was 140 mm x 80 mm. A standard spring-loaded
probe of gap 10 mm was used in conjunction with a U8 Crack Microgauge instrument
operating at 6 kHz to take readings by hand at measurement positions which were always
arranged to be in the centte of the jig. Figure 4 shows the experimental arrangement.
550
Crack Microgauge
field
probe
-
field induction JIg
supply
~upp
fi eld
v/wires
fusion line
-----
t
ly
-,..--
---
"--+----t-t+f-Htil-tt-t-tt-t-t- pro be
Fig. 4 Experimental set-up for measurements on a tubular transition weId specimen
551
The tubular specimen comprised a tube of 316 stainless steel joined by an
austenitic stainless steel weId to a tube of low alloy CrMo steel. A crack present at the
CrMo/stainless steel bond line extended around the entire circumference of the weId and
hence could be considered to be long and of essentially constant depth as assumed in the
models. In order to obtain repeatable results the surface of the CrMo was cleaned so as to
remove the oxide and to allow good probe contact to be made.
Experimental results at four locations along the crack, all depths in mm
Table 2
No
d*
1:
7.53
2:
8.54
3:
7.15
4:
6.70
mean error
d
Mjf=2
15.07
17.09
14.30
13.40
+9.2%
d
Mjf
---equation15 --12.79
1.70
14.51
1.70
12.20
1.70
11.39
1.70
-7.1%
d
Mjf
---equation 17--1.87
14.10
16.10
1.88
13.40
1.87
1.87
12.50
+2.3%
d
real
14.50
16.00
12.54
12.00
Table 2 gives values of crack depth obtained at four positions along the crack. The
values calculated are the one-dimensional depth d*, the depth obtained from the simple
theory assuming Mjf = 2 (equation 13), that for the thin-thin model with corner corrections
(equation 15) and the result obtained by applying the thin-thick model (equation 17). In all
cases measurements were made from the ferritic side. The property values given in Table
1 give Öf = 0.34 mm at 6kHz. The values calculated from the electrical measurements are
compared in Table 2 with the real depths obtained from destructive examination at these
four positions after core sampIes were taken. The values given by Mjf = 2 are seen to
overestimate the true depths slightly in all cases, but only by +9.2 % on average. This is
remarkable given the simplicity of that model. With corner corrections, the thin-thin
model produces improved agreement in that the Multiplier predicted is constant at 1.70,
correct to two decimal places, this giving underestimates oftrue depth in all cases, but
with the mean error reduced to -7.1 %. Best agreement is obtained with the thin-thick
model which gives a Multiplier value essentially constant at 1.87 for the conditions of the
test, showing one underestimate and three overestimates but with a mean error of
only +2.3 %. The results from all models in Table 2 are in fact very satisfactory.
ACKNOWLEDGMENT
We are grateful to Rolls-Royce & Associates, Derby, United Kingdom for
initiating this work and for agreeing to its publication. R Clark is now with the British
Railways Board at the Railway Technical Centre in Derby.
REFERENCES
1.
R Collins, W.D. Dover & D.H. Michael in "Research Techniques in NonDestructive Testing" vol 8 (RS. Sharpe ed) Academic Press, London, pp 211-267
(1985)
2.
F.D.W. Charlesworth & R Clark. Private communication
3.
R Collins, D.H. Michael & R Clark. In preparation
4.
D. Mirshekar-Syahkal, R Collins & D.H. Michael. The influence of skin depth
on crack measurement by the ac field technique.
J ofNDE vol3, No 2, pp 65-76 (1982)
5.
D.H. Michael R.T. Waechter & R Collins. The measurement of surface cracks
in metals using ac electric fields.
Proc Roy Soc Lond A381, pp 139-157 (1982)
552


